Appearance
IntelliTrack® Fixed Assets Guide
How to set up and run the IntelliTrack Fixed Assets bundle: adding and importing assets, bulk changes, maintenance and calibration, asset inventory and cycle counts, containers, reports, lookups, assignees and depreciation.
Chapter 1 - Fixed Assets Bundle
Welcome to the Fixed Assets bundle. This bundle contains the workflows that manage asset inventory and asset depreciation.
Features
You will find features to fully manage your fixed assets.
- Asset Inventory: Perform an asset inventory via the Mobile client.
- Cycle Count: Perform a cycle count on assets in a designated site-location.
- Asset Move: Track asset movement from one site-location to another.
- Depreciation: Calculate asset depreciation over time with a proven formula or manually track it.
- Asset Maintenance and Calibration Tracking: Track the maintenance schedule and the calibration schedule for an asset.
Fixed Assets Terminology
Understanding IntelliTrack terminology will help orient you to the Fixed Assets Bundle and its capabilities. Refer to the table below to find the meanings and connected workflows of some of the most common terms you will come across in the Fixed Assets Bundle.
Common IntelliTrack Fixed Assets Bundle Terms
| TERM | WORKFLOW | DEFINITION |
|---|---|---|
| Tenant | Bundle Setup | All data elements contained within a Tenant are segregated to that Tenant. In other words, data elements cannot be transferred or shared between Tenants. |
| Site | Location Setup | Site is the first tier of the organizational hierarchy. A Site belongs to a Tenant. Multiple sites can belong to one Tenant. Sites can be physical or logical units. |
| Location | Location Setup | Location is the second tier of the organizational hierarchy. A location belongs to a site and is stationary; it is often referred to as a "physical location" because it has a physical presence. Examples of a location could be a bin, rack, shelf, or closet. More than one location can belong to a Site. Locations cannot belong to more than one Site. |
| Sub-location | Location Setup | Each location can also have multiple sub-locations. To create a sub-location, enter the “Parent Location” field during the create location process. |
| Containers | Moveable Storage Setup | A container is a movable storage unit that resides in a physical location. Examples of a container include a toter or a shipping container. |
| Items | Asset Setup | Items are physical goods or materials that the organization wishes to track. An item is unique to each Tenant. All item numbers and alternate item numbers must be unique within a Tenant. When performing your initial Item import or data entry process think of an item as the master record which contains the properties that are common between every like item (part number, item group, manufacturer, etc.). The unique item details are contained in the asset (asset #, serial #, etc.) imports. The item is the "parent" record of an asset. |
| Assets | Asset Setup | An asset is an item that has a value in the market, generates revenue, has a maintenance or calibration cost, is tracked by assignee and location. Examples of fixed assets include vehicles, office furniture, and computer equipment. An asset is always assumed to have a quantity of 1. |
| Assignees | Fixed Assets Management | An assignee is used with fixed asset management. The assignees are displayed at the Assignees page. An assignee may be any entity such as: a person, a location, a department. The Fixed Assets Bundle has two types of assignees: Owner: the owner of an asset; this assignee is associated with an asset in the asset’s record in the Owner field. Site Contact Assignee: the assignee may be designated as Site contact. The Site Contact Assignee is listed at the Site as a contact. |
| Depreciation Class | Depreciation Management | A depreciation class is required to calculate asset depreciation. The depreciation class defines the depreciation method and the asset's usable life. |
Chapter 2 - Asset Data Management
When you add an asset to IntelliTrack, the Asset is required to be associated to an item in IntelliTrack.
Qualities of an Asset
In IntelliTrack, the asset has the following qualities:
- Each asset has a unique asset number and may be tracked individually.
- When an asset is added to the application and placed in a location, the asset number is able to be inventoried and moved.
- The asset quantity is always considered to be 1.
- An asset cannot be deleted; when it is no longer in active use, it can be retired.
Assets Page
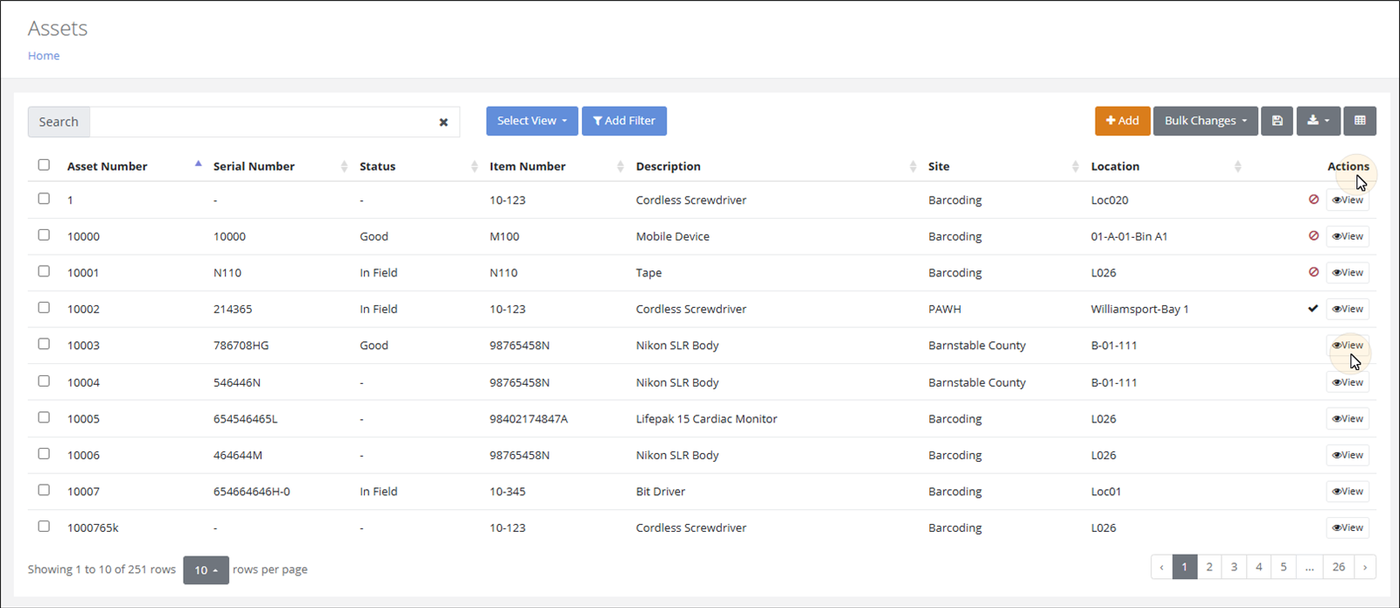
The Assets page provides a way to easily manage your assets. To reach the Assets page, select Home> Assets > Assets.
This page lists the following information about an Asset:
- Asset number: Unique asset number. This is a required field.
- Item Number associated with the asset: Item Number that is associated with this asset. This is a required field.
- Asset serial number: Unique serial number of this asset. This is an optional field.
- Status: Status assigned to this asset. This is an optional field. The Status options available are from the Status Lookup list (Management > Assets > Status).
- Description: Item Number Description that this asset inherits from the associated Item Number. This field is populated when the associated item has a description.
- Site: Site that the asset resides in. This field is populated when the asset location is set.
- Location: Location that the asset resides in. This field is populated when the asset location is set.
Note
The site-location is the default location of the asset. The assumed quantity of an asset is always 1.
Page Icons
The Assets Data page contains the icons that support various User actions.
Asset Page Icons
| Icon | Name | Description |
|---|---|---|
 | Search Bar | Limit the data in the page to the Search entry. |
 | Select View | Select the drop-down arrow to view the saved views for the page. |
 | Add Filter | Press to invoke the Add Filter dialog. Apply a query to a specific asset field. |
 | Add | Press to invoke the Add Asset page. |
 | Bulk Changes | Press to view the bulk change options available for the Asset. For more information, see "Bulk Changes". |
 | Select Row Check box | Resides in the far left of the page for each record. Mark the check box to select this record for a bulk operation. |
 | Save View | Press to invoke the Save View popup. |
  | Export > Export to CSV | Press to export the page's data out of IntelliTrack and into a CSV file. |
 | Export > Subscription | Press to invoke the Create Subscription popup. |
 | Manage Columns | Press to invoke the Manage Columns window. |
 | Retired | Resides in a row to the right of the Actions column. Denotes a Retired asset. |
 | View | Press to reach the View Asset page for the asset. |
 | Rows per Page | Press to show more row options per page, up to a maximum of 1000 rows. |
 | Grid Pager | Press an option to page through the rows of data. |
Page Filters and Views
For more information about data filtering and page views, please refer to the Getting Started Guide, which is available under Platform Basics and Administration information in the Knowledge Base
- Log into IntelliTrack.
- Select Help from the Main menu to reach the Help page. At the Help page, select the Knowledge Base link from the IntelliTrack Help Resources section in the middle of the page.
- The Knowledge Base opens in the browser in another Tab.
- Select Platform Basics and Administration > Getting Started Guide.
- You will reach a Getting Started Guide page.
- At this page, select the Download option for the Getting Started PDF file to download the Guide to your computer or device.
Chapter 3 - Setting Up Assets
The Assets page provides a way to easily manage your assets.
Note
Asset may also be imported into the platform.
Note
Adding an asset requires Admin or User level access to IntelliTrack.
Adding Assets
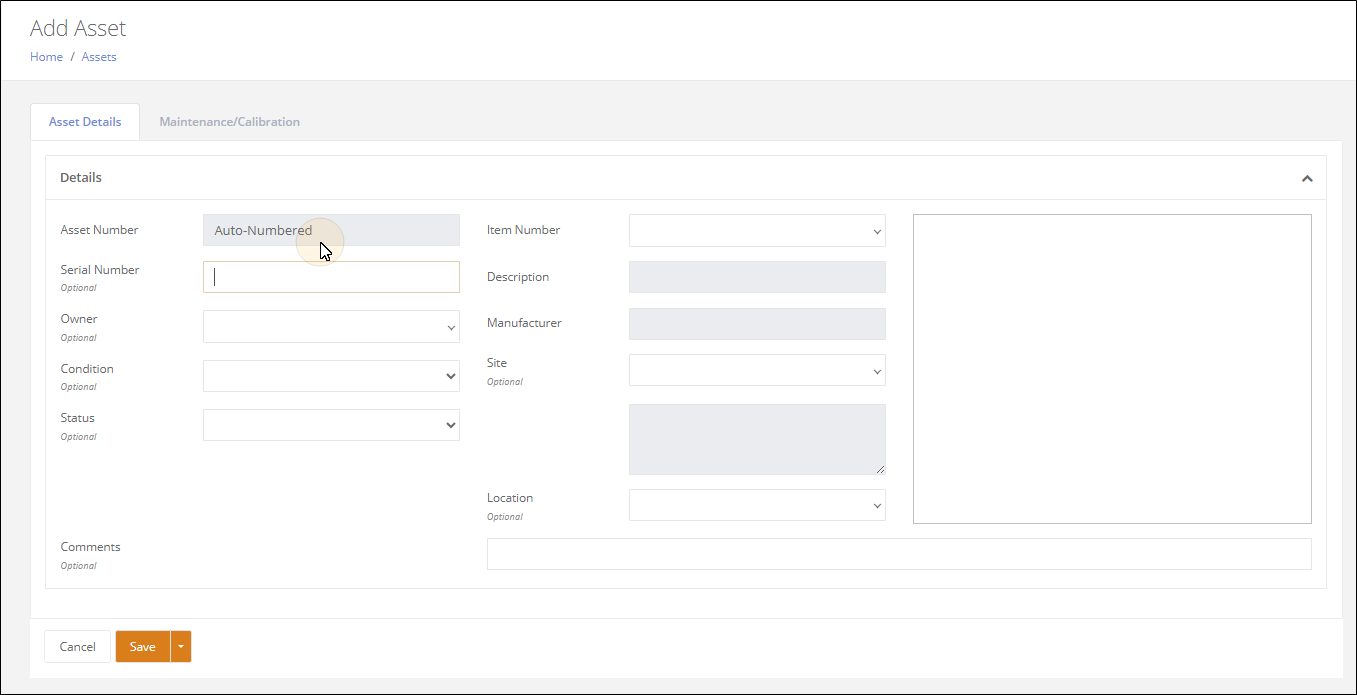
An asset may be added at the Add Asset page, which is reached from the Assets page.
Select Home > Assets > Assets to reach the Assets page.
Press the Add button to reach the Add Asset page.
Asset Number: required; it must be unique.
Item Number: required; press the drop-down arrow in the Item Number field and select the associated item from the list.
Description: automatically populated with the item's description, if applicable.
Manufacturer: automatically populated with the item's manufacturer, if applicable.
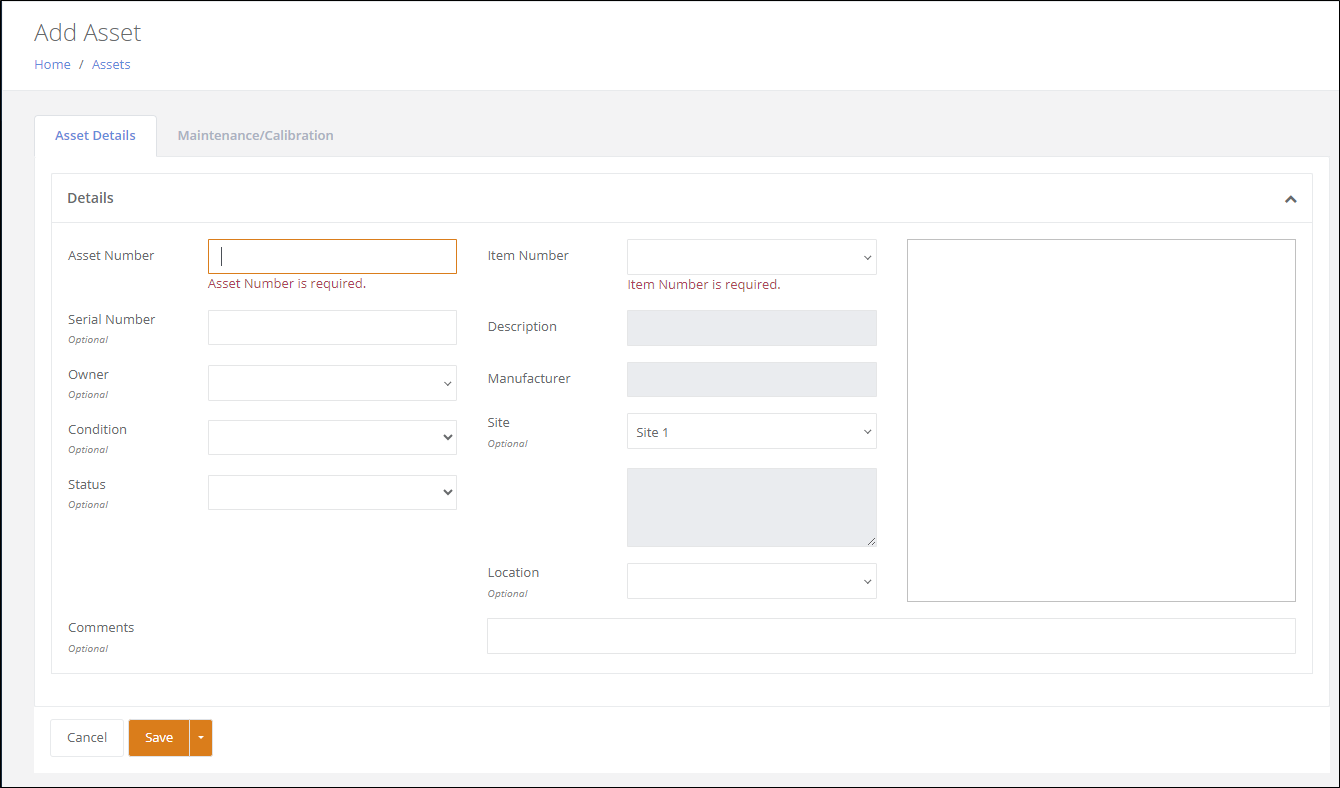
Serial Number: optional; must be unique.
Owner: optional; select from the Owner field drop-down list.
Condition: optional: select from the Condition field drop-down list.
Status: optional; select from the Status field drop-down list.
Site: optional; select from the Site drop-down list.
Location: optional; select from the Location drop-down list.
Comments: optional; add any comments about the asset in this field.
Maintenance / Calibration Tab: press this Tab to bring it to the front and add Maintenance or Calibration related information.
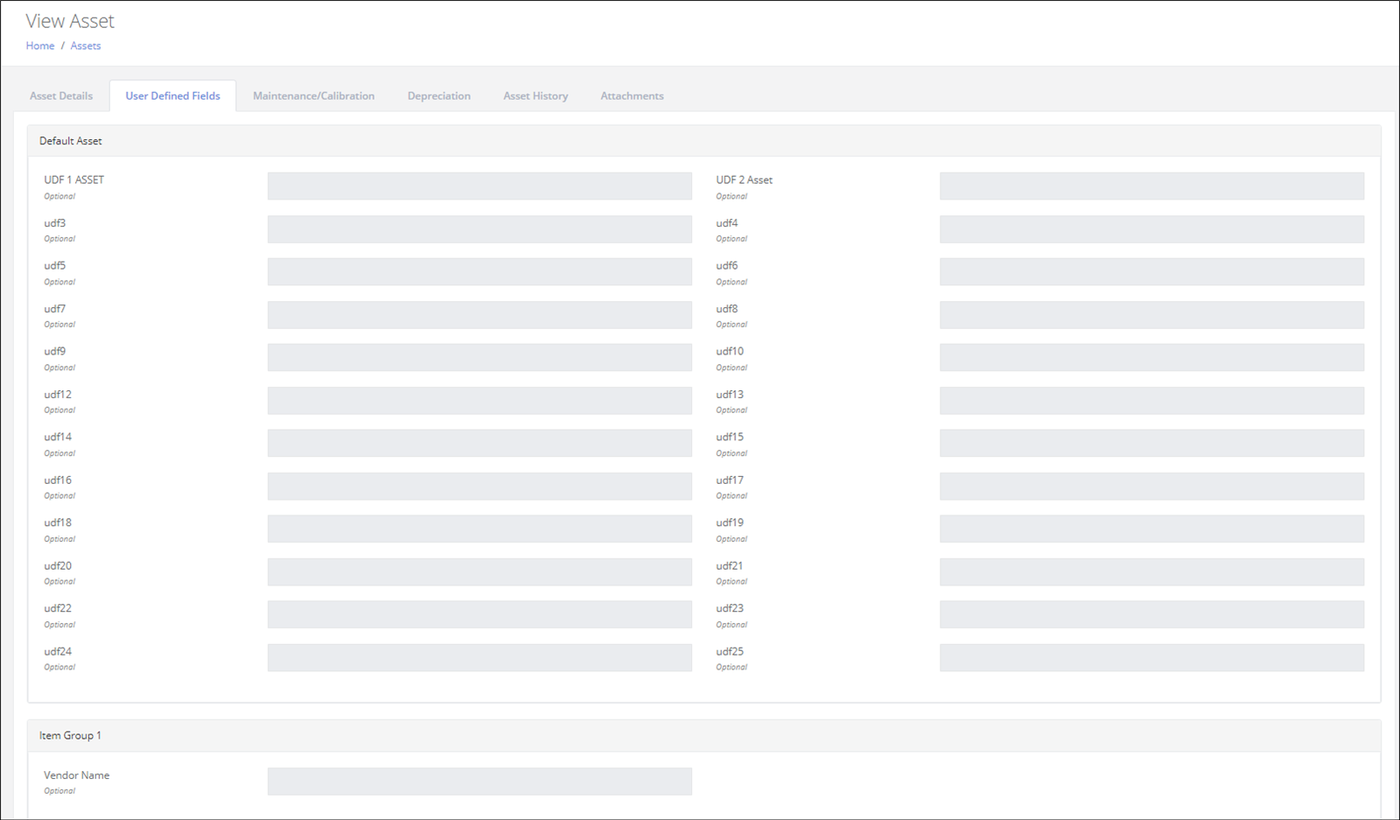
User Defined Fields Tab: appears if the Item has Item or Asset User Defined fields. Press this Tab to bring it to the front. Asset User Defined Fields are editable. Item User Defined Fields are read-only.
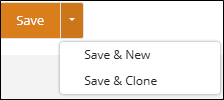
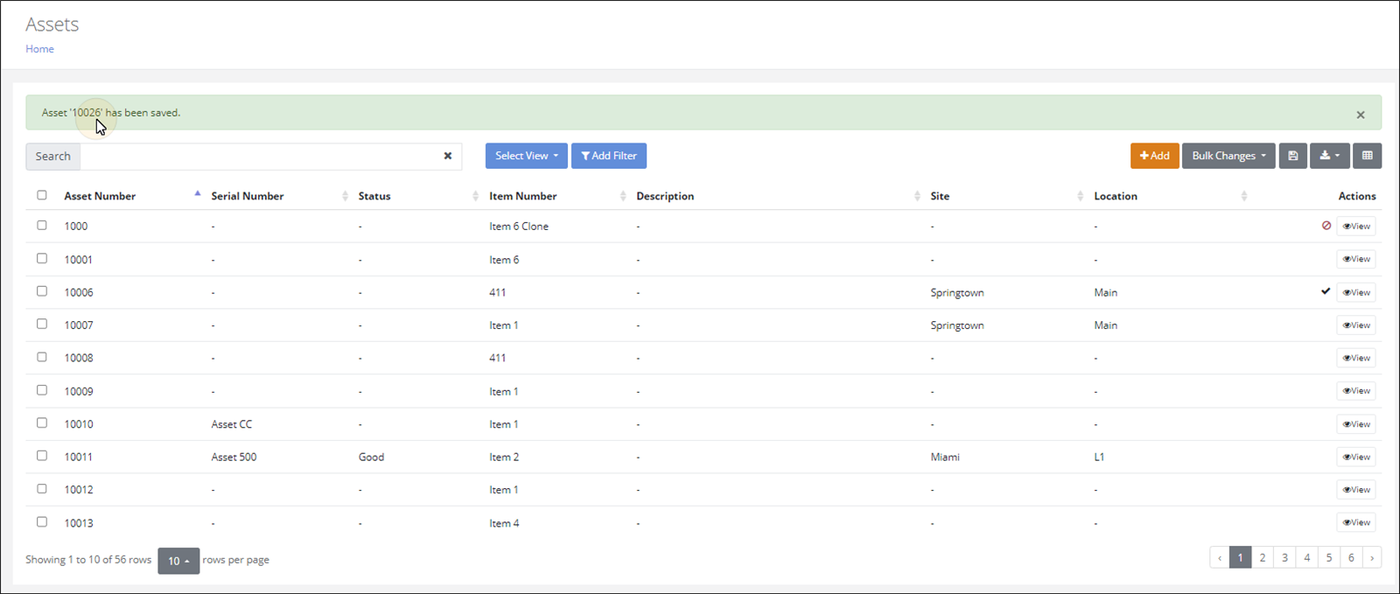
Save: press the Save button to save the Asset and return to the Assets page.
- Save & New: press the Save button down arrow and select this option to save the Asset clear the page and add another asset.
- Save & Clone: press the Save button down arrow and select this option to save the Asset, maintain the Item Number and Location selections, and add another asset.
Asset Auto-Number Setting
Note
When the Asset Auto-Number setting is enabled for the Tenant, the Asset Number is automatically generated and you do not have to enter it in the Asset Number field.
The screen example below shows the Add Asset page in a Tenant that has Asset Auto-Numbering Enabled (see "Asset"). In this case, Auto-Numbered appears in the Asset Number field. You do not have to enter an asset number, it will be automatically generated when the Asset is saved.
Importing Assets
Assets may also be imported into IntelliTrack via a CSV Import Template. It is available from the Import Assets page. Select Home > Assets > Import Assets to reach this page.
Important
When Asset Auto-Numbering is ON the asset import file must still contain a value for the Asset Number when importing a new asset for the import to process; however, the resulting imported assets will still follow the auto-numbering schema. This means that the imported assets will be auto-numbered instead of using the Asset Number value in the Auto Number field.
To import asset data into a tenant, follow these guidelines:
- Download the template.
- Follow the field requirements and field order in the template.
- Upload the template file (it is in .csv format).
- An email will be sent to your Inbox detailing the results of the import.
For best results:
- A fresh template should be used each time you perform an import.
- The Header row is required. Do not remove it.
- Make sure to include all required fields.
- Follow the field order of the template.
- Optional fields may be removed from the template. If an optional field is not present, it will be skipped over.
- The import file type must be CSV.
Chapter 4 - View Asset Page
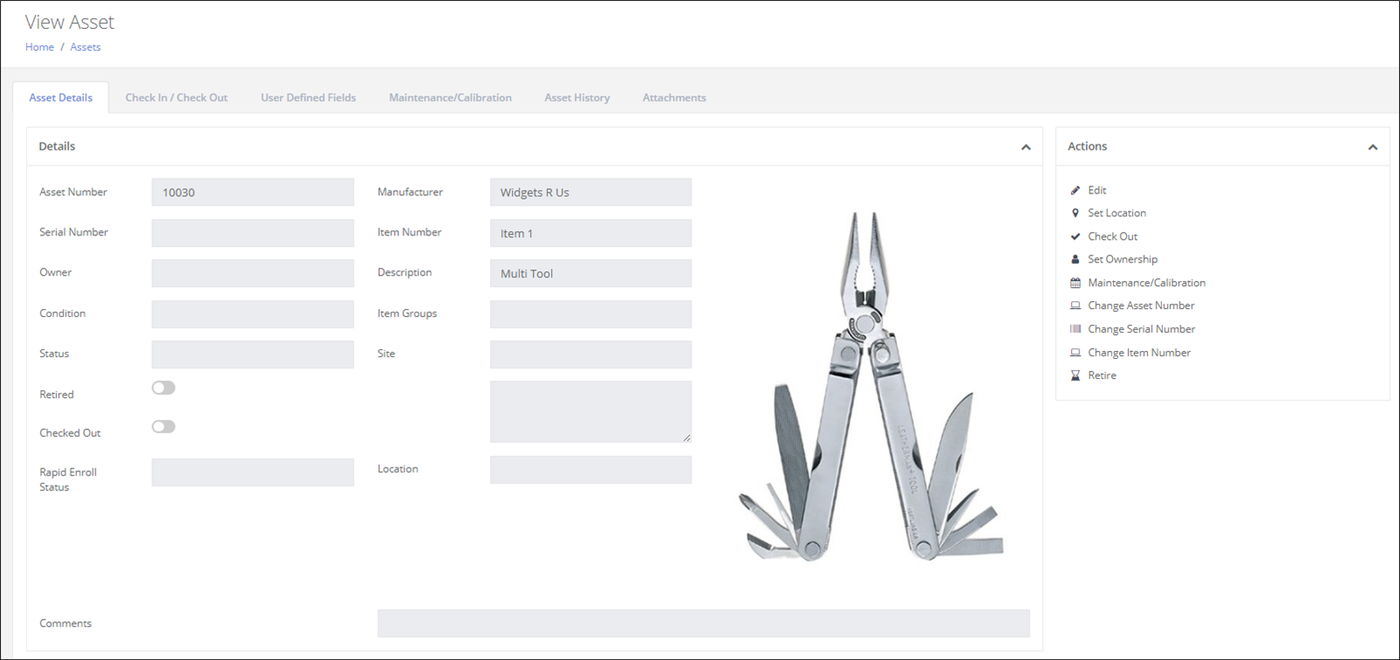
At the View Asset page, you are able to view all aspects of the Asset's record as well as perform transactions on the Asset. The View Asset page for an asset is reached from the main Assets page by selecting the View button.
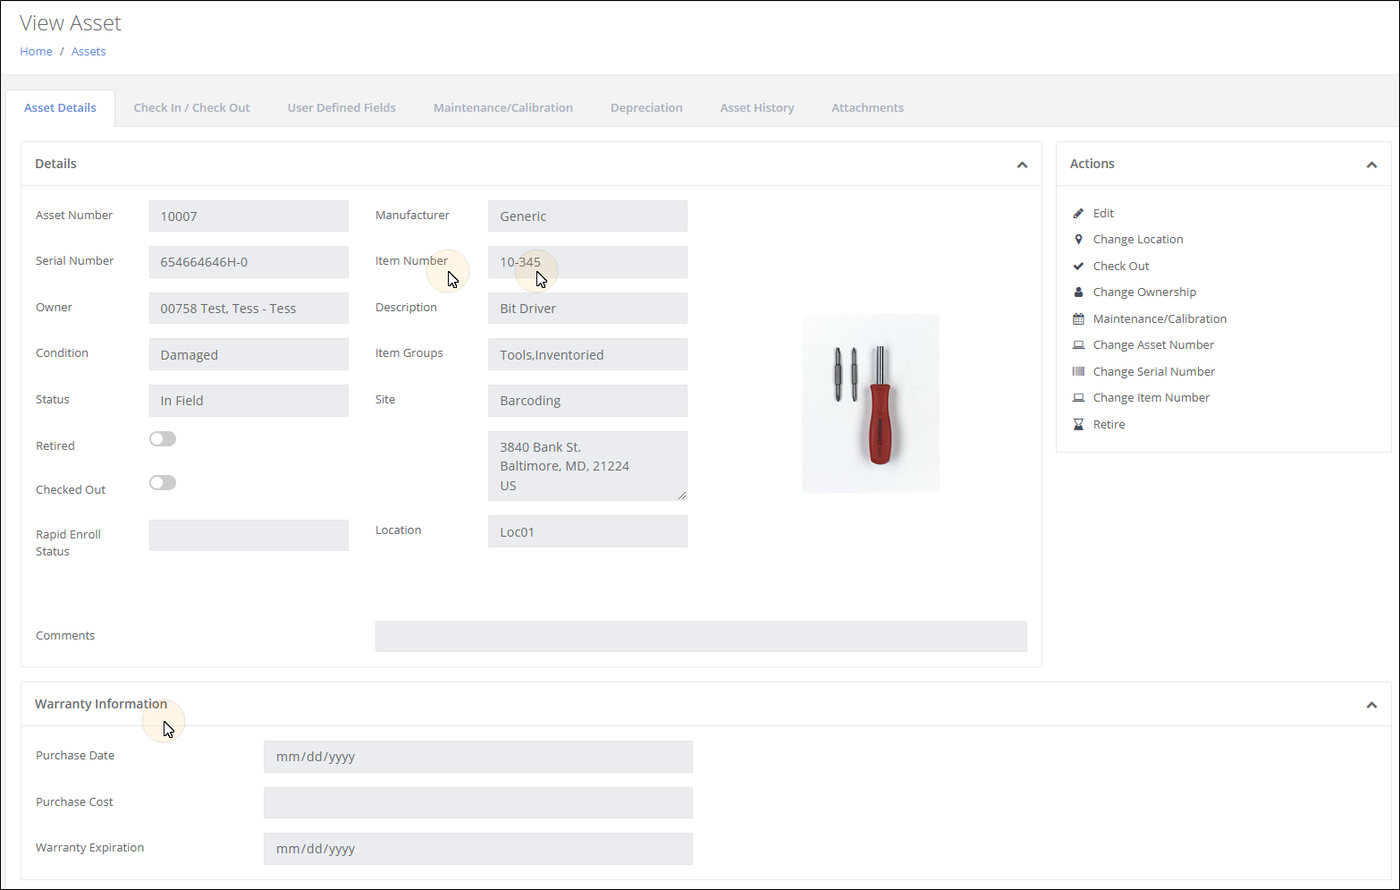
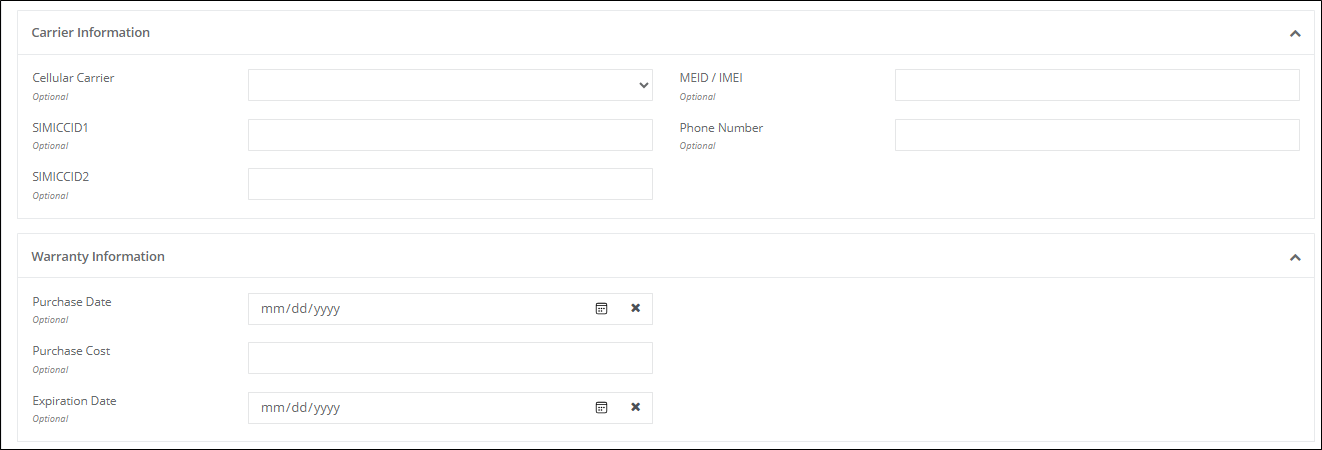
Warranty Information
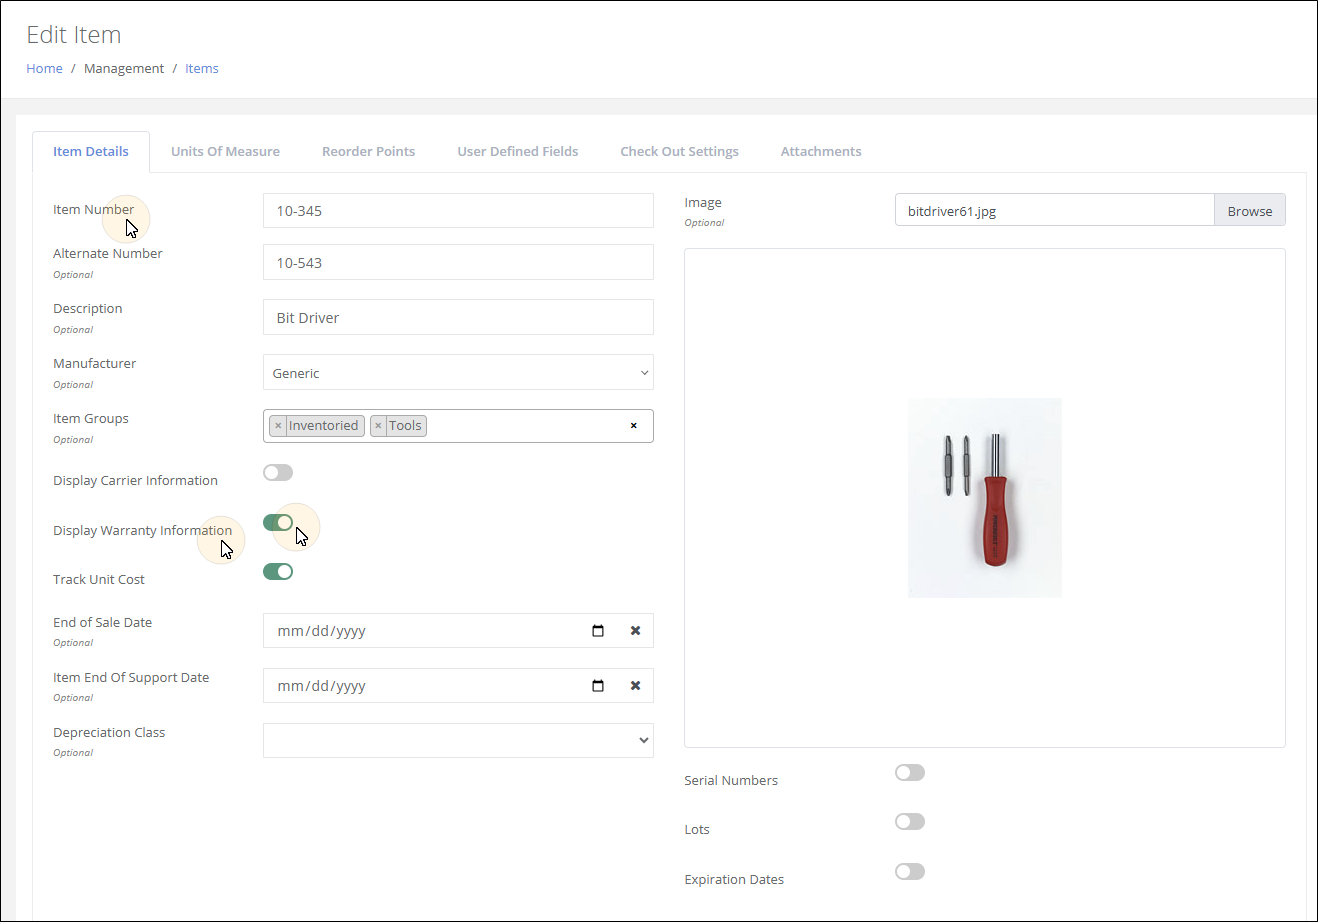
When the Display Warranty Information setting is enabled for the associated item, the Asset will display the Warranty Information fields.
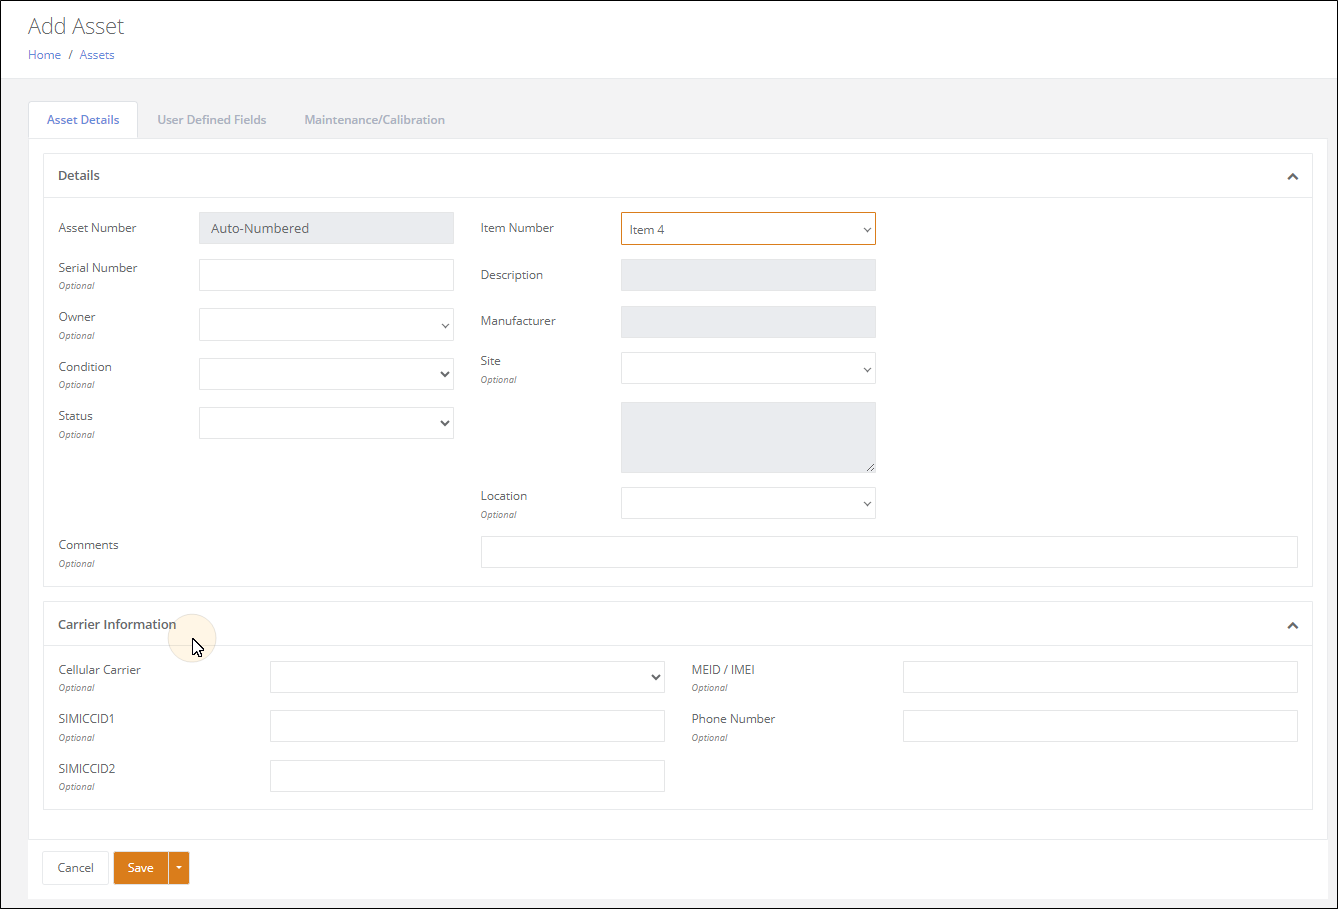
Carrier Information
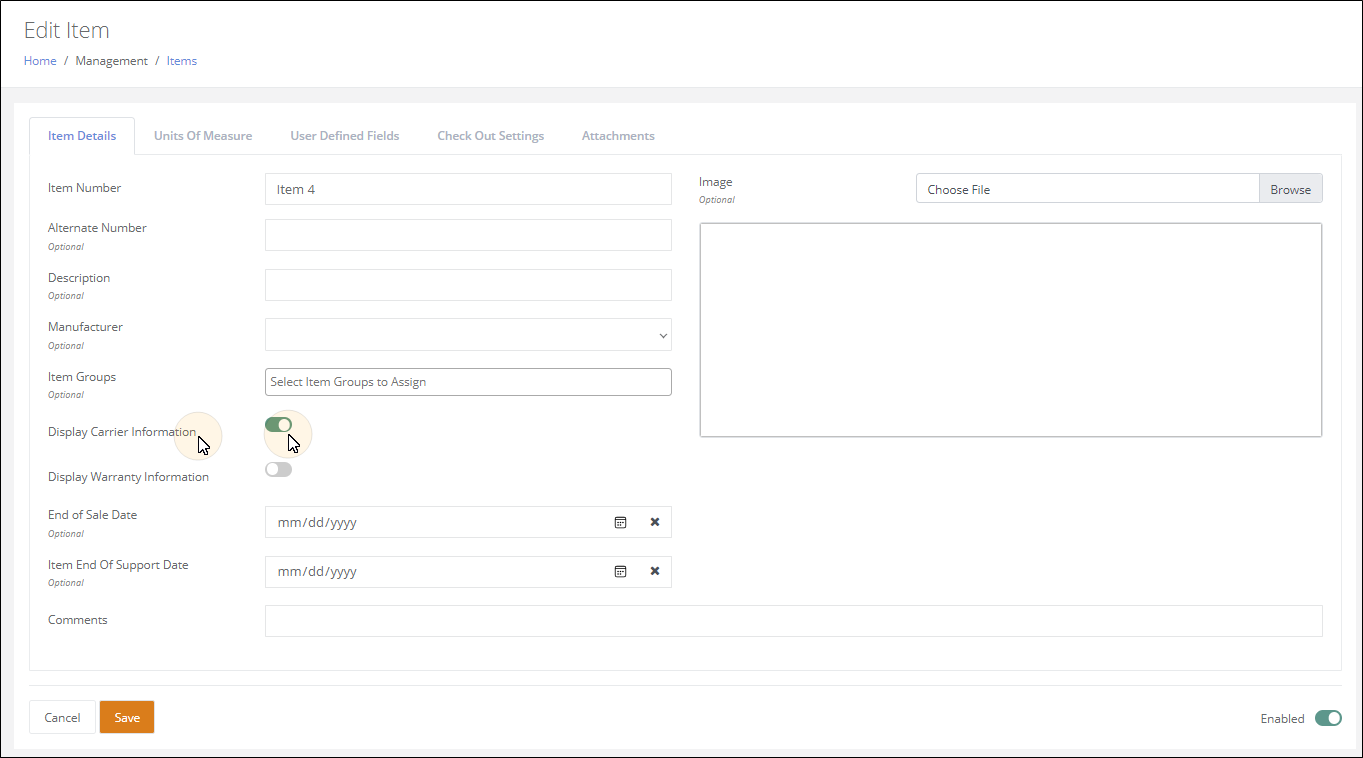
When the Display Carrier Information setting is enabled for the associated item, the Asset will display the Carrier Information fields.
Actions Pane
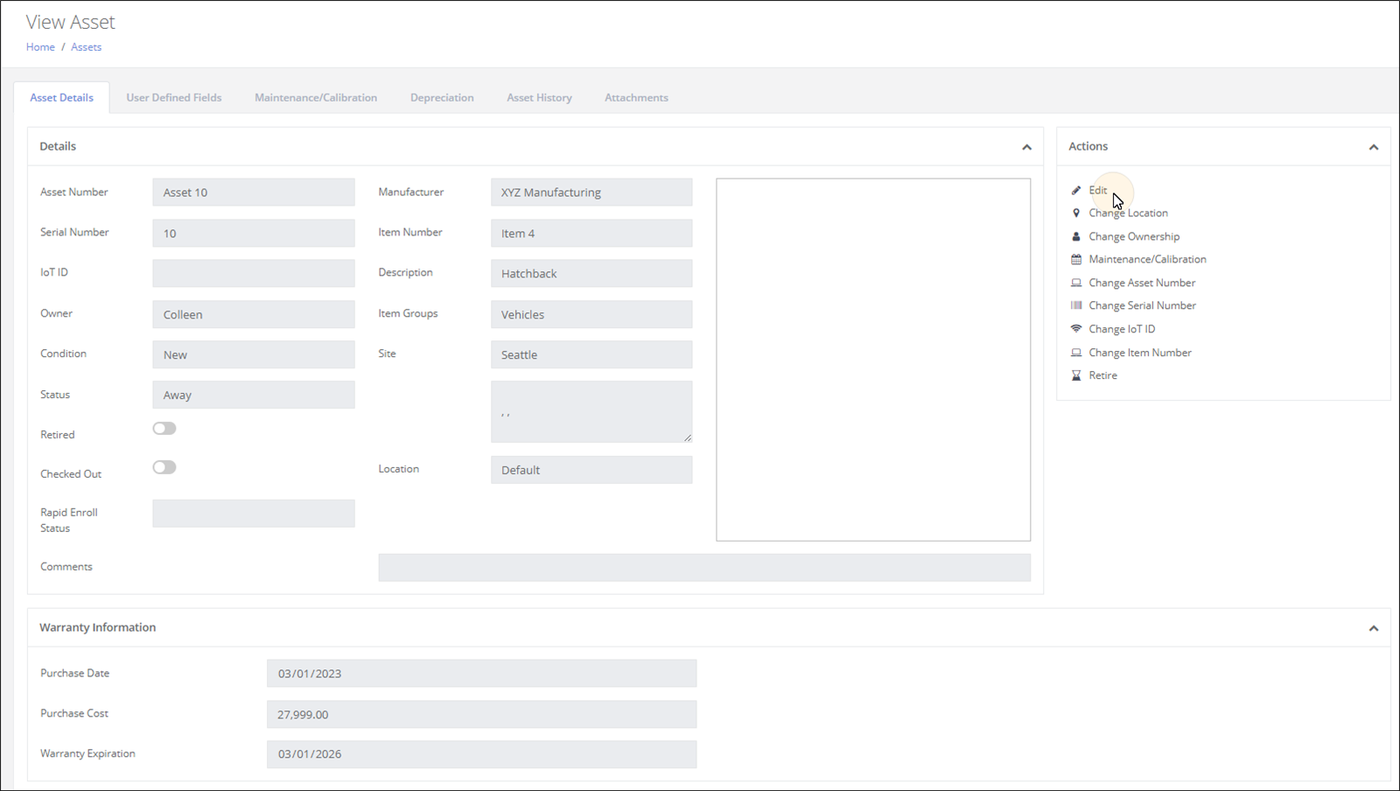
Perform actions on the asset via the Actions pane. Any action performed via the options found in the Actions pane is tracked as a transaction for the asset in asset history.
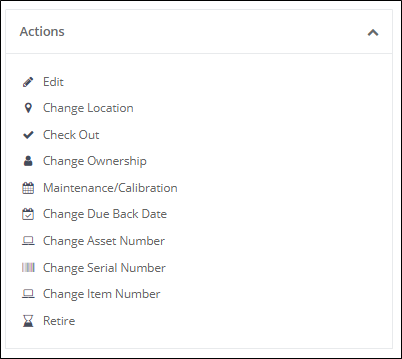
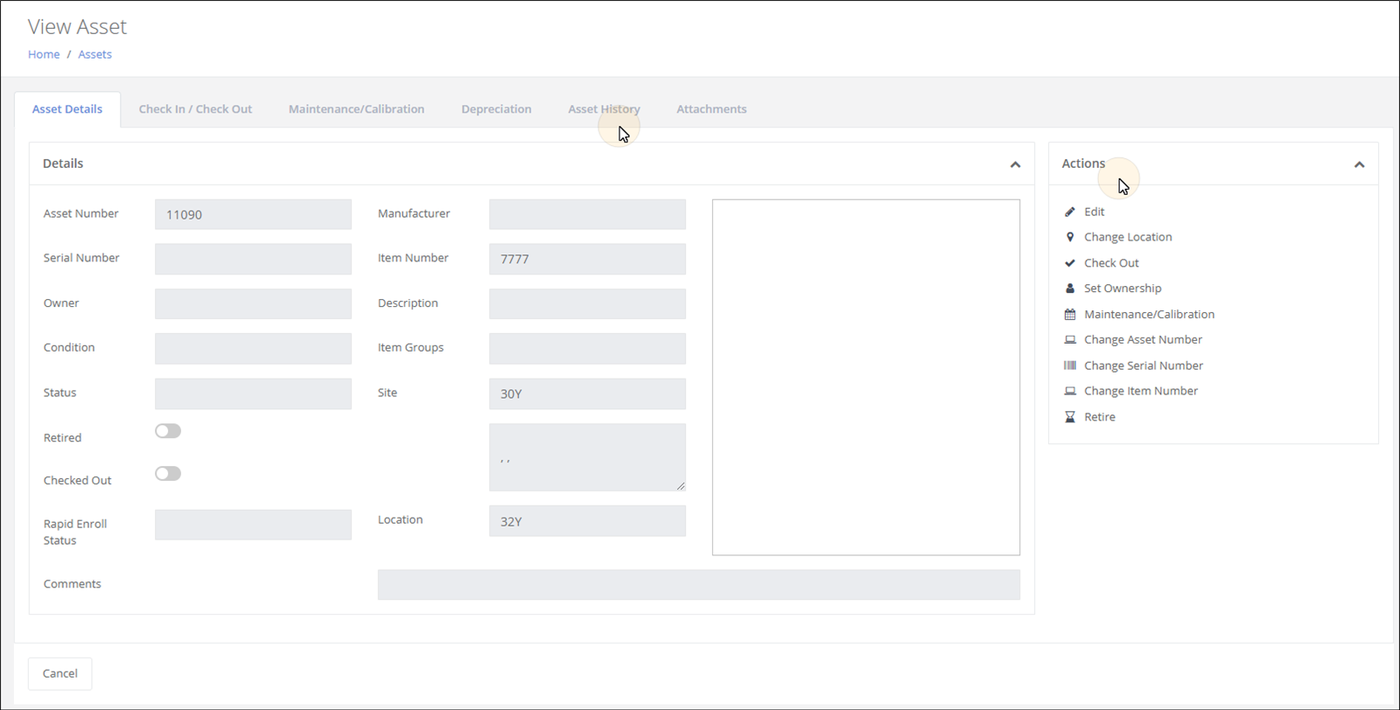
Actions Pane Actions
You are able to perform various asset transactions for the individual asset at the asset's View Asset page.
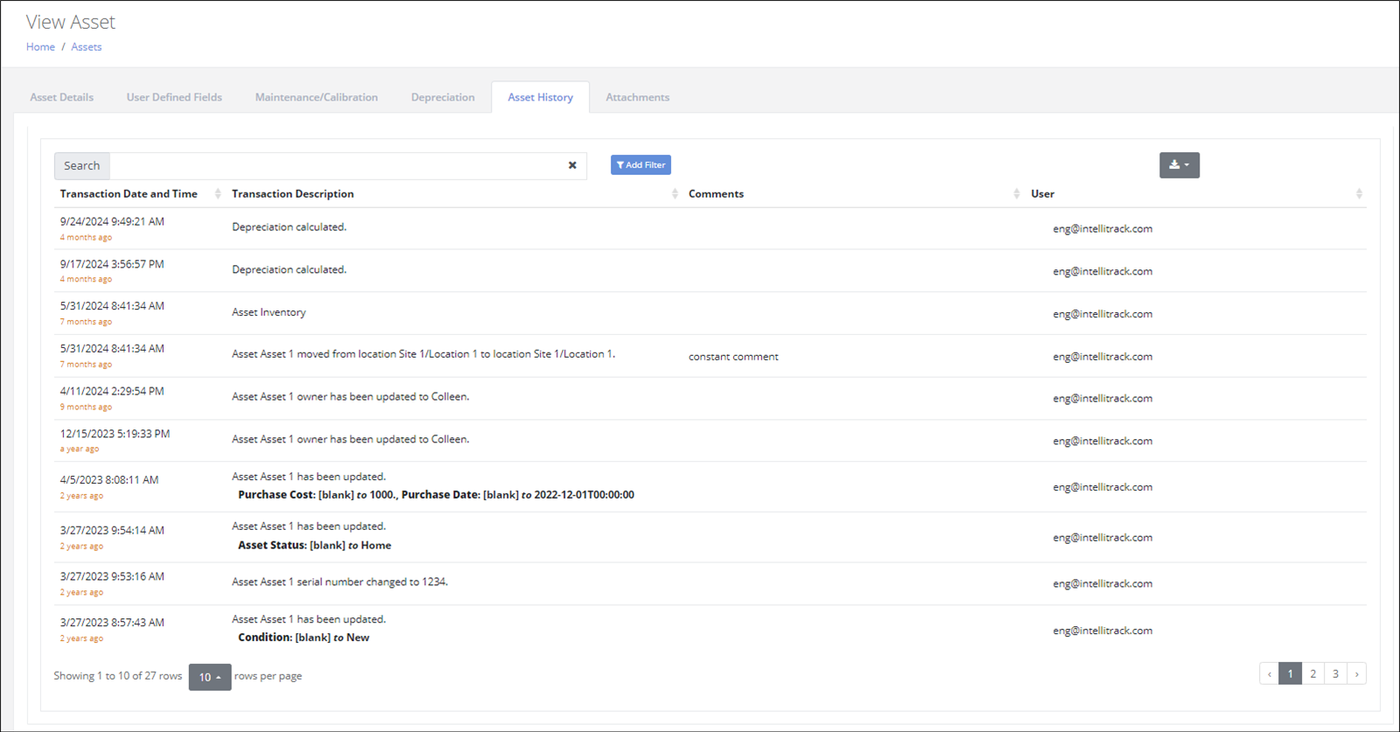
The asset transactions are tracked in the Asset History tab at the View Asset page and in the Asset History report (Insights > Asset History > Report button).
The Asset Actions available from the Actions pane are detailed in the table that follows.
View Asset Page Actions
| Icon | Name | Description | Transaction Type |
|---|---|---|---|
 | Edit Asset | Select to invoke the Edit Asset page. Edit asset lookup fields, comment, user defined fields, maintenance and calibration fields. Attach up to 5 files to the asset. | Asset Updated |
 | Set Location | Available when the asset's location is not set. Select to invoke the Set Location popup. Set the asset location via the Set Location popup. | Set Location |
 | Change Location | Available when the asset has a set location. Select to invoke the Change Location popup. Change the asset's location via the Change Location popup. | Changed Location |
 | Set Ownership | Available when the asset owner is not set. Select to invoke the Set Ownership popup. Set an owner for the asset. | Owner Updated |
 | Change Ownership | Available when the asset's owner is set. Select to invoke the Change Ownership popup. Change the owner for the asset. | Owner Updated |
 | Maintenance / Calibration | Select to invoke the Maintenance / Calibration popup. Record the Maintenance or Calibration Date for the asset. | Maintenance or Calibration |
 | Change Asset Number | Select to invoke the Change Asset Number popup and change the asset's number. | Asset Number Changed |
 | Change Serial Number | Select to invoke the Change Serial Number popup and change the asset's serial number. | Asset Serial Number Changed. |
 | Change Item Number | Select to invoke the Change Item Number popup and change the asset's item number. | Asset Item Changed |
 | Retire | Select to invoke the Retire popup and retire the asset from active use. | Asset Retired |
 | Unretire | Available when the asset is retired. Select to invoke the Unretire Asset popup and unretire the retired asset. This will put this asset back into active use. | Asset Unretired |
Asset History Tab
The View Asset page > Asset History Tab displays a running log of all transactions completed for this asset.
Note
The Asset History report shows a running log of all transactions completed for all assets in the Tenant, see "Asset History".
Editing an Asset
An asset is edited at the Edit Asset page. The Edit Asset page is reached from the View Asset page. In the Asset Details tab, press the Edit button in the Actions pane.
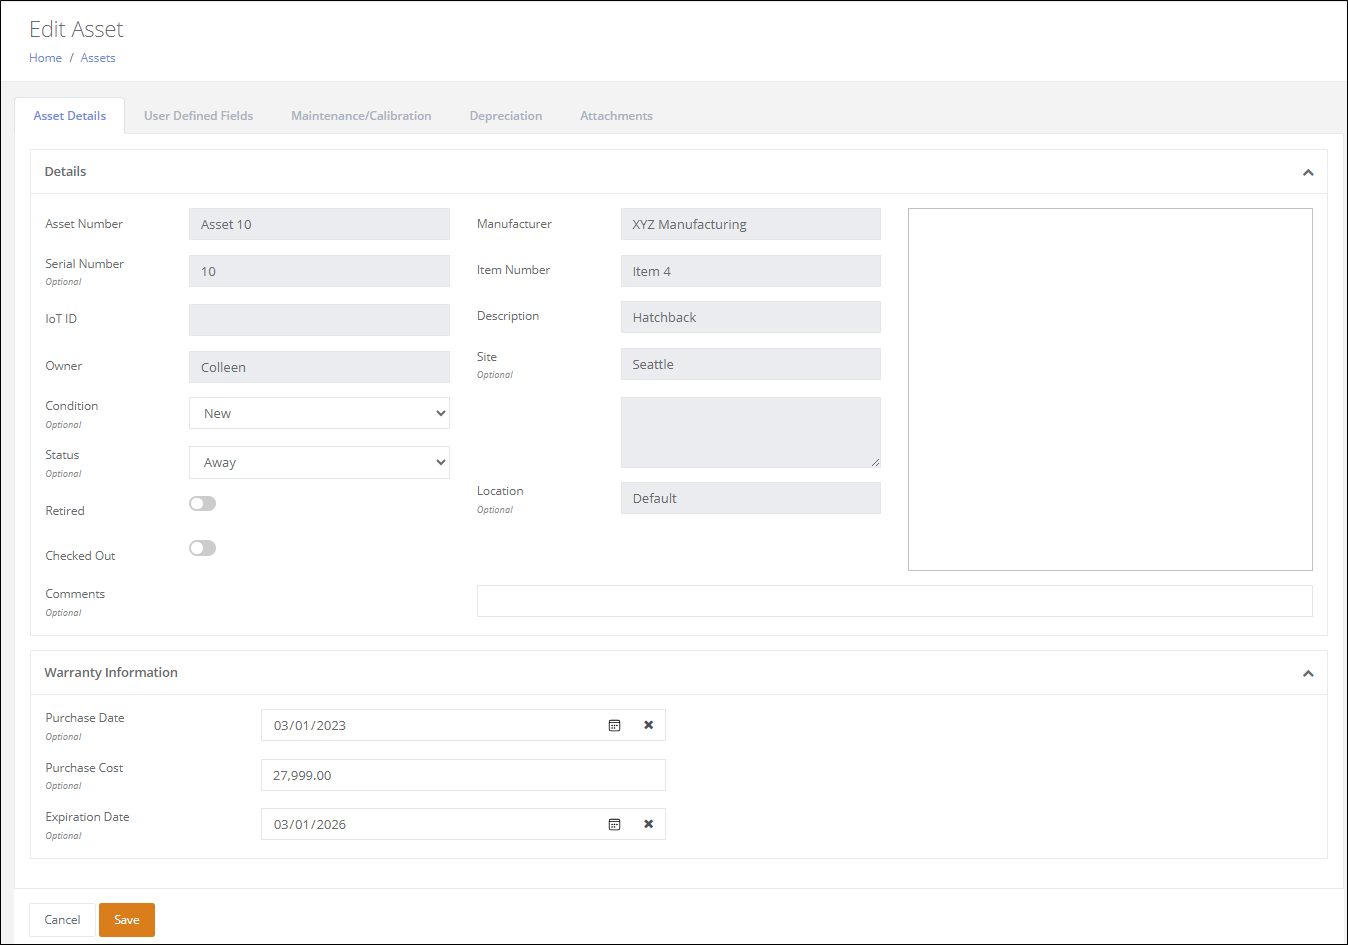
The Edit Asset page appears.
Asset Details Tab
In the Asset Details Tab, the Condition field, Status field, and Comments field can be edited.
Carrier and Warranty Information
When the Carrier Information and / or Warranty Information fields are part of the Asset, the fields in these sections may be edited.
User Defined Fields Tab
If the Asset has Asset User Defined Fields, they may be edited in this Tab.
Important
When the Asset User Defined Fields are added to the item, the asset user defined fields will be available to the asset when this asset is associated with this item. Asset User Defined Fields are editable at the Add Asset page and the Edit Asset page.
Note
Item User Defined Fields are read-only at the Add Asset page and the Edit Asset page.
Note
If the Asset does not have any item or asset user defined fields, this Tab does not appear.
Maintenance / Calibration Tab
The Maintenance Period, Calibration Period, and Last and Next Maintenance and Calibration Dates may be edited, see "Asset Maintenance and Calibration" for more information.
Attachments Tab
A maximum of five files may be attached to an asset from the Attachments tab, which is available from the Edit Asset page. The maximum file size is 50 MB.
Select the Attachments Tab to bring it to the front.
Browse to the file via the Browse button in the Attachment field.
Select the file so that it appears in the Attachment field.
Upload it via the Add button.
The file is placed in the file attachment grid.
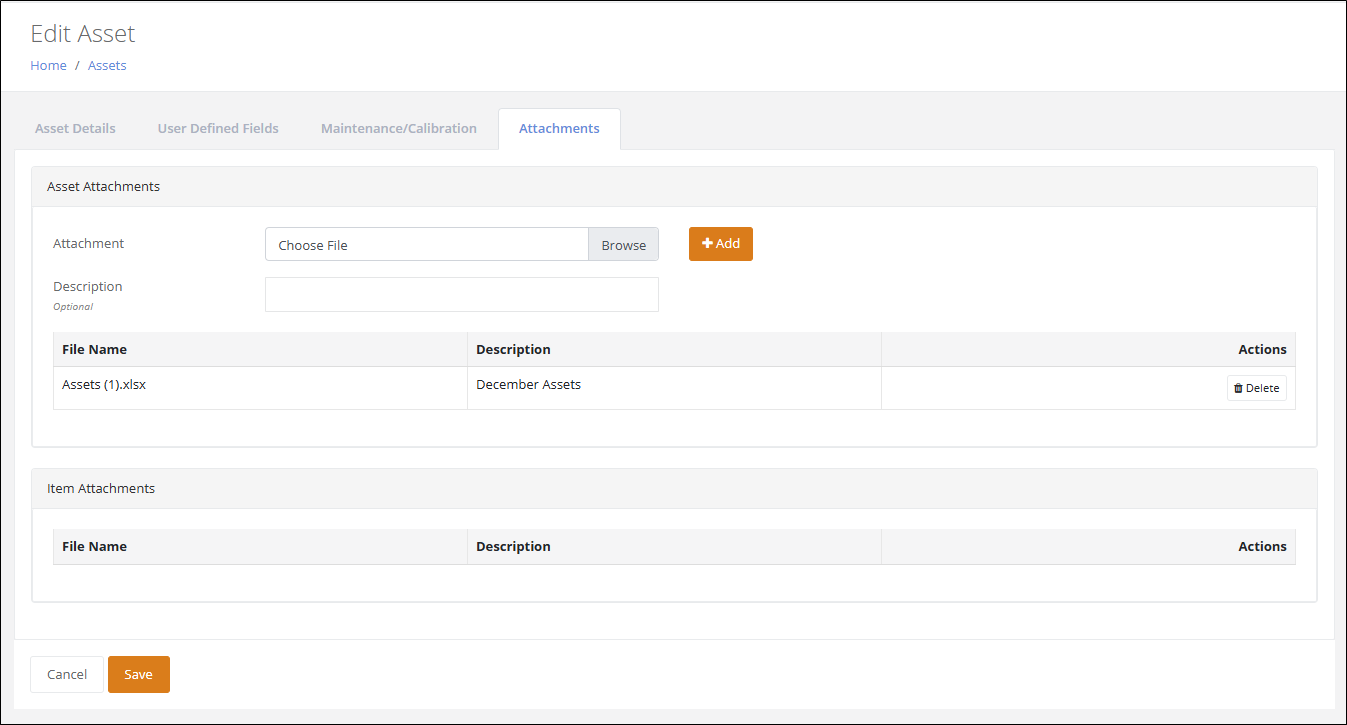
Press the Save button to save the file attachment(s) to the asset. They are available for Download at any time.
Chapter 5 - Bulk Changes
You are able to perform various asset transactions in bulk, for many assets at once, via the Bulk Changes options at the Assets page.
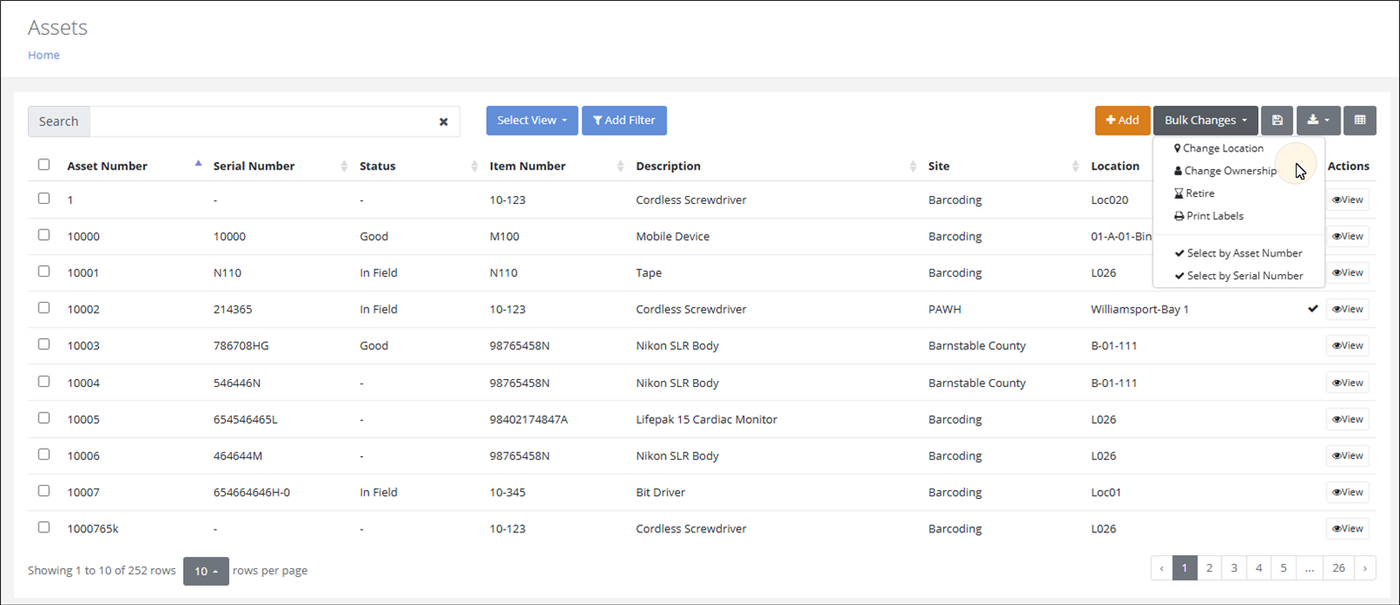
The Bulk Change Actions available from the Assets page > Bulk Changes drop-down list are detailed in the table that follows.
View Asset Page Actions
| Option | Name | Description | Transaction Type |
|---|---|---|---|
| Change Location | Set or change the location for the selected asset rows. | Set Location Changed Location |
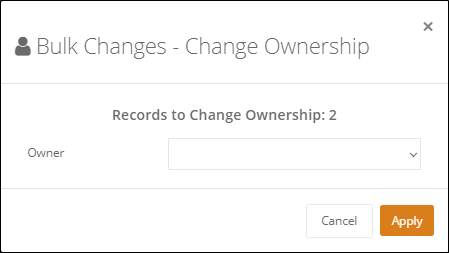
| Change Ownership | Set or change the asset's owner for the selected asset rows. | Owner Updated |
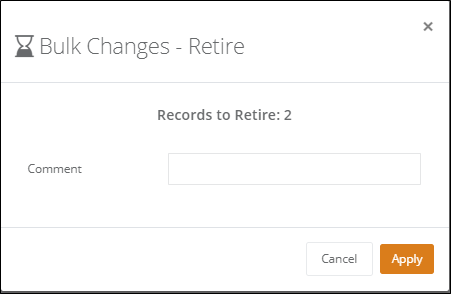
| Retire | Retires the asset of the selected asset rows. | Asset Retired |
 | Print Labels | Prints a label for each selected asset row (see "Asset Print Labels Option" | NA |
Performing a Bulk Change Operation
To perform a bulk operation, select the row or rows that will be a part of it. Two options are available for selecting the rows for a bulk operation.
Select the Assets
Select the Assets for the bulk change. You can do this by either using check box selection or by using dialog box selection.
Select Rows by Check box
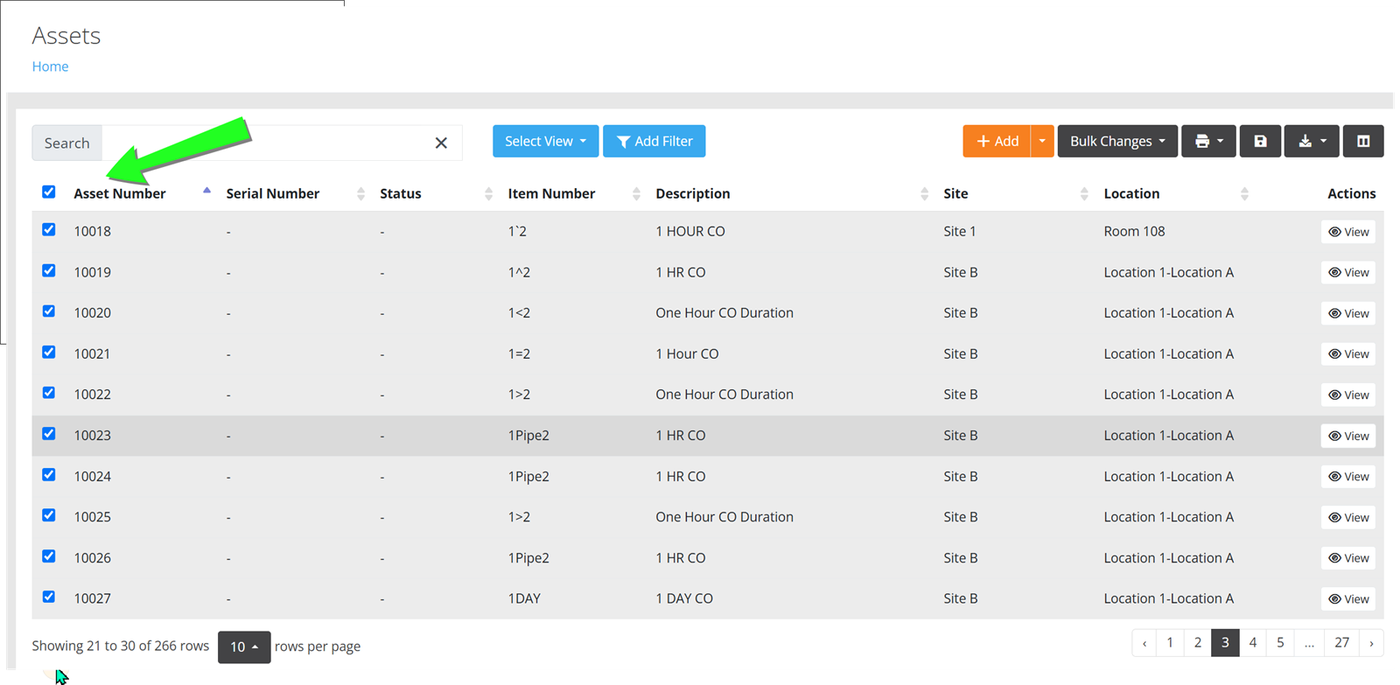
Mark the check box to the left of a row to select it for the bulk operation.
Select All Visible Rows
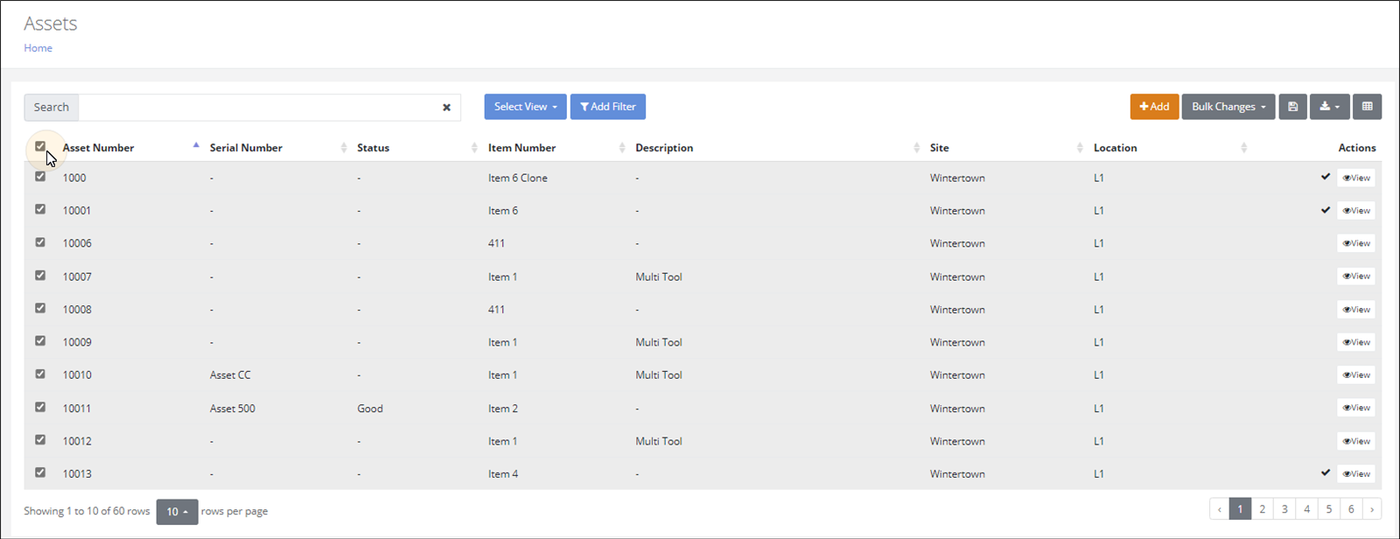
Select each row individually.
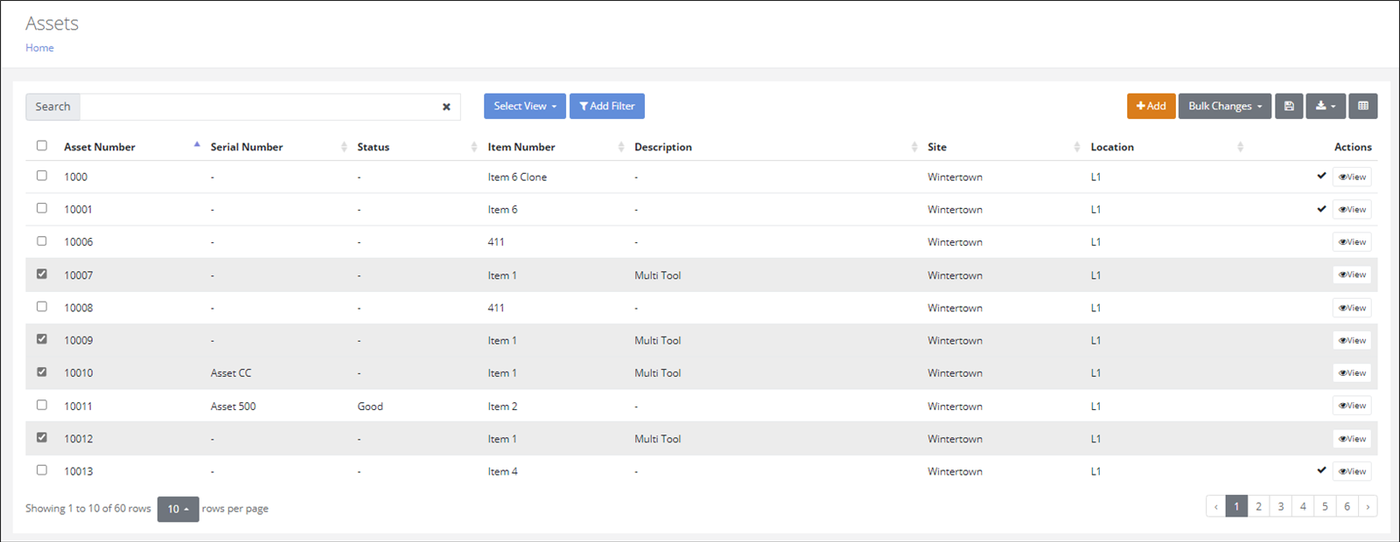
Select Rows by Select By Options
Select the Bulk Changes button > Select by Asset Number option
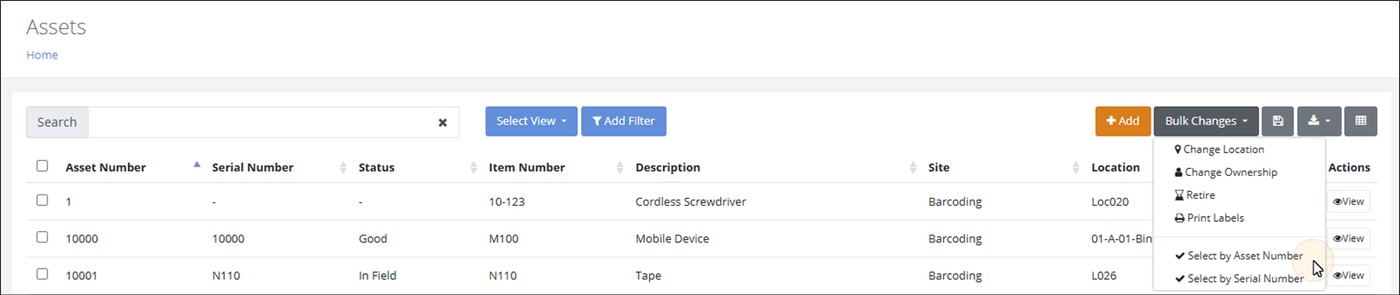
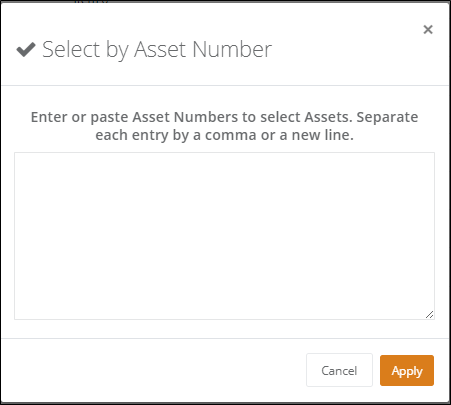
Select by Asset Number option: Enter or paste the Asset Numbers to select the Assets in the page. These are the assets for the bulk operation.
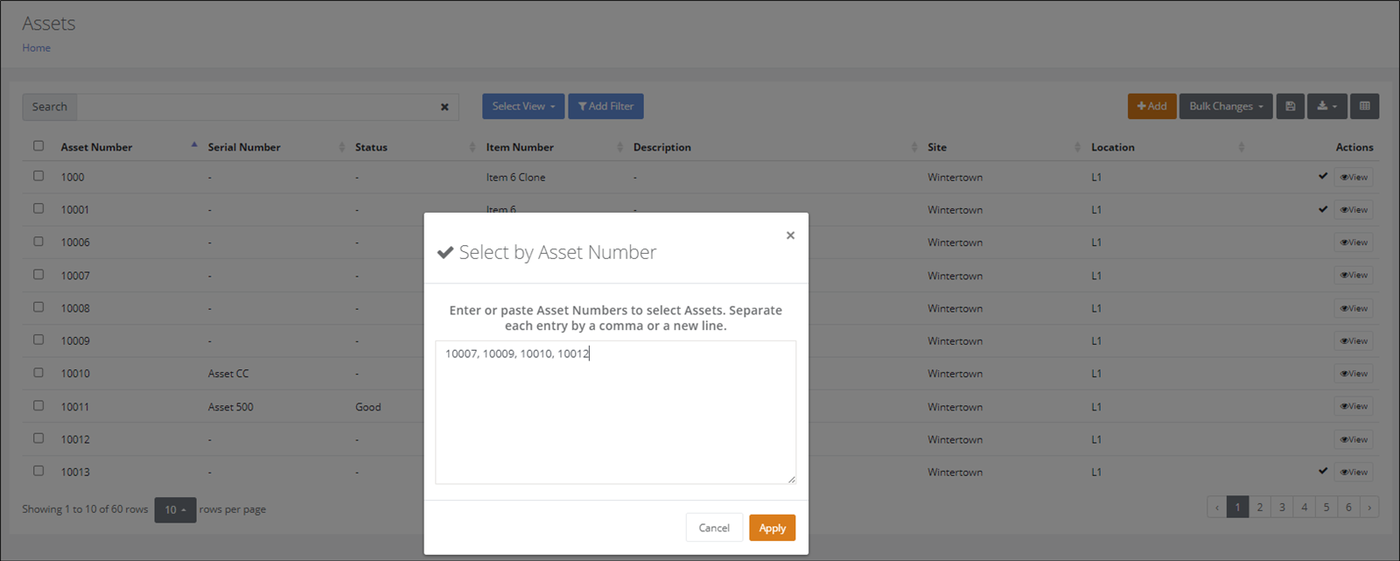
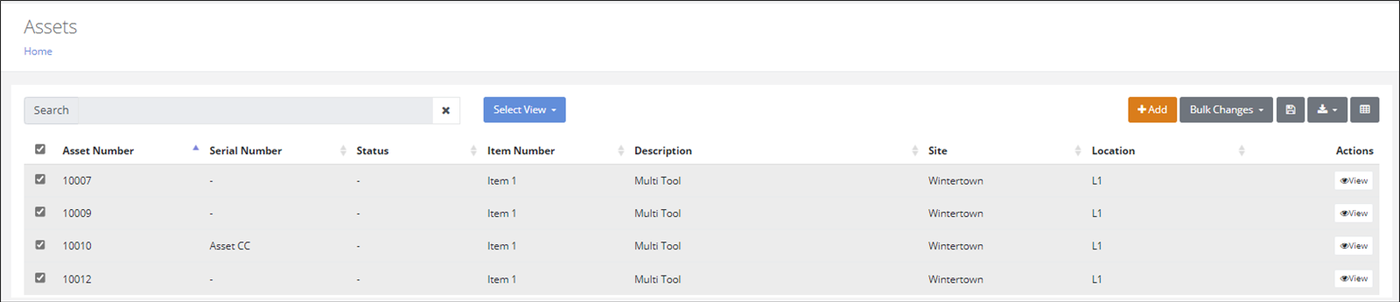
Press Apply to close the popup and return to the Assets page: the assets are selected for the Bulk Operation.
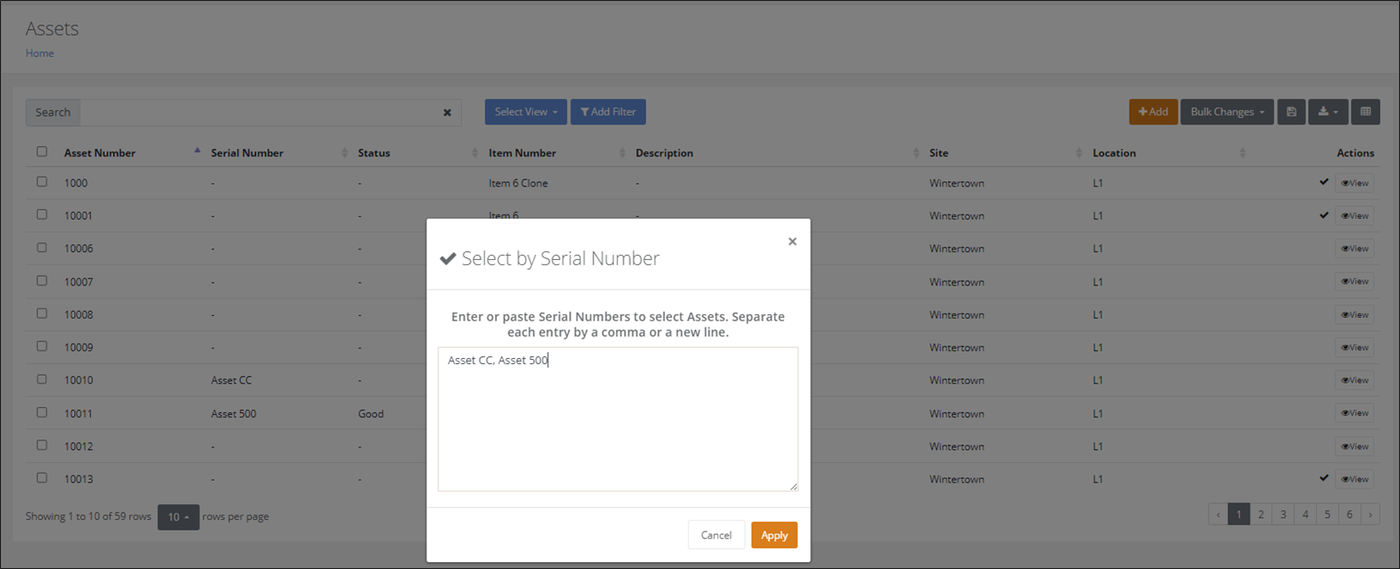
Select the Bulk Changes button > Select by Serial Number option

Select the Bulk Change Option
Select the Bulk Change from the Bulk Changes options.
A popup appears to continue with the bulk operation. Select the necessary options in the popup to perform the bulk operation and then press Apply to close the popup and run the bulk operation.
Important
At least one row must be selected to perform a bulk change.
Bulk Changes - Change Location Option
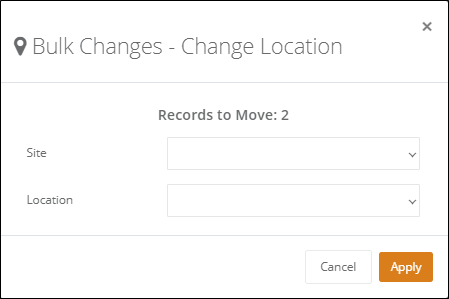
Bulk Changes - Change Ownership Option
Bulk Changes - Retire Option
Run the Bulk Change
After the popup closes, a Bulk Changes page appears to notify you of the status of the bulk operation. The example below shows a Bulk Changes page for the Change Location option.

Asset Print Labels Option
The capability to print Asset labels is found at the Assets page (Home> Assets> Assets). It is a Print operation, which is completed from the Print button, found along the top of the page.
The label sizes that IntelliTrack supports are:
- 2 x 1,
- 3 x 1,
- 3 x 2,
- 3 x 5,
- 4 x 2.
To print Asset labels:
Select the records to be printed as labels by marking the check box to the left of the Asset.
Select the Print button.
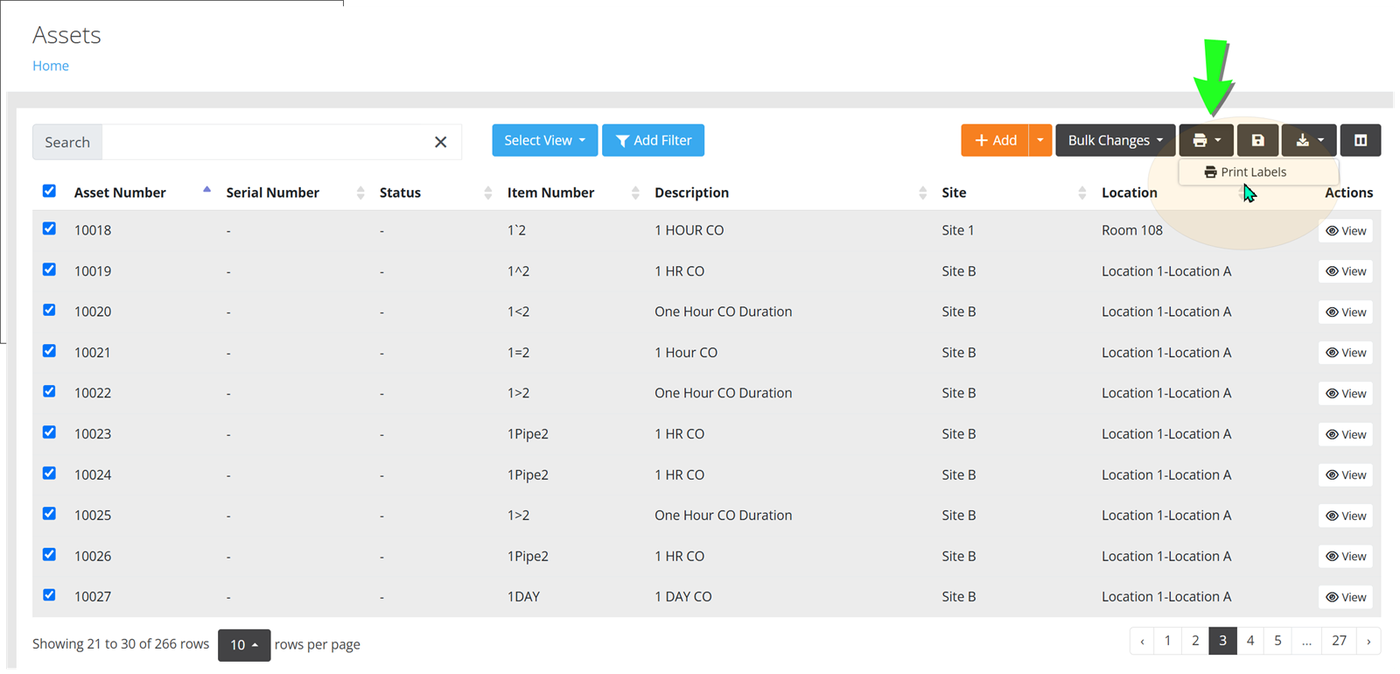
The Print Labels prompt appears.
Label Size: select the label size that corresponds to the printer.
Include Description: Enable this setting to include the asset's description in the label.
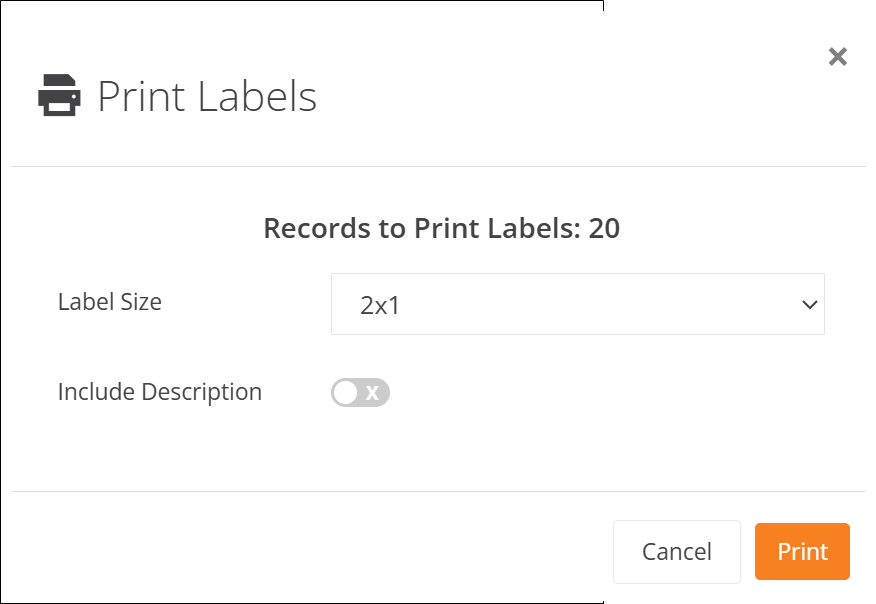
Select the Print button to print the labels.
The Print window appears. It contains a Preview of the Labels that will be printed.
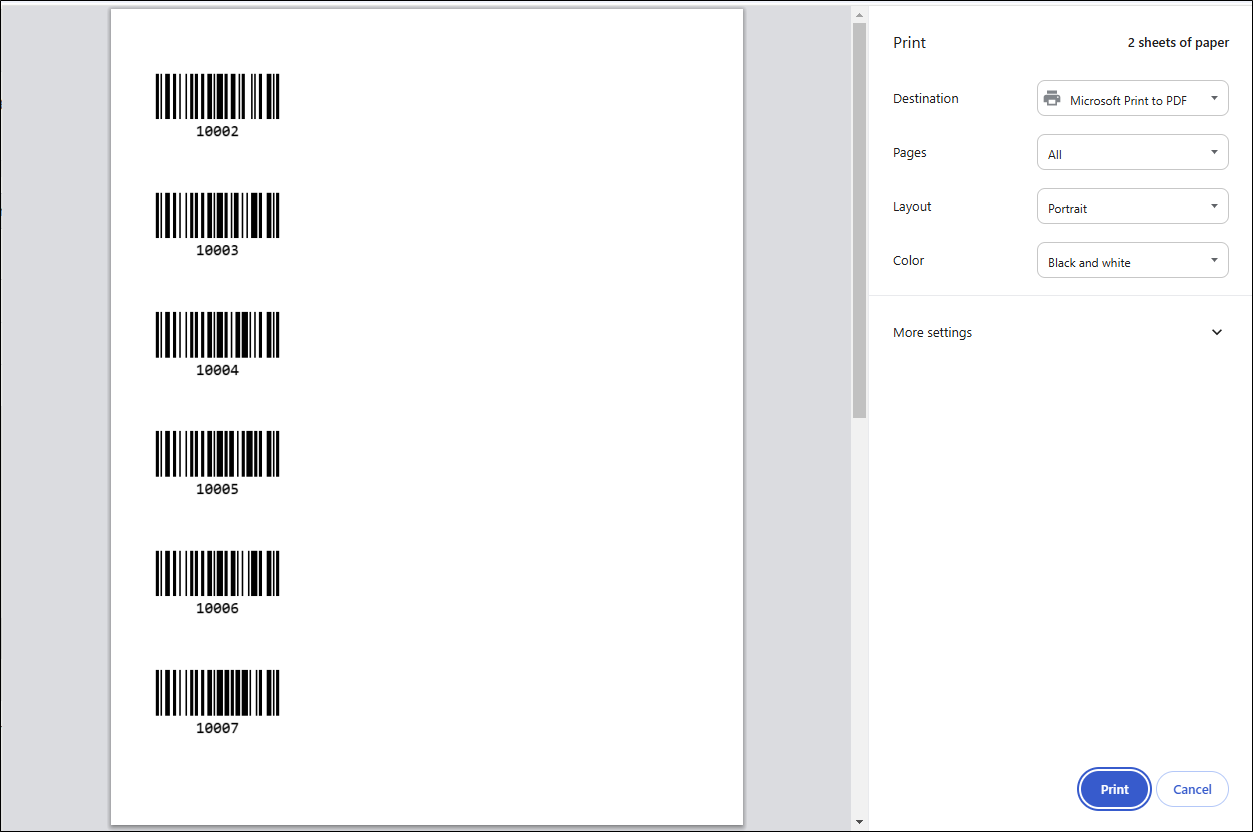
Select the Printer from the list of installed printers either from the Destination field or the Printer field, depending on your browser.
Press the Print button or the Save button, depending on your browser.
The Labels are sent to this printer and then printed.
Chapter 6 - Asset Maintenance and Calibration
A maintenance order and a calibration order are performed for an individual asset.
Feature Description
The maintenance and calibration feature enables you to record the maintenance or calibration service date for the asset. When you save a Maintenance Order or a Calibration Order, the system automatically updates the maintenance and / or calibration last service date in the View Asset page\Maintenance and Calibration tab. If a maintenance or calibration period is entered, the next maintenance date or the next calibration date is also updated.
Maintenance and Calibration Tab
The Maintenance / Calibration Tab is available at the Add Asset page, Edit Asset page, and View Asset page.
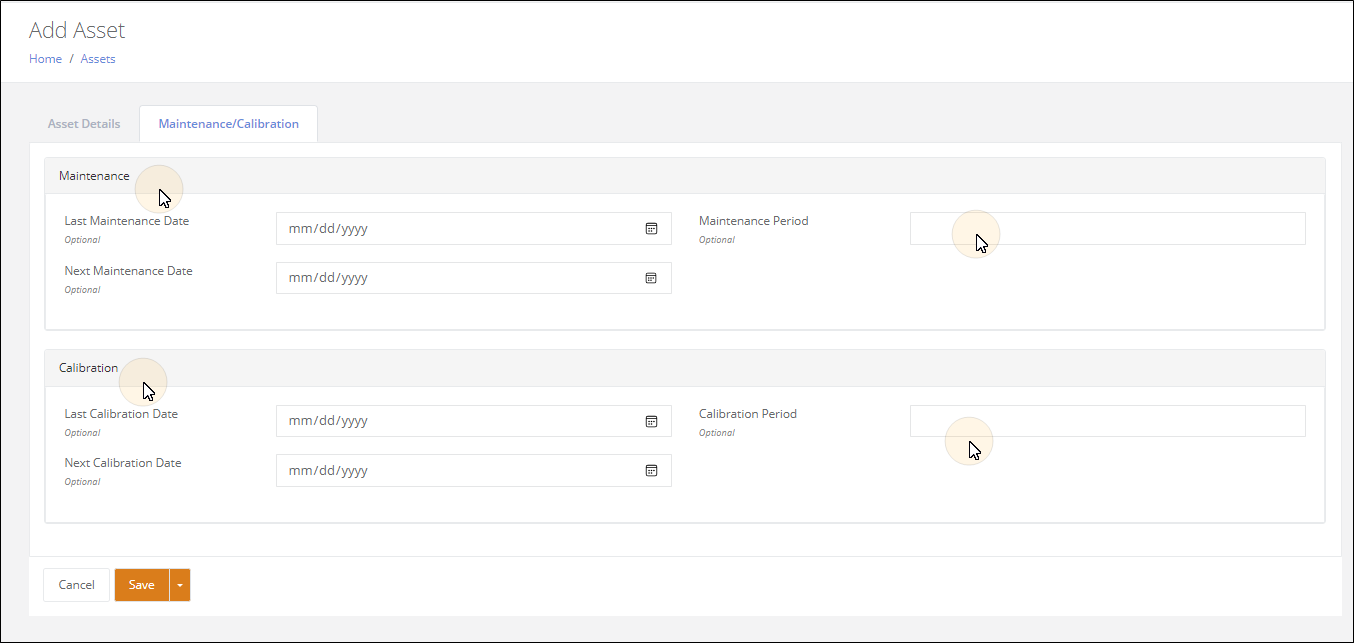
Add Asset Page and Edit Asset Page
You may adjust the Maintenance or Calibration Period (in days) and the Last and Next Maintenance and Calibration Dates in the Maintenance/Calibration Tab.
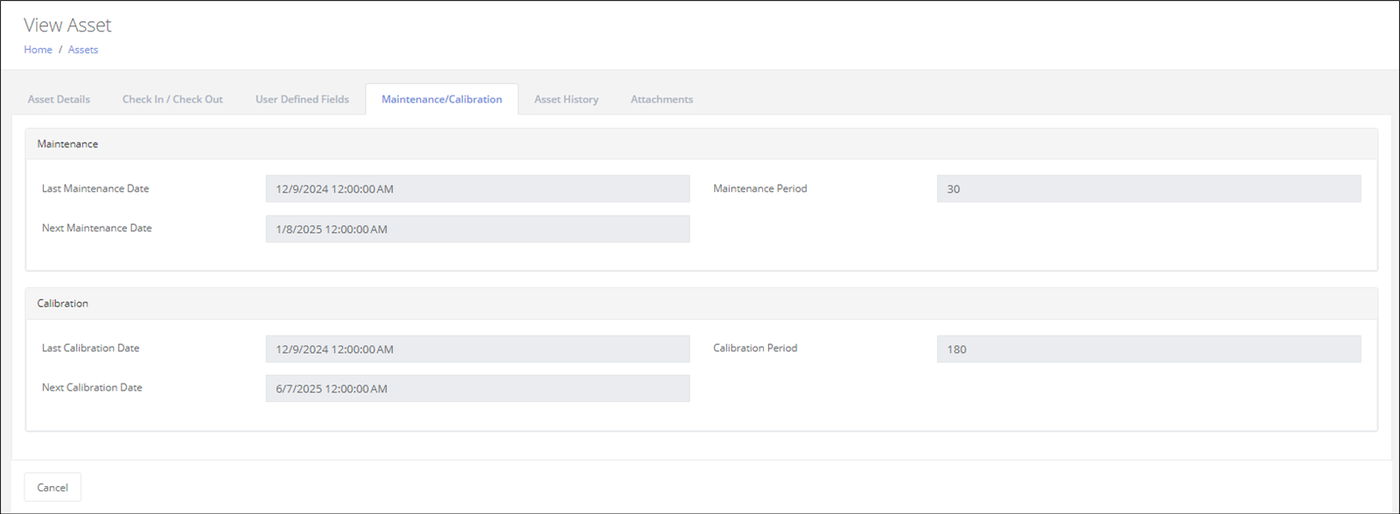
View Asset Page
You may view Maintenance and Calibration information at the Maintenance/Calibration Tab.
Maintenance / Calibration Due View
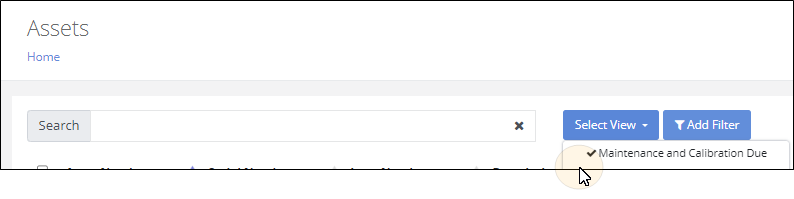
The Assets page has a Maintenance and Calibration Due View that reports on asset maintenance and calibration. Press Select View > Maintenance and Calibration Due to load this view.
Performing Asset Maintenance
To record a maintenance for an asset please refer to the steps that follow.
From the navigation pane, select Home > Assets.
The Assets page appears.
Locate the asset for the maintenance.
Press the View button to reach the View Asset page for this asset.
In the Actions pane, select the Maintenance/Calibration option.
The Maintenance/Calibration popup appears.
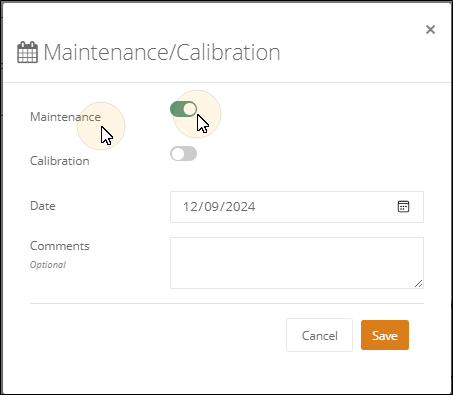
Maintenance Setting: enabled by default. For a Maintenance it has to be enabled.
Date: defaults to today's date. This can be changed.
Comments: add any maintenance comments.
Save: press the Save button to process the Maintenance transaction.
The Last Maintenance Date updates. If a Maintenance Period is set, the Next Maintenance Date also updates.
Performing Asset Calibration
To record a calibration for an asset please refer to the steps that follow.
From the navigation pane, select Home > Assets.
The Assets page appears.
Locate the asset for the calibration.
Press the View button to reach the View Asset page for this asset.
In the Actions pane, select the Maintenance/Calibration option.
The Maintenance/Calibration popup appears.
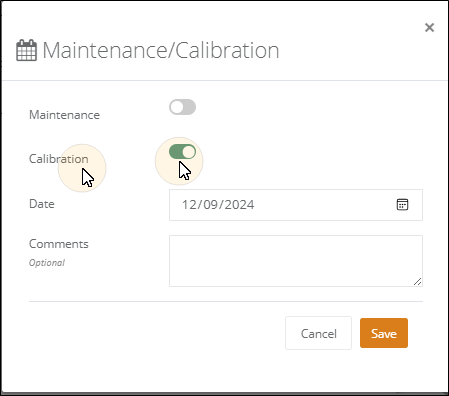
Calibration Setting: For a Calibration enable this setting.
Date: defaults to today's date. This can be changed.
Comments: add any maintenance comments.
Save: press the Save button to process the Calibration transaction.
The Last Calibration Date updates. If a Calibration Period is set, the Next Calibration Date also updates.
Chapter 7 - Asset Inventory
Asset inventory is performed from the Mobile Client. When you perform an asset inventory on a Site-Location, the asset site-location is verified by date and time with an Asset Inventoried transaction. This will establish where your assets reside and enable you to have a baseline of inventoried assets.
Important
Asset inventory is performed in the IntelliTrack Mobile Client. The Mobile Client is an Android application that is available from the Google Play Store. It runs on Android 8.1 or greater. For integrated scanner support, the device must be a Zebra, Analogical, or Honeywell device. Camera scanner support is available when using the IntelliTrack Mobile Client on consumer devices from other manufacturers.
Asset Inventory Setting for the Tenant
The Inventory settings govern the rules the Tenant follows for asset inventory.
Note
The Tenant is set up by default to use Asset Inventory.
Important
The following steps outline asset inventory setup for the Tenant. They must be performed by a Tenant Administrator.
Select Home > Management > Settings > Tenant Settings. The Tenant Settings page appears.
In the Asset row, press the Edit button.

The Settings for Asset page appears. The inventory settings are found in the Inventory section of the page.
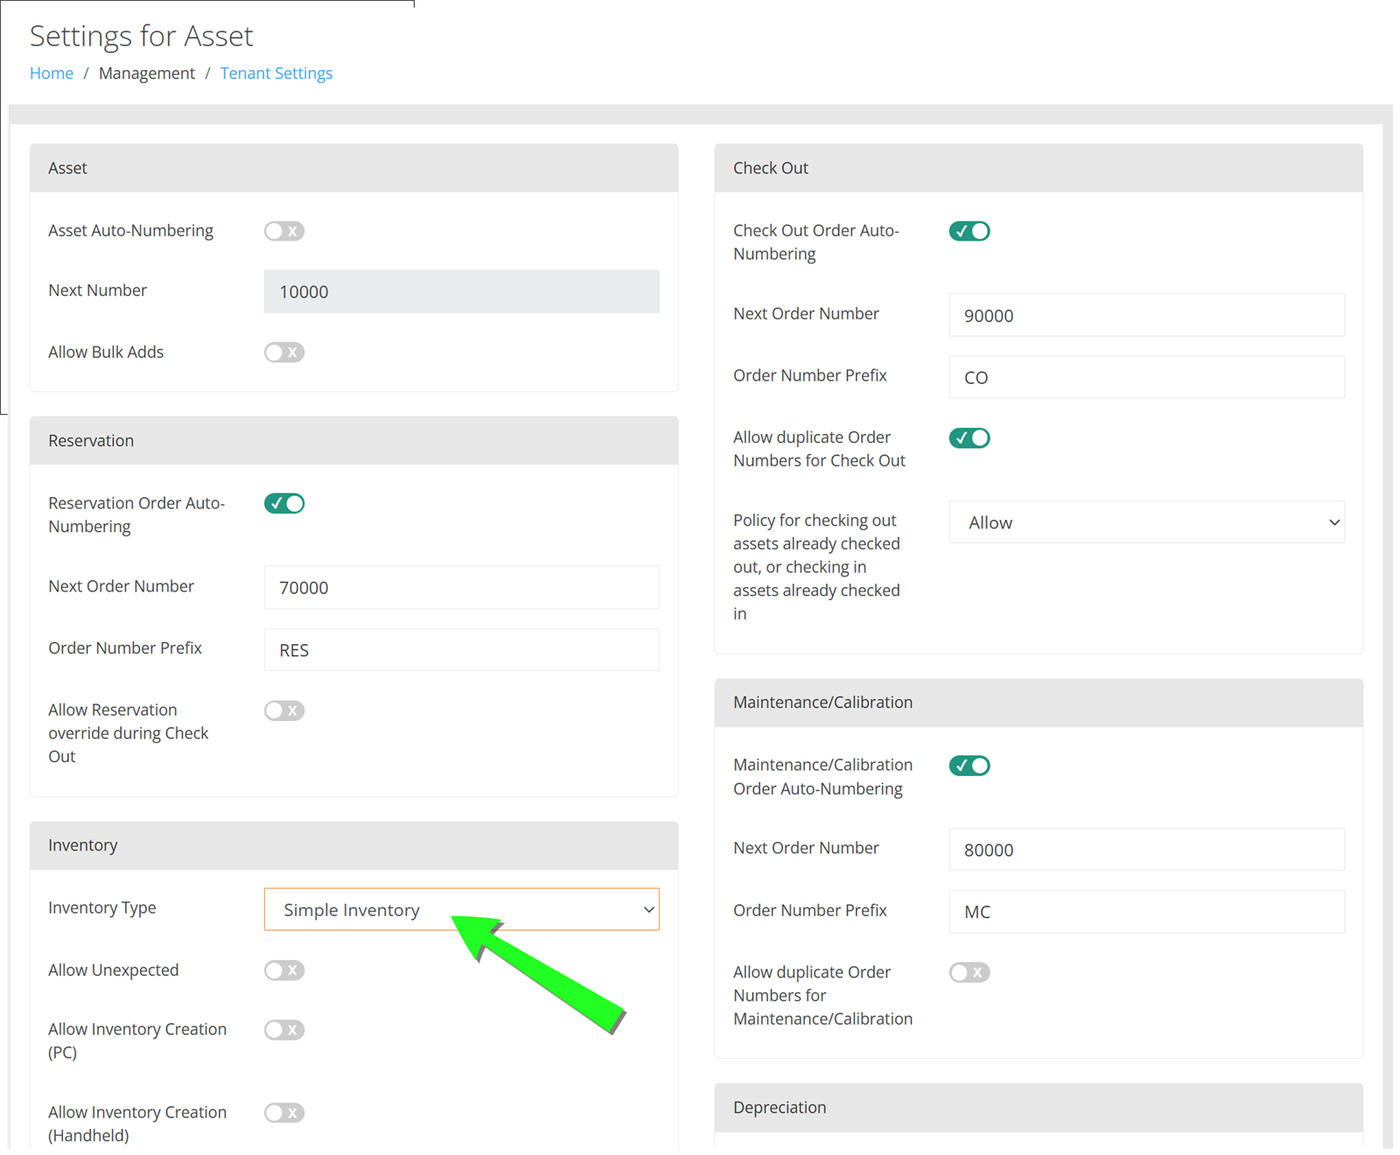
Inventory Type: Select the drop-down arrow in the Inventory Type field.
Select the Simple Inventory option. This will enable the Tenant for performing a baseline asset inventory for the Assets in the Tenant.
Press Save to save the Simple Inventory type to the Tenant.
Installing IntelliTrack Mobile on the Device
Asset inventory is performed from the IntelliTrack Mobile Client. The Mobile Client is an Android application. To get started with asset inventory, install the IntelliTrack Mobile Client on the device.
- Power on the device and open the Play Store app.
- In the Play Store, search for IntelliTrack Mobile.
- IntelliTrack Mobile from Decision Technologies will be returned as part of the search results.
- Select this option by tapping on the IntelliTrack Favicon.
- IntelliTrack Mobile from DecisionPoint Technologies appears onscreen.
- Press the Install button to install IntelliTrack Mobile on the device.
- After the device is installed, select the Open option to launch the IntelliTrack Mobile app.
- Log into the IntelliTrack Mobile Client by using the IntelliTrack Username and Password.
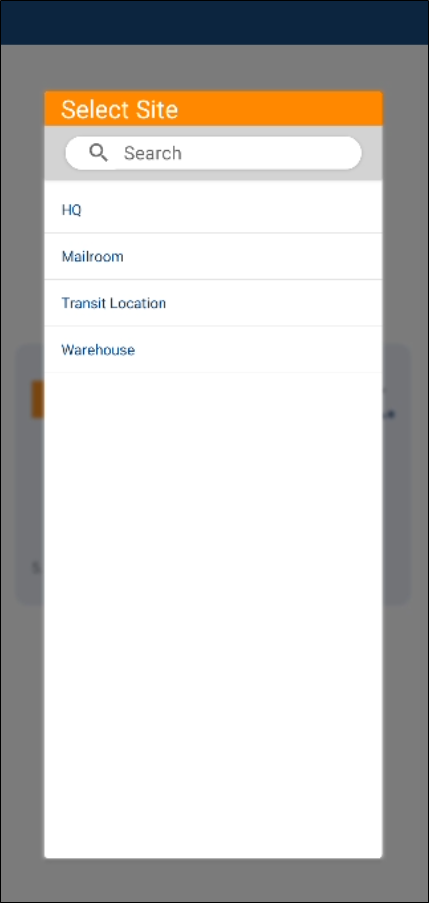
Selecting a Default Site for the Mobile Session
After you log into the IntelliTrack Mobile Client, a Select Site popup will appear. Select the Default Site that you will use for this mobile session.
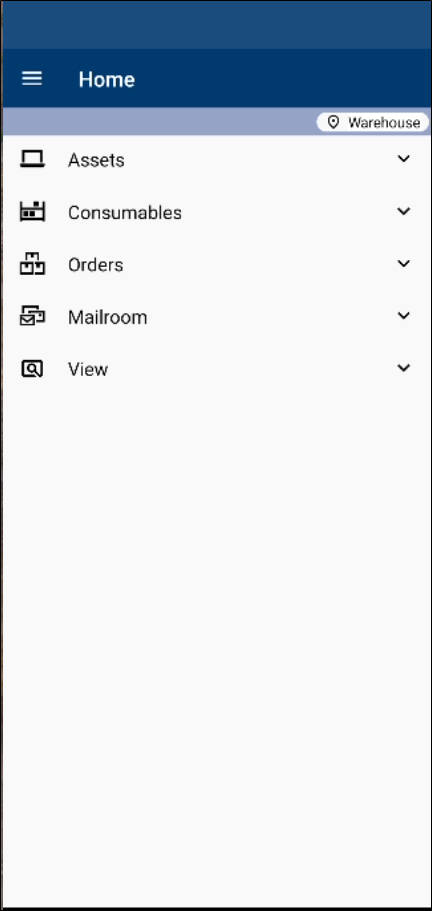
IntelliTrack Mobile Home Screen
After you select a default site for the Mobile session, the Select Site screen closes and you are at the Home screen. The default site is displayed in the Site button found in the upper right area of the screen. You may change this at any time during the session by selecting the Site button and selecting another site from the Select Site popup that appears.
Asset Inventory Options in the Mobile Client
Four inventory options are available. The default option is Directed Inventory. To reach the Inventory options, go to the Settings screen by following these steps.
Select the Hamburger icon in the upper left area of the screen.
The Hamburger Menu options appear.
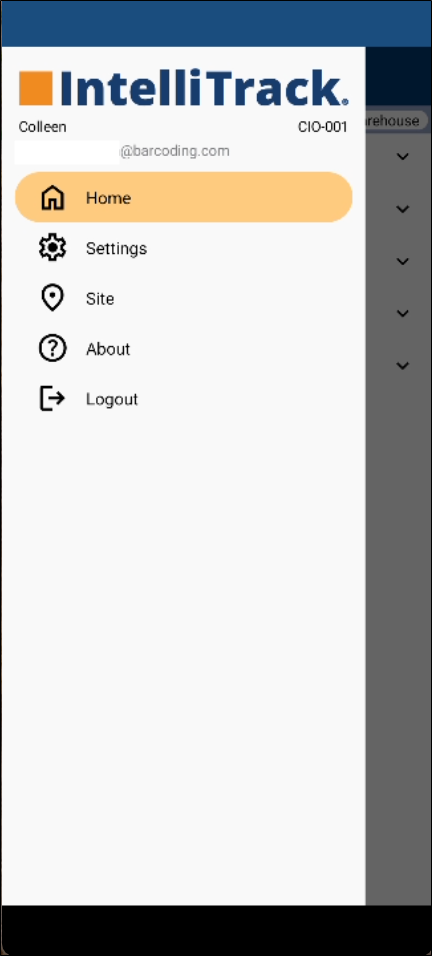
Select the Settings option.
The Settings screen appears.
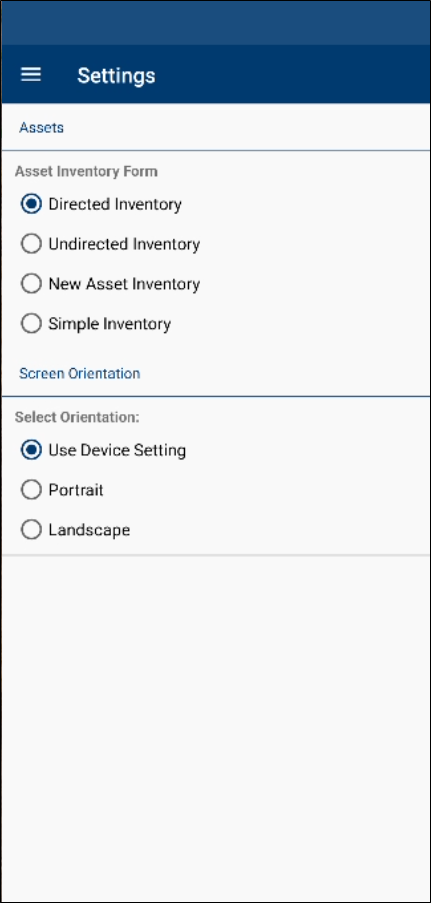
In the Assets section of the screen, four options are available. Select the option that you want to use when you perform the Asset Inventory. When you perform asset inventory in IntelliTrack Mobile, an Asset Inventory transaction will post to the Asset History for the asset in IntelliTrack.
- Directed Inventory : This method accommodates new and existing assets. You will notice three aspects to this method; they display the following information when you enter the location: Inventoried: the amount of assets inventoried in this location is displayed. Remaining: the amount of assets remaining to be scanned/entered into this location is displayed during the inventory session. New: the amount of new assets scanned is displayed during the inventory session. You may perform an inventory on all of the assets for this location in one session when you use this option.
- Undirected Inventory: This method accommodates new and existing assets You may perform the asset inventory by counting the asset-location one at a time.
- New Asset Inventory: This method accommodates new assets. You may use the Lock feature to expedite asset inventory scanning of new assets. You may also assign a serial number, assignee, and condition to the new asset.
- Simple Inventory: This method accommodates EXISTING inventoried assets. When the asset number is scanned, the asset is automatically inventoried in its site-location.
Chapter 8 - Cycle Counting
Cycle counting is used to check the assets that reside in a site-location. When a cycle count is performed, the assets that are counted are categorized as expected, unexpected, and missing, depending on the Tenant settings.
Tenant Settings
The following steps outline cycle count setup for the Tenant. They must be performed by a Tenant Administrator.
Select Home > Management > Settings > Tenant Settings. The Tenant Settings page appears.
In the Asset row, press the Edit button.
The Settings for Asset page appears. The inventory settings are found in the Inventory section of the page.
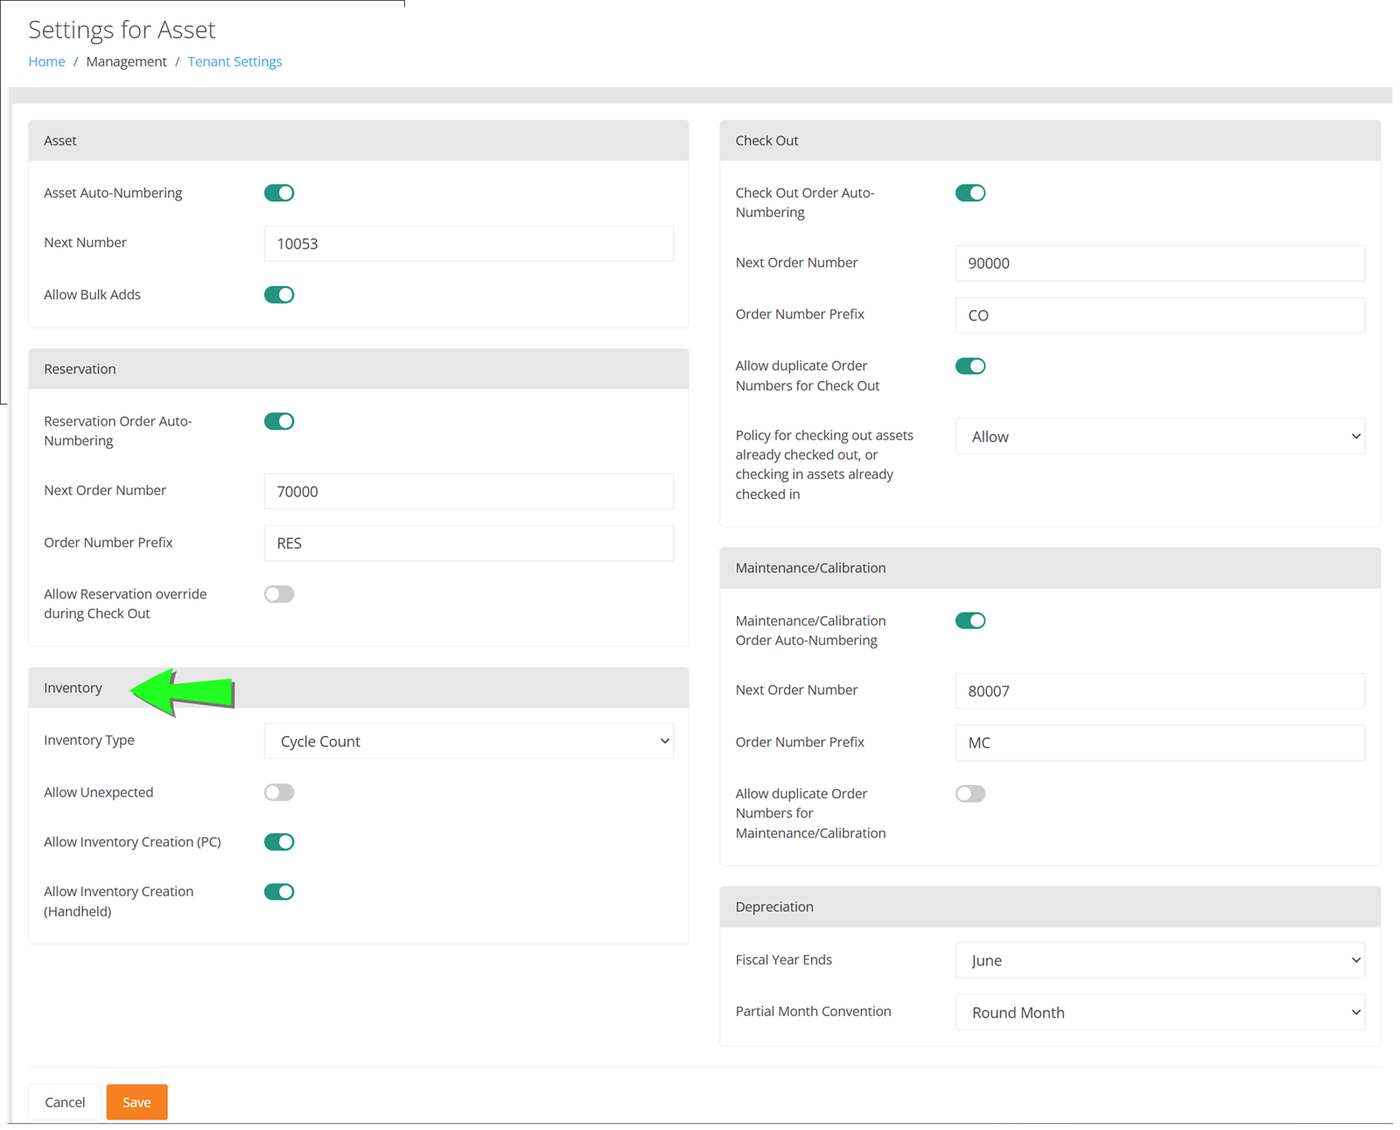
Cycle Count Settings
The Inventory settings govern the rules the Tenant follows for inventory.
- Inventory Type: Select the drop-down arrow in the Inventory Type field.
- Select the Cycle Count option.
- After the Cycle Count option is selected, the following cycle count settings become active:
- Allow Unexpected: this setting can be enabled or disabled.
- When enabled this setting allows unexpected assets to be included in the cycle count.
- When disabled, unexpected assets are not allowed to be included in the cycle count.
- Allow Inventory Creation (PC): this setting can be enabled or disabled.
- When enabled this setting allows a new cycle count to be created in the IntelliTrack web application.
- When disabled, a new cycle count cannot be created in the web application.
- Allow Inventory Creation (Handheld): this setting can be enabled or disabled.
- When enabled this setting allows a new cycle count to be created in the IntelliTrack Mobile Client application.
- When disabled, a new cycle count cannot be created in the web application.
- Allow Unexpected: this setting can be enabled or disabled.
- Press Save.
- You are returned to the Tenant Settings page. A message appears to notify you that the settings for Asset have been saved. Your Tenant Settings for Inventory will be enforced when you perform a cycle count.
Cycle Count Management
When the Tenant uses Cycle Counts, the Assets menu will contain a Cycle Count option, which provides access to the Cycle Count page.
To work with cycle counts in the web application, please refer to the steps that follow.
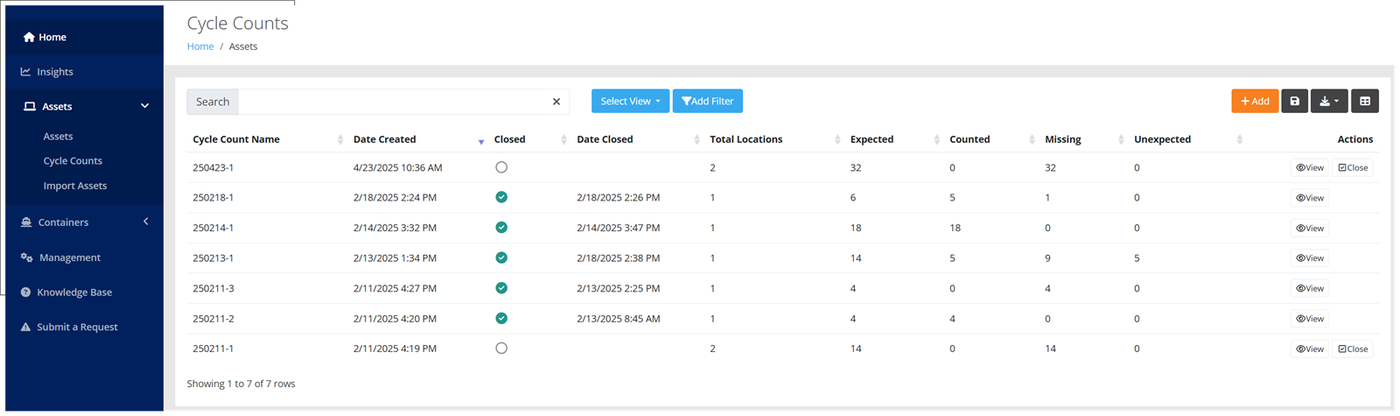
- Select Home > Assets > Cycle Counts from the menu.
- The Cycle Counts page appears. At this page you are able to add a cycle count and work with existing cycle counts.
Adding a Cycle Count in the Web App
Refer to the steps that follow to add a cycle count in the web application.
Note
To have this function in the web application, this function must be allowed for the Tenant via the Tenant Settings.
Select Home > Assets > Cycle Counts to reach the Cycle Counts page.
Press the Add button at the Cycle Counts page.
The Add Cycle Count page appears.
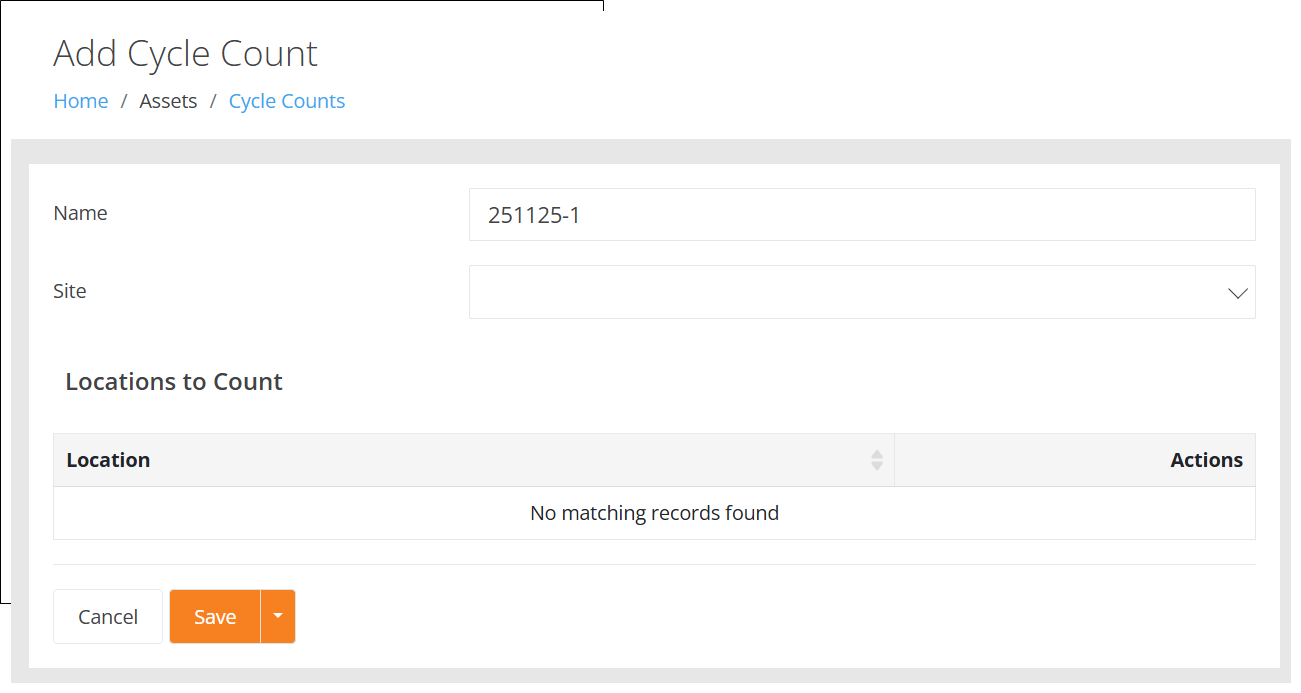
Name: The cycle count name is auto-assigned. You may change it, if desired.
Site: press the drop-down arrow and select a Site from the list of sites that appear. The Add Locations button appears.
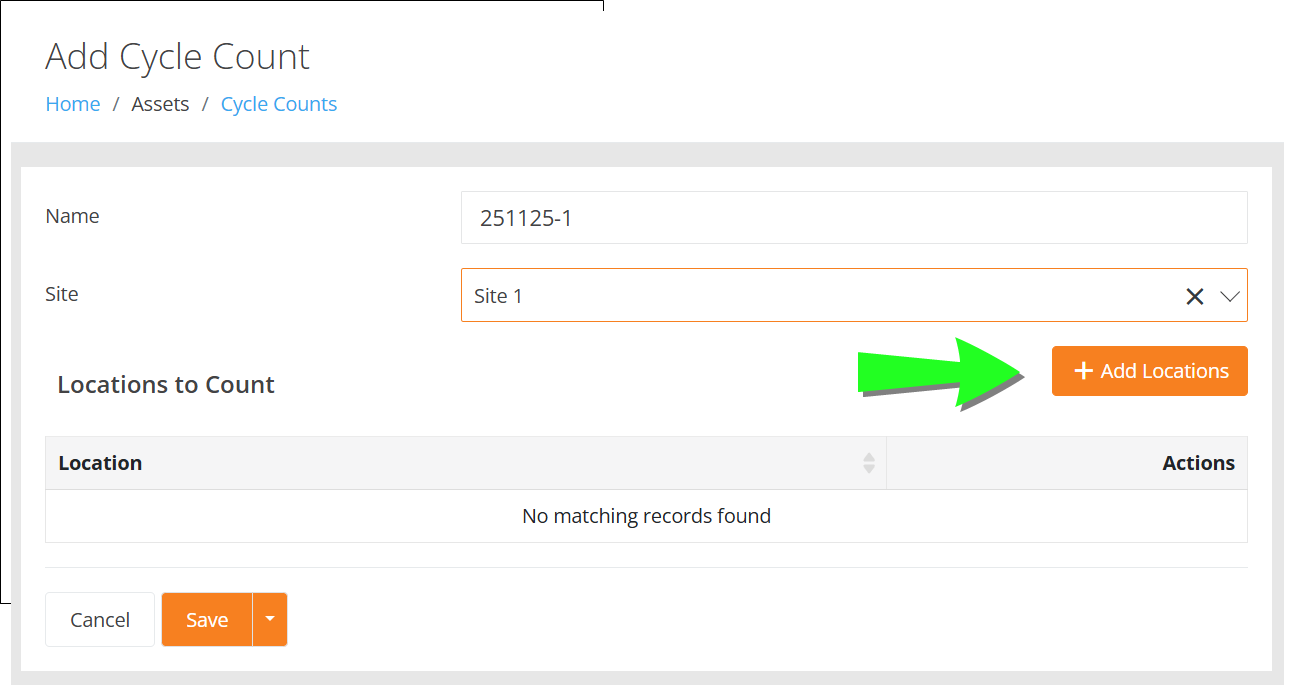
Add Locations button: press the + Add Locations button. The + Add Cycle Count Location popup appears.
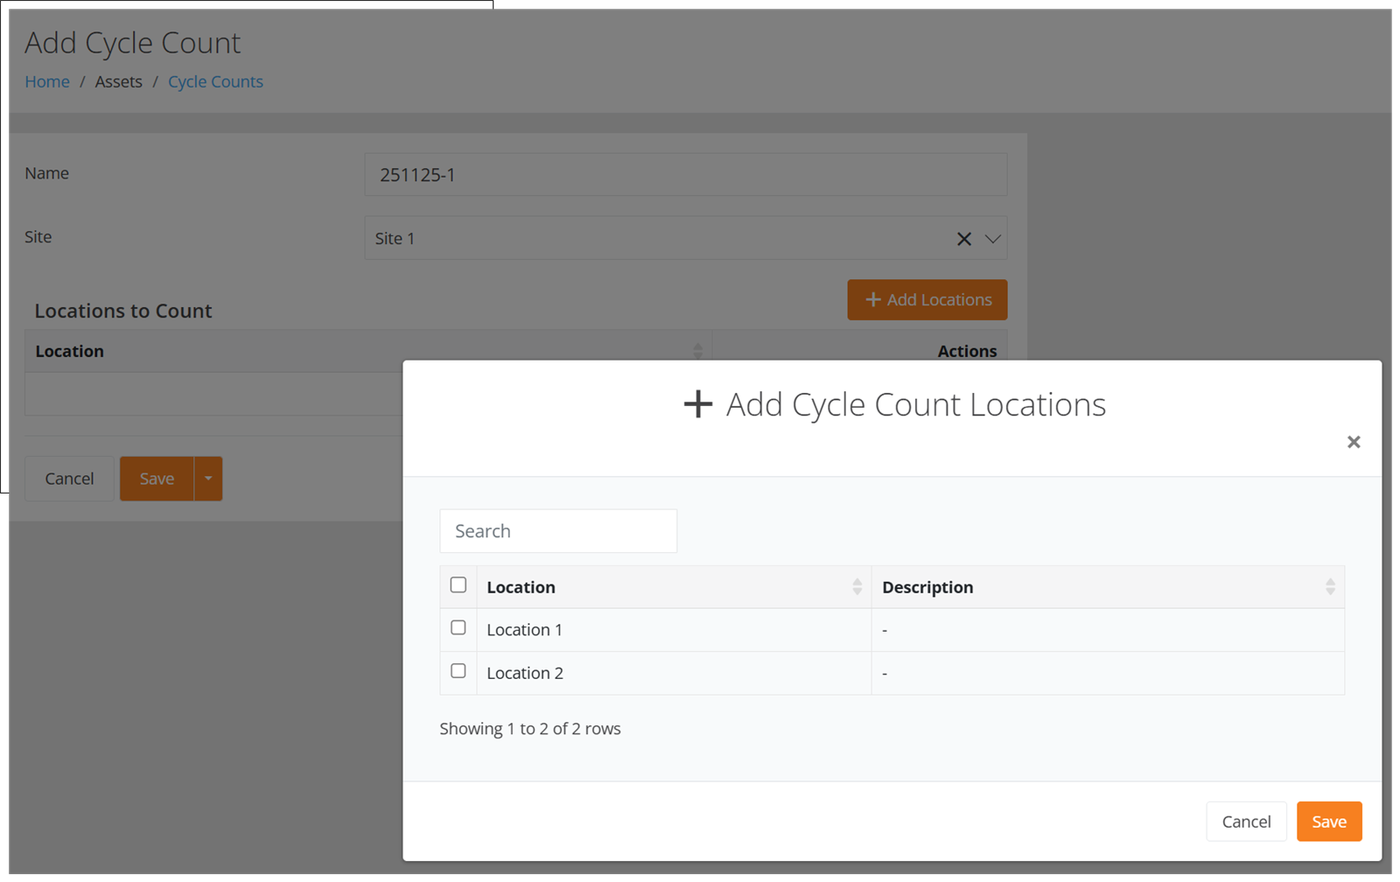
Mark the check box found to the left of the location or locations to add the locations to the cycle count. At least one location is required for the cycle count, but multiple locations from the same site may be added. Tip: If you want to add all the Locations at this Site, press the Top Level check box to the left of the Location column.
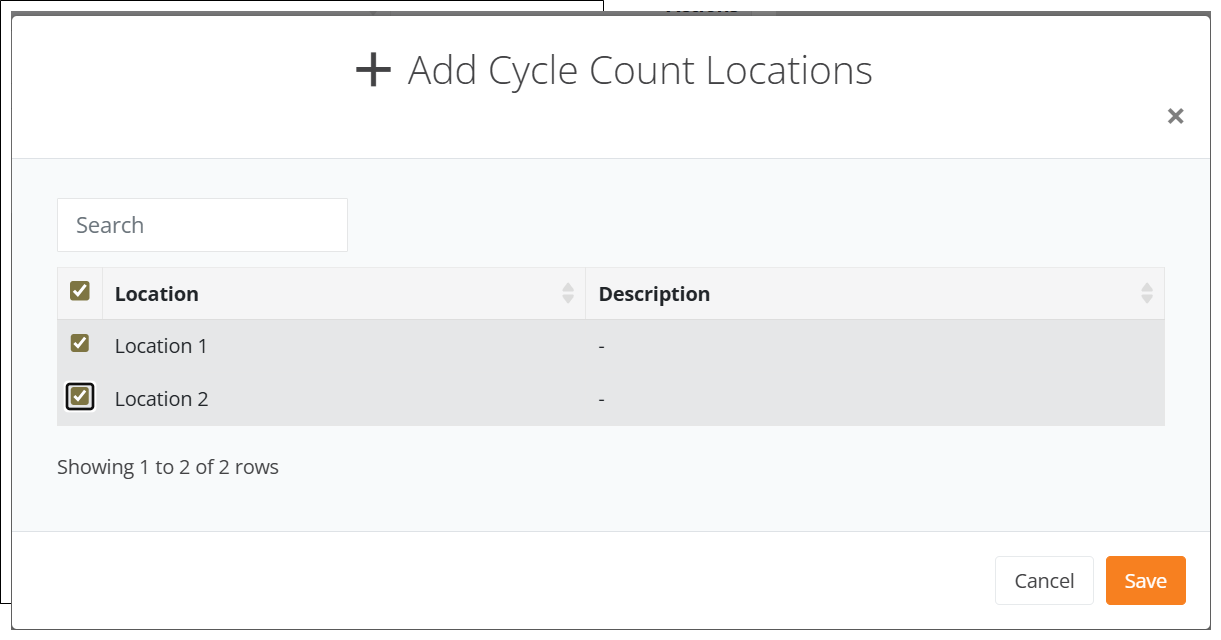
Press the Save button to close the + Add Cycle Count Locations popup and return to the Add Cycle Count page. The selected locations have been added to the Cycle Count.
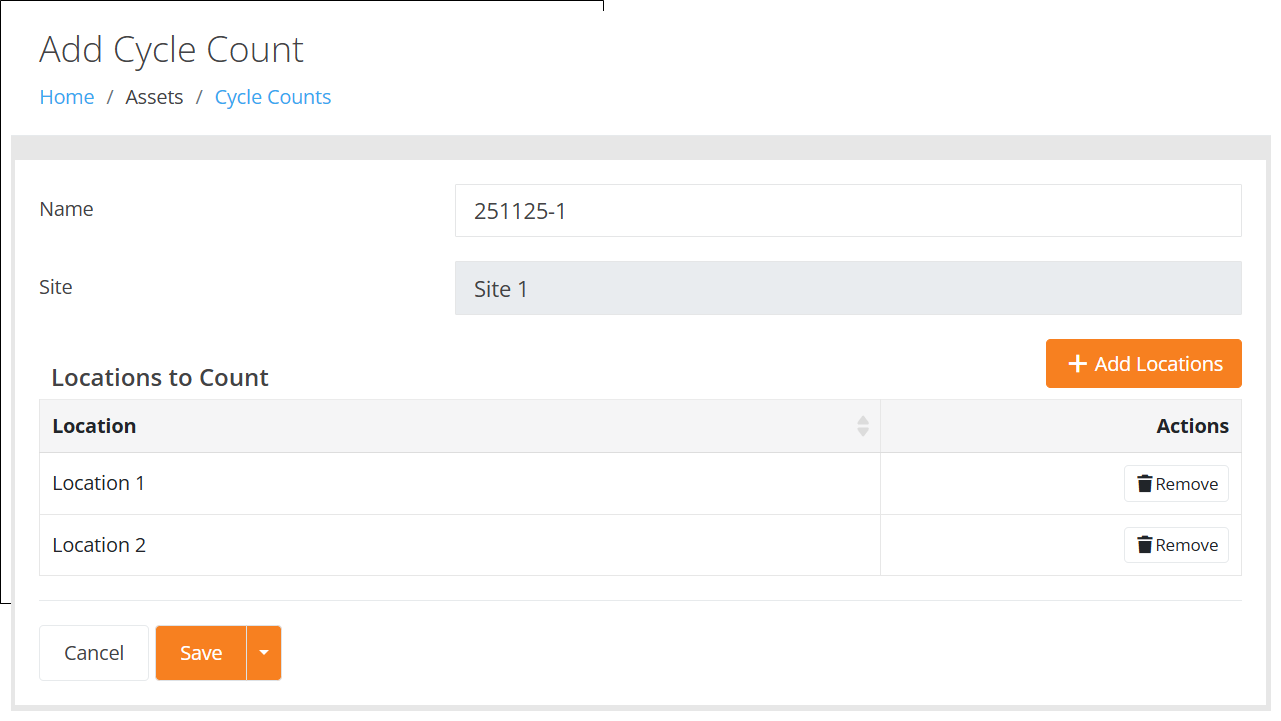
Location Area: If you want to remove a location from the cycle count, press the Remove button to the right of the Location in the Location grid.
Save: to Save the Cycle Count, press the Save button. The Cycle Count is saved. You are returned to the main Cycle Count screen.
Save & New and Save & Clone: Press the Down Arrow to view the Save & New and Save & Clone options.
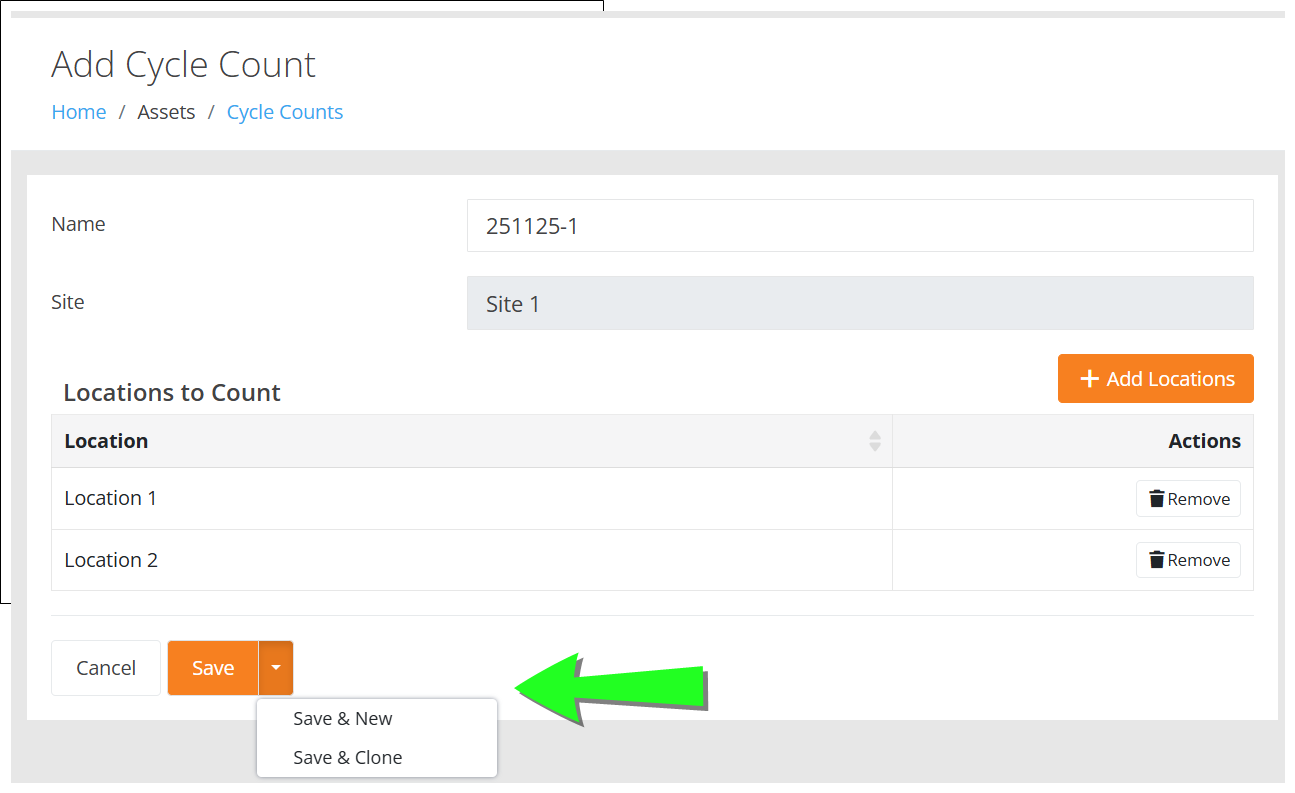
- Save & New: select this option to save the current cycle count and return to the Add Cycle Count screen. The Cycle Count Name increments by one. The Site and Locations are cleared from the screen. Add the Site and Location(s) and save the new cycle count.
- Save & Clone: select this option to save the current cycle count and clone it. You are returned to the Add Cycle Count screen. The Cycle Count Name increments by one. The Site and Locations of the previous cycle count remain selected. The cycle count is saved.
- Save: When you are finished adding the new cycle counts, press the Down arrow in the Save button and select Save to save the cycle count and return to the Cycle Counts page.
Adding a Cycle Count in the Mobile Client
Refer to the steps that follow to add a cycle count in IntelliTrack Mobile.
Note
To have this function in the Mobile Client, this function must be allowed for the Tenant via the Tenant Settings.
In the Mobile Client, go to the Home screen.
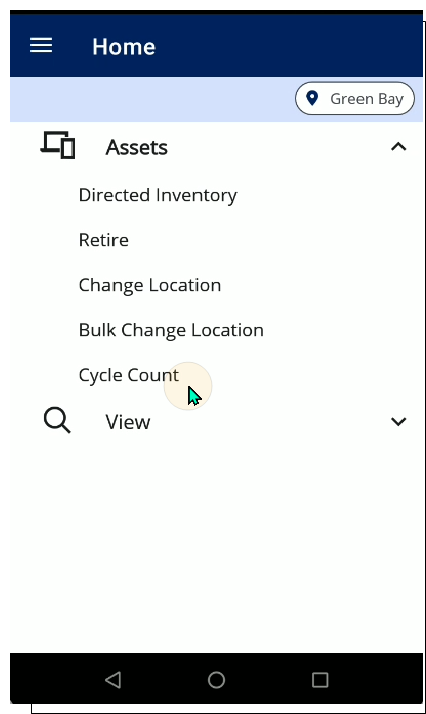
Select Assets > Cycle Count. The Cycle Count screen appears.
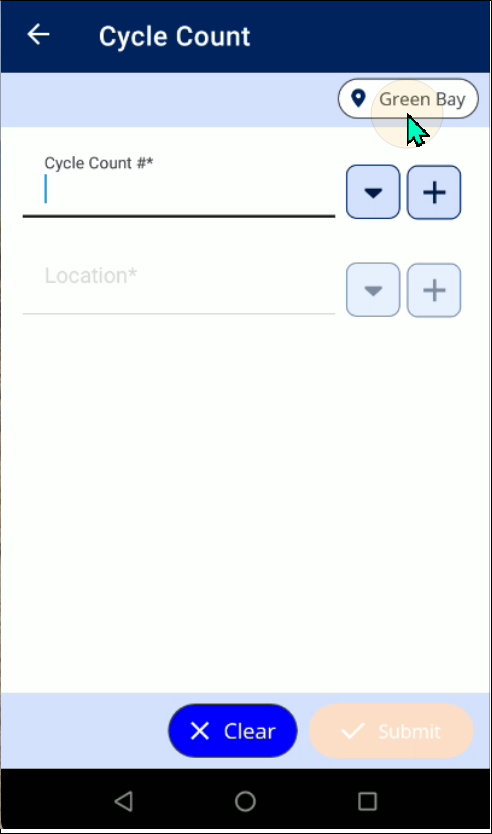
Cycle Count # field: press the Add button to the right of the field to add a new cycle count.
The New Cycle Count screen appears. The Cycle Count Name is automatically entered in the Cycle Count field. You may change the Cycle Count Name if desired.
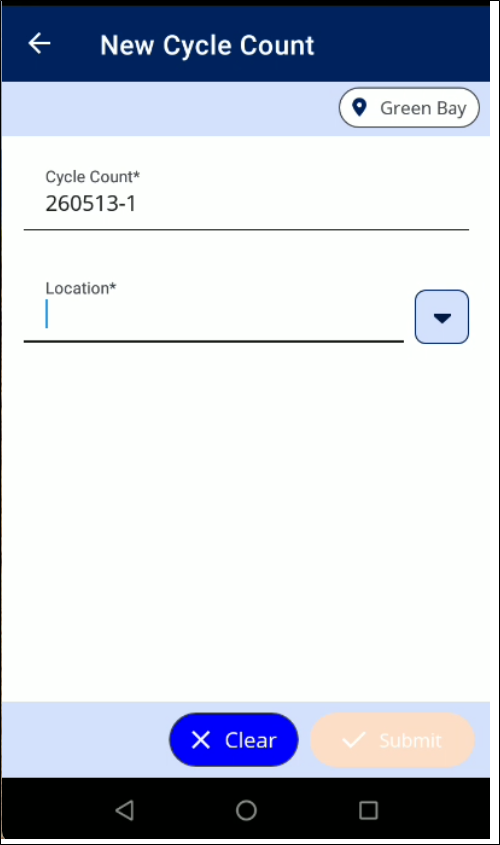
Site: A cycle count is set up by site. The default site is automatically set. You are able to change the cycle count site by pressing the Site button in the upper right area of the screen and selecting another site.
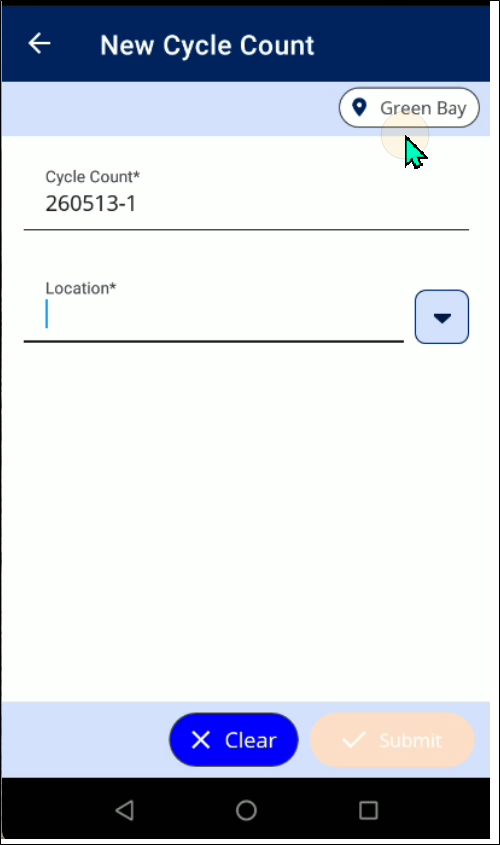
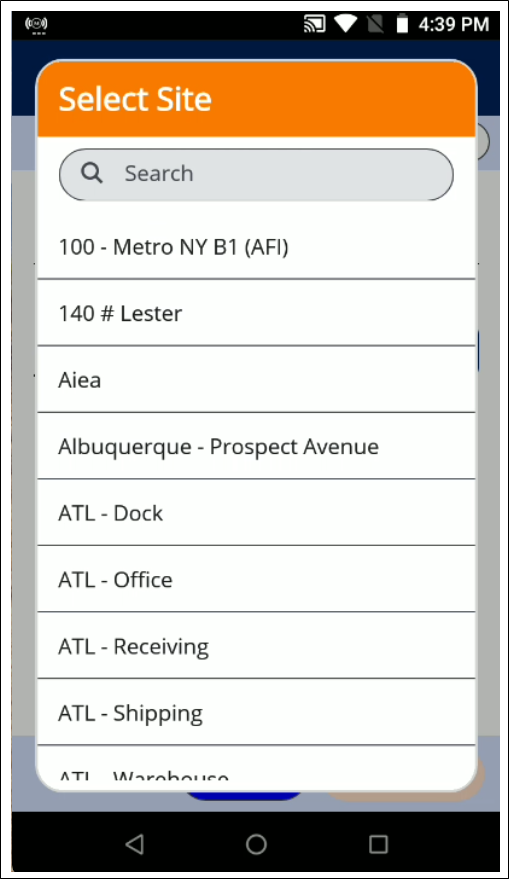
Location: Select the site-location for the cycle count by scanning the Location into the Location field or by pressing the down arrow in the Location field and selecting the Location for the count from the list that appears.
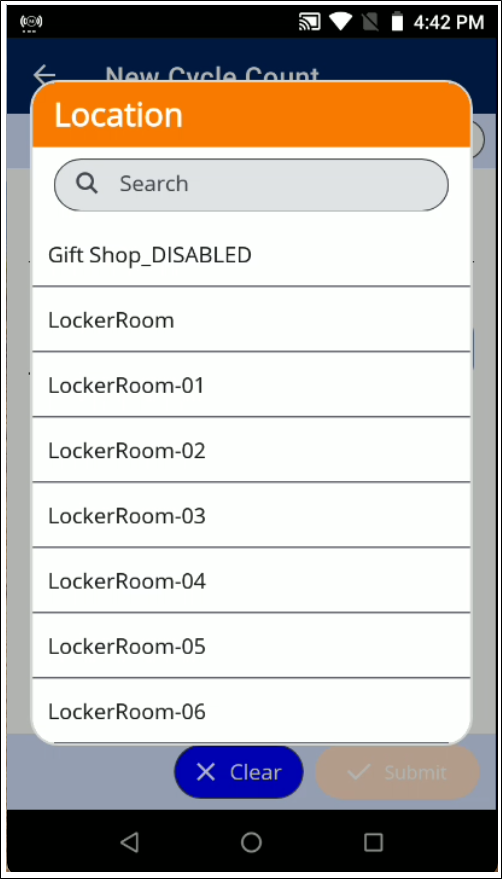
You are returned to the New Cycle Count screen. The Location is placed in the Location field. Press the Submit button.
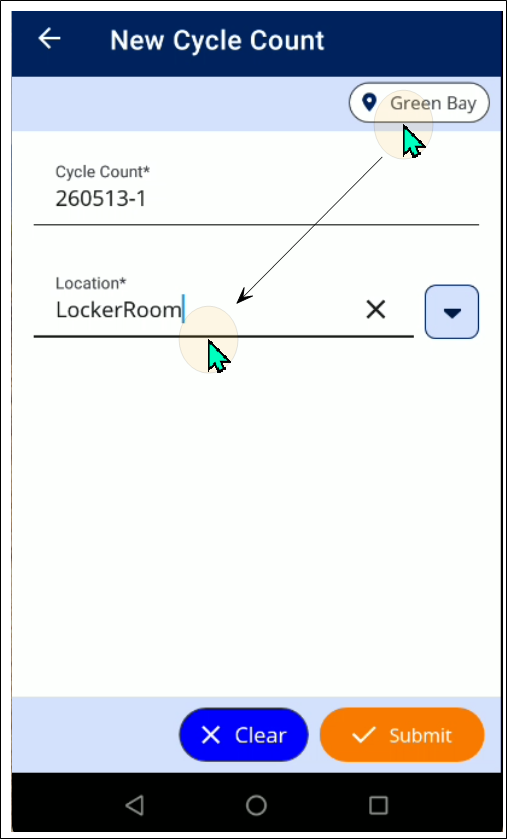
You are returned to the Cycle Count screen.
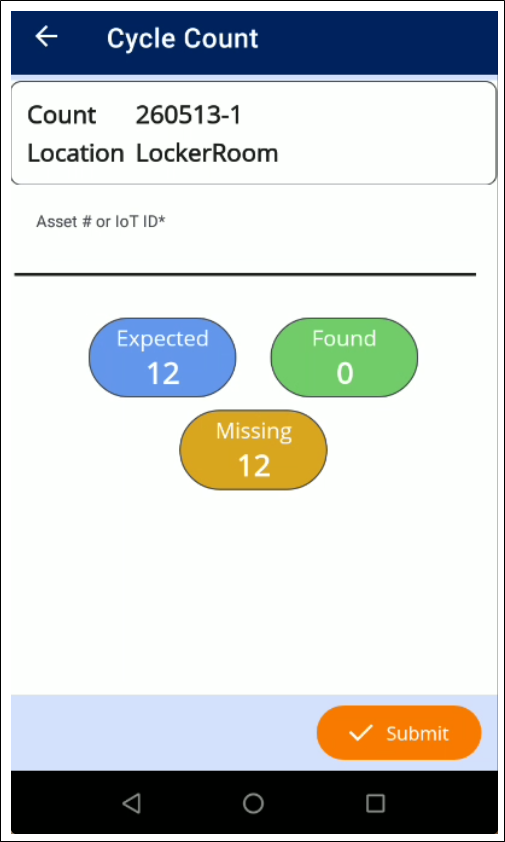
Asset # field: scan each asset that you count.
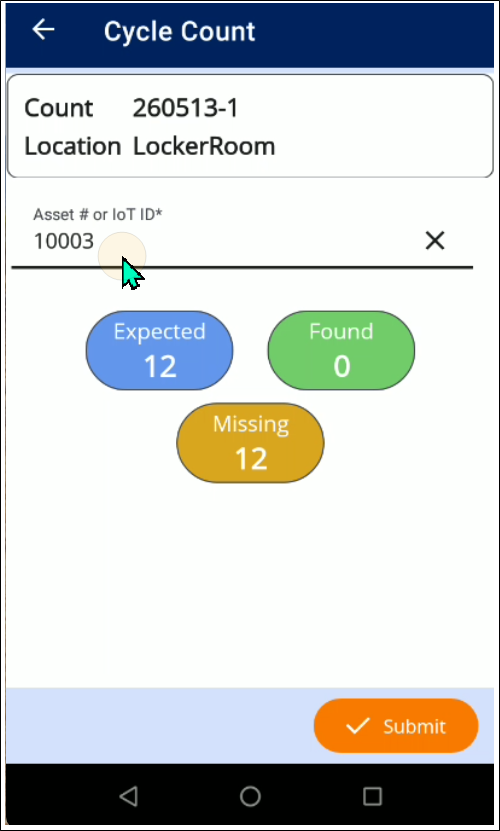
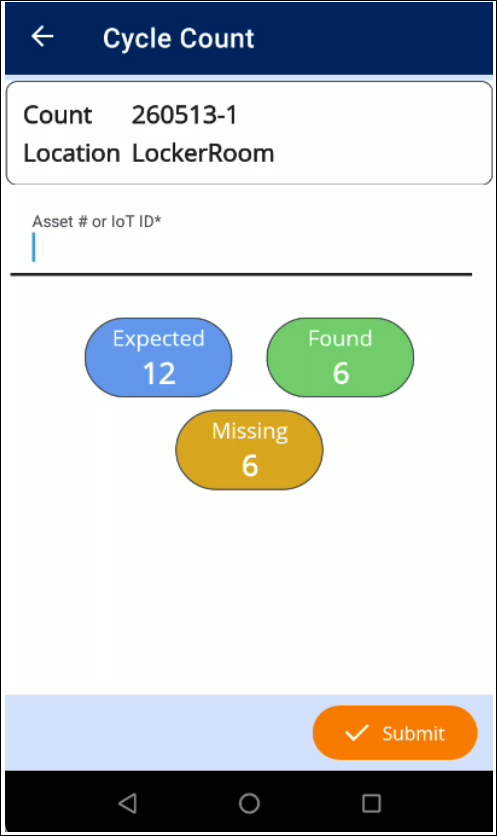
It is placed in the appropriate category for the cycle count:
- Expected: Assets that currently reside in the cycle count location are expected to be part of the cycle count and placed in the "Expected" category for the current count.
- Found: Assets in the "Expected" category that are counted in the current cycle count are placed in the "Found" category for the current count.
- Unexpected (Tenant Setting Dependent Category): If the Tenant Settings allow unexpected assets, an asset that is cycle counted during the current count, which does not reside in the current location is added to the cycle count as an "unexpected" asset.
- Missing: When an asset is currently found in the cycle count location but it is not included in the current cycle count, the asset is categorized as missing in this cycle count.
Press Submit to submit the cycle count.
Performing a Cycle Count
Important
Asset cycle counting is performed in the IntelliTrack Mobile Client.
Cycle Counting is performed from the IntelliTrack Mobile Client on a supported Android device. To get started with performing a cycle count, install the IntelliTrack Mobile Client on the device and open IntelliTrack Mobile. You are able to access open saved cycle counts from the Cycle Count screen in IntelliTrack Mobile.
Cycle Count Properties
The Cycle Count is based upon a Site-Location in IntelliTrack.
Note
The Cycle Count List is based upon the selected Site, which is displayed in the Site button.
If you want to view the Cycle Count(s) for another Site:
- Select the Site button to reach the Select Site popup.
- From the Select Site popup, select the Site that contains the cycle counts that you want to view.
Cycle Count Steps
To perform a cycle count, refer to the steps that follow.
In the Mobile Client, select Assets > Cycle Count from the Home screen.
The Cycle Count screen appears. (Make sure the Default Site selected for this Mobile Client session is the Cycle Count Site.)
Press the Down arrow in the Cycle Count# field.
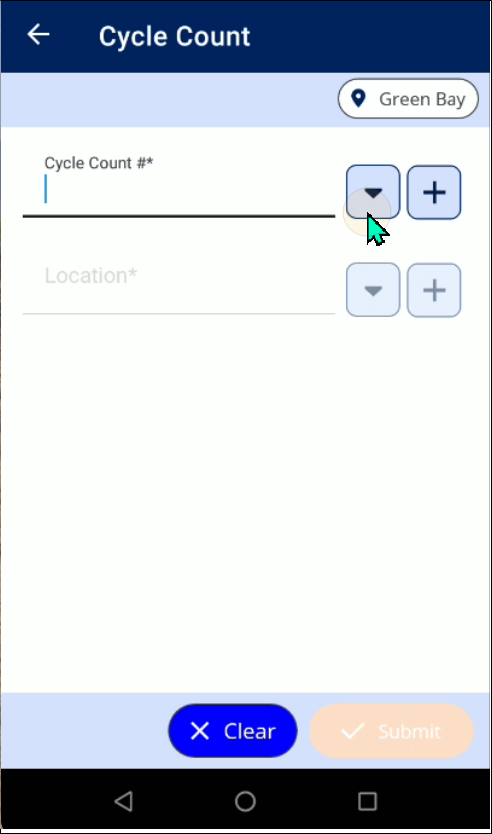
The Cycle Count popup appears. It displays the list of Cycle Counts for the Default Site selected for the Mobile Client (The Site button in the upper right area of the screen displays the selected site). The Cycle Count or Cycle Counts found in the mobile client's selected site appear in the list.
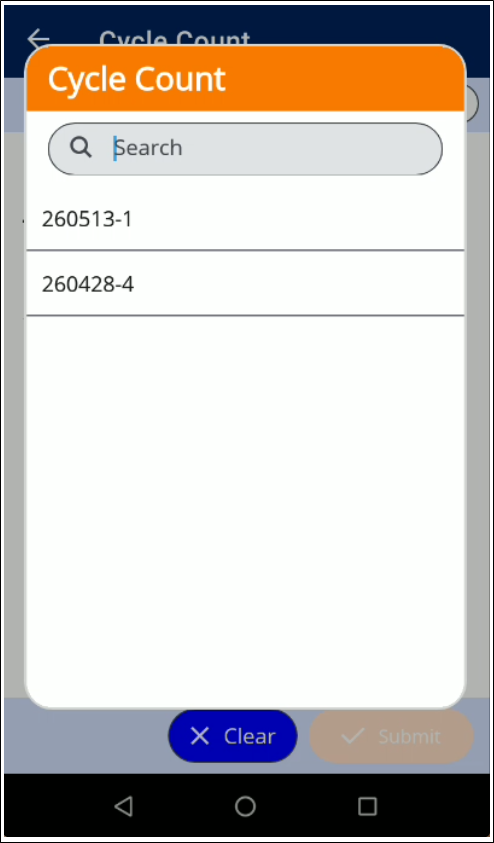
Select the Cycle Count. The Cycle Count popup closes. You are returned to the Cycle Count screen. The Cycle Count number is placed in the Cycle Count# field.
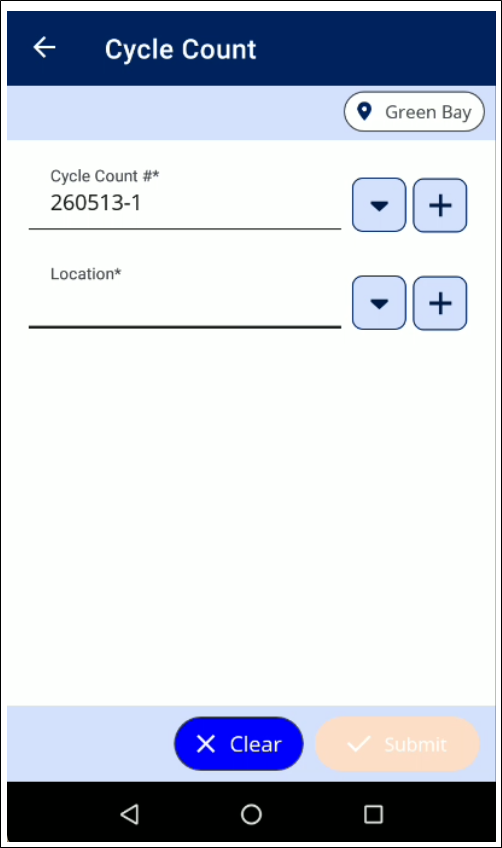
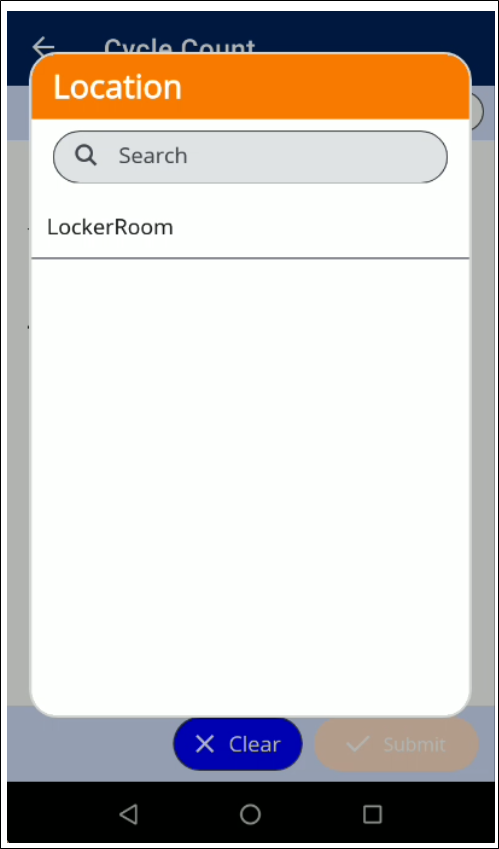
Location: you may select the count location that is already saved to the count by pressing the Down arrow to invoke the Location popup and select the Location from the popup.
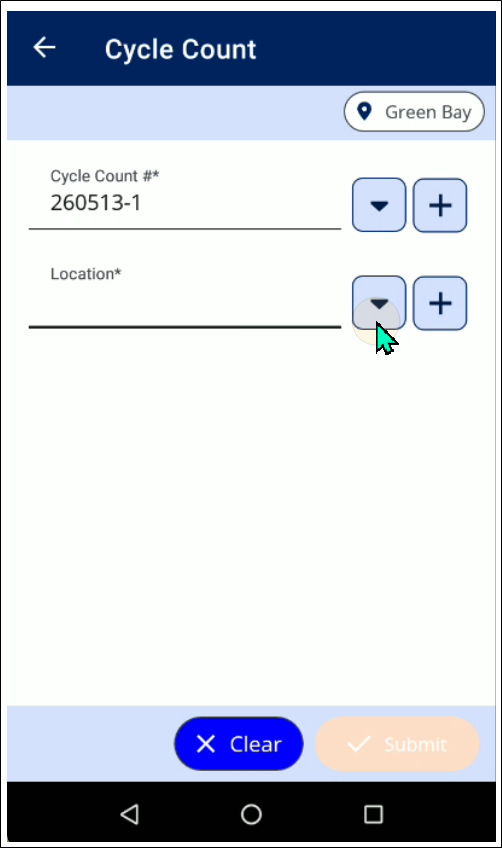
Location: if the Tenant is setup to allow this function, you may add another count location by pressing the Add button to reach the Add Count Location screen.
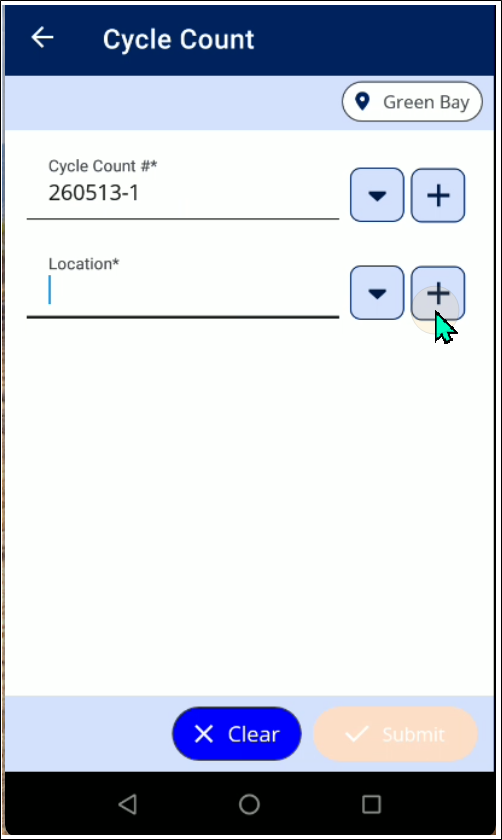
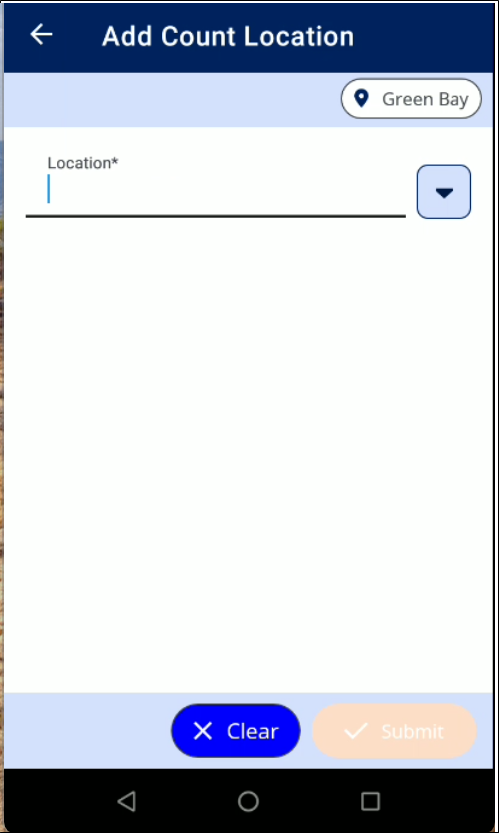
At the Add Count Location screen, press the Down arrow in the Location field to invoke the Location popup. Select the new cycle count location from the Location list.
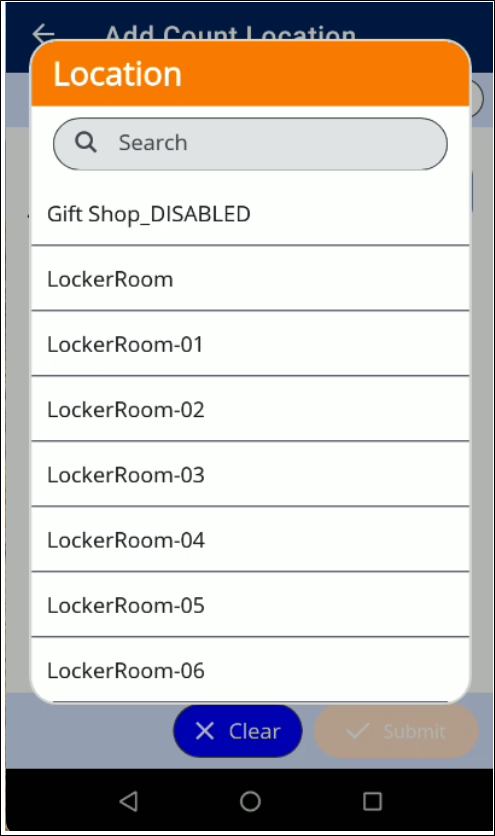
The Location popup closes. You are returned to the Add Count Location screen. The new count location is placed in the Location field. Press the Submit button.
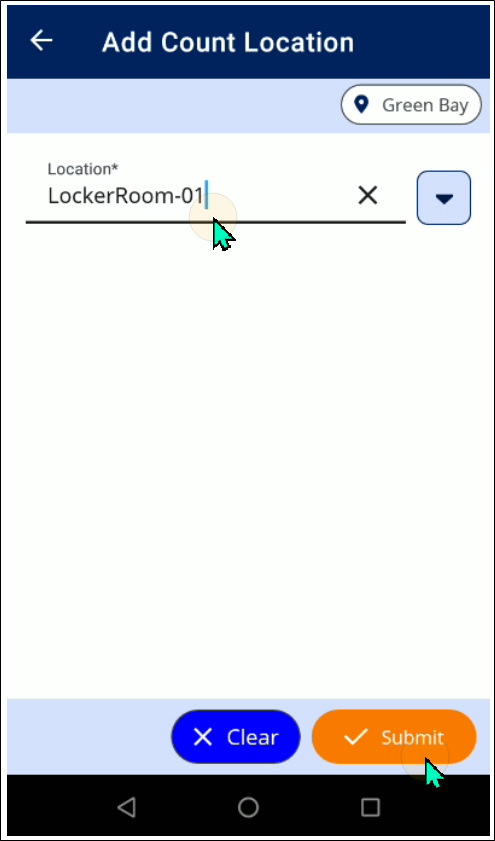
When you have selected the Cycle Count Location, press Submit. The Cycle Count screen loads onscreen.
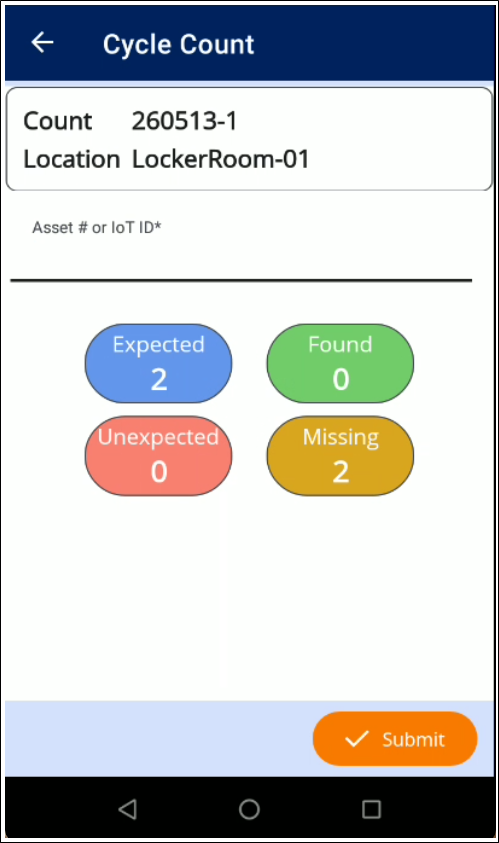
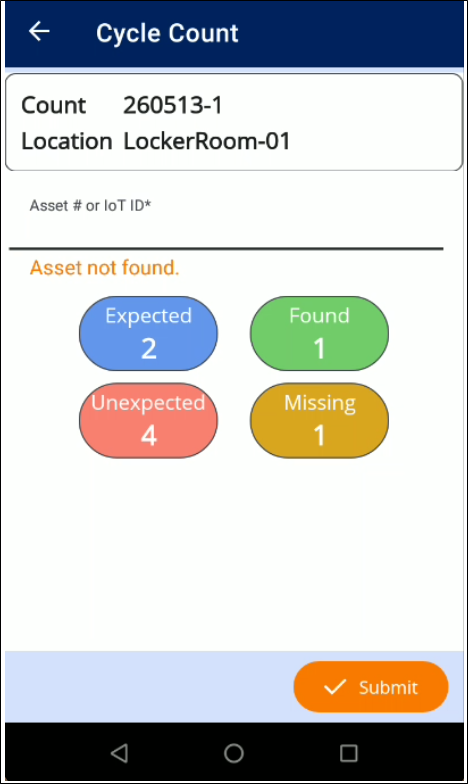
Asset# field: scan each asset that you count. It will be placed in the appropriate category:
Tip
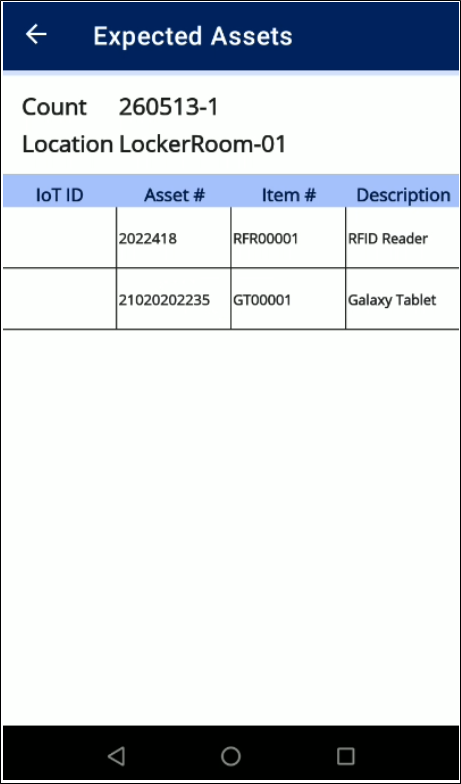
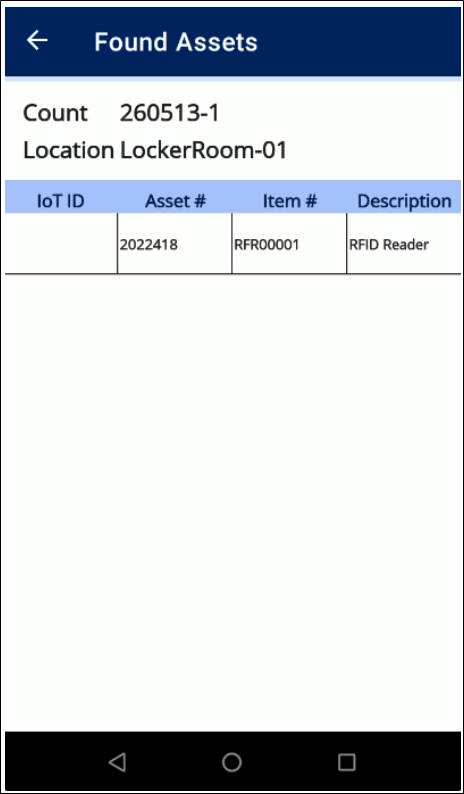
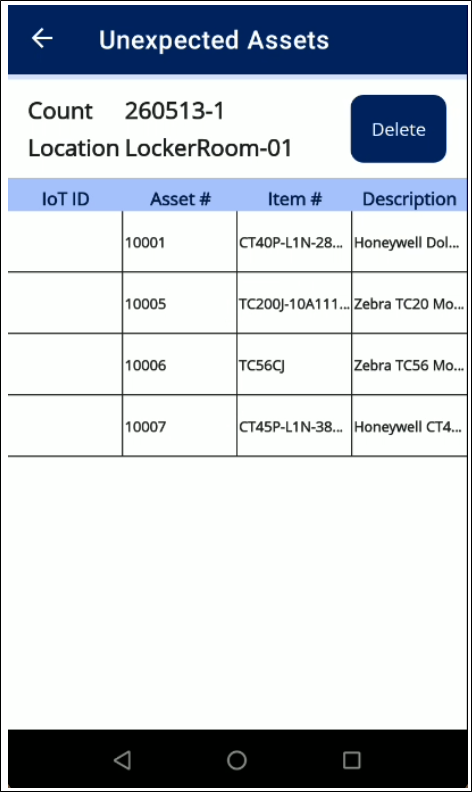
You are able to view the scanned assets for each category by pressing on the appropriate button. To return to the Cycle Count screen, press the back arrow from the Expected, Unexpected, Found, and Missing screens.
Note
To View Unexpected and Missing assets as part of the Count, two conditions must be met. The Tenant must be setup to allow them into the count. If the Tenant is setup to allow them into the count, AND the count contains them, they are added to the count.
Expected: Assets that currently reside in the cycle count location are expected to be part of the cycle count and placed in the "Expected" category for the current count. Tap the Expected button to view the Expected Assets.
Found: Assets in the "Expected" category that are counted in the current cycle count are placed in the "Found" category for the current count. Press the Found button to view the asset(s) found during the cycle count.
Unexpected: (Tenant Setting Dependent Category): If the Tenant Settings allow unexpected assets, an asset that is cycle counted during the current count, which does not reside in the current location is added to the cycle count as an "unexpected" asset.
Missing: When an asset is currently found in the cycle count location but it is not included in the current cycle count, the asset is categorized as missing in this cycle count.
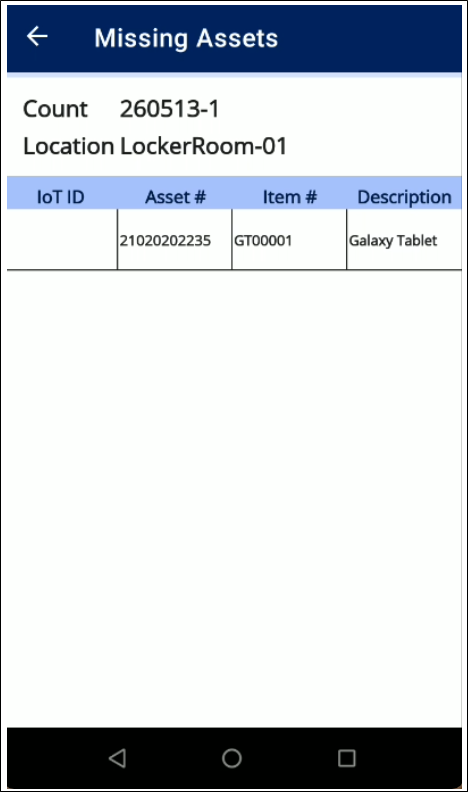
Press Submit to submit the cycle count. The count will be updated and ready for processing. The cycle count is processed.
After the cycle count is submitted, the cycle count is updated to reflect the submitted cycle count. You are able to view the Cycle Count information at the View Cycle Count page in the web application.
Working with the Cycle Count
The Cycle Counts are listed at the Cycle Counts page in the web application. Select Home > Assets > Cycle Counts from the main menu bar to reach this page.
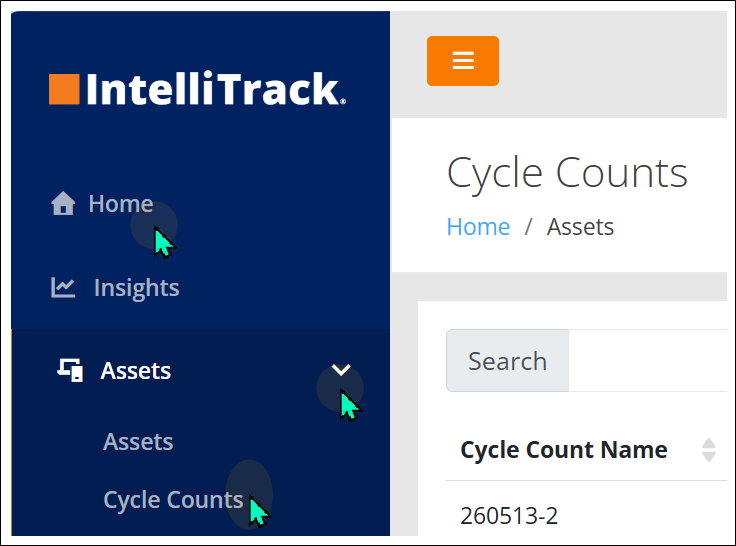
- View the Cycle Count List from this page.
- Close the Cycle Count from this page.
Page Features
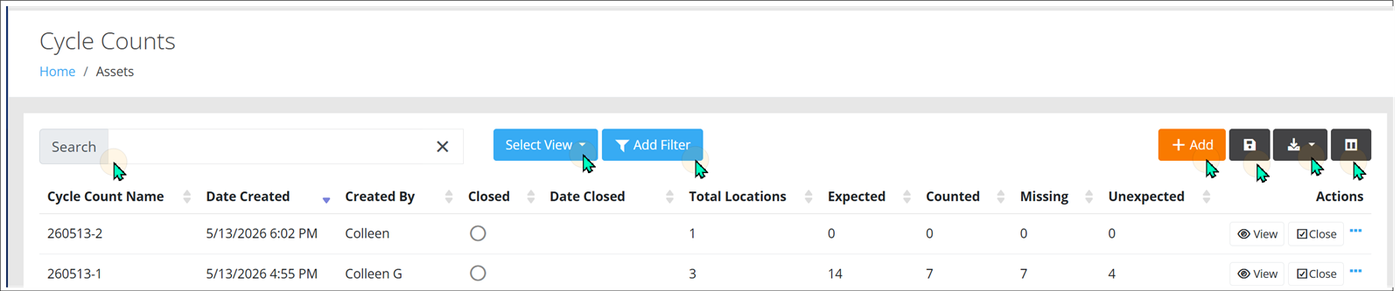
The page consists of a header area and a grid.
Header Area
The page consists of a Header Area above the grid. It contains the following features:
A Search bar allows for full page text searching.
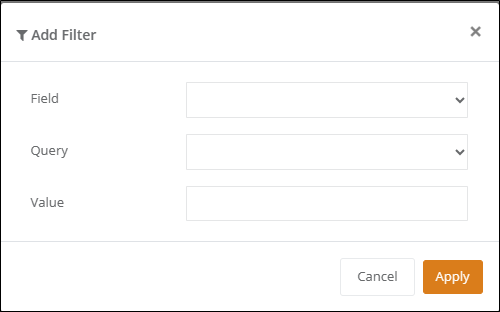
The Add Filter feature allows for building a data query on a specific field.
Add a Cycle Count by pressing the Add button.
Save a View by pressing the Save button.
Note
A View can consist of changes to the Columns by using the Manage Columns function and the Add Filter Query function.
The data on this page can also be exported from IntelliTrack into an Excel compatible CSV file via the Export > CSV option.
Press the Manage Columns button to reach the Manage Columns window. Add or Remove Optional Columns from the page via the Manage Columns window.
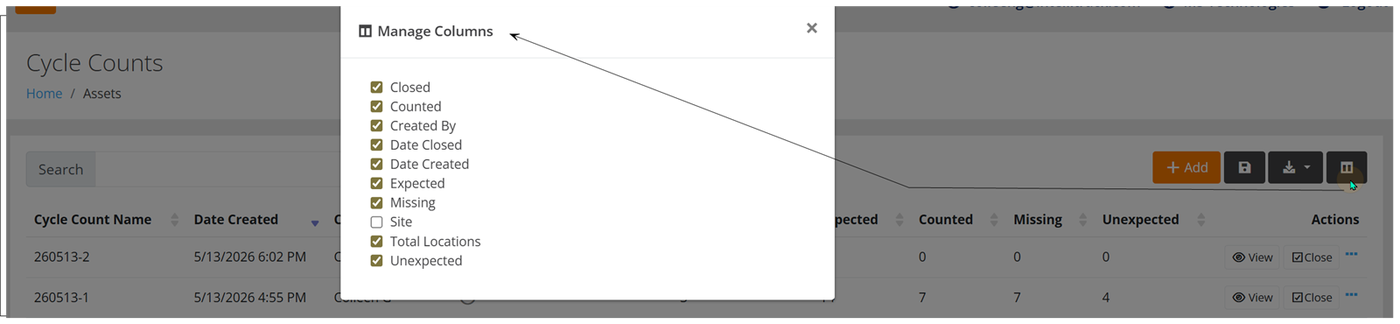
Grid Area
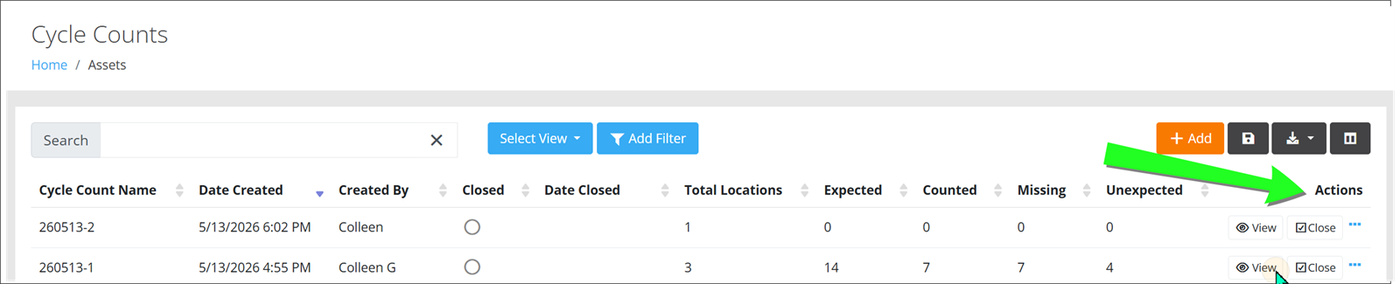
The grid area consists of the Cycle Count Name and the information that surrounds the Cycle Count. The following information is included in the default page view.
- Cycle Count Name: name of the cycle count.
- Date Created: date the cycle count was created.
- Created By: name of the User who created the cycle count.
- Closed: check mark indicator of whether the cycle count is closed.
- Date Closed: date the cycle count was closed.
- Total Locations: amount of locations included in the cycle count.
- Expected: amount of assets expected in the cycle count location.
- Counted: amount of assets counted in the cycle count.
- Missing: amount of expected assets not counted in the cycle count location.
- Unexpected: amount of unexpected assets counted in the cycle count location.
Actions
At the Cycle Counts page, the Actions area has options for viewing, closing, cloning, and deleting the cycle count.
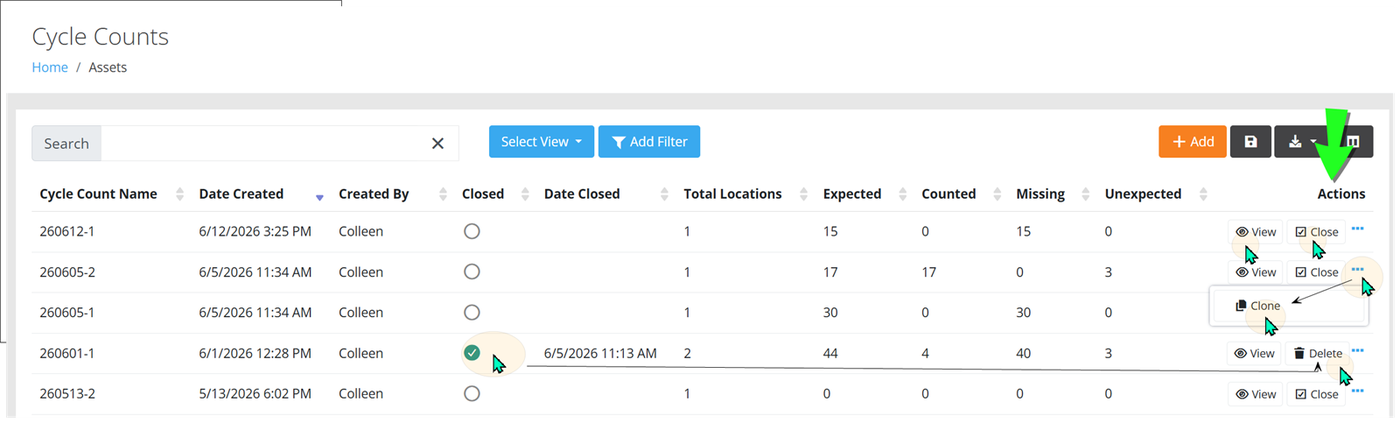
View Cycle Count
Press the View button to reach the View Cycle Count page, and view details of the assets in the count. Please see "View Cycle Count Details" for more information.
Close Cycle Count
Press the Close button to close the Cycle Count.
When the count does not include any unexpected assets, the following popup appears. It contains a Process Counts setting, Perform Updates and Create History, which is enabled by default. Press Save to perform updates and create history; this will set the date for all counted assets and close the cycle count.
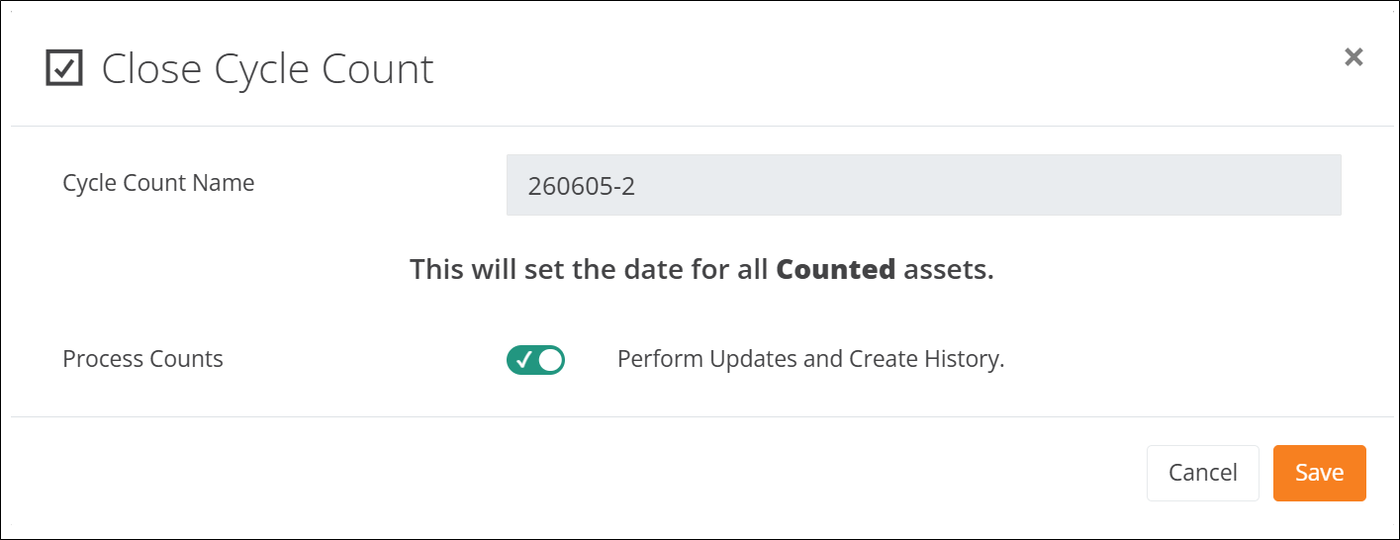
When the count includes unexpected assets, two settings appear in the popup: Process Counts and a setting for the Unexpected Assets, Move to Counted Location. By default the Unexpected Assets, Move to Counted Location setting is disabled.
To process the counts for the expected assets and disregard the unexpected assets, leave the Process Counts setting, Perform Updates and Create History, Enabled and the Unexpected Assets setting, Move to Counted Location, Disabled, and press Save to close the count, set the date as cycle counted for all expected counted assets and disregard the unexpected counted assets.
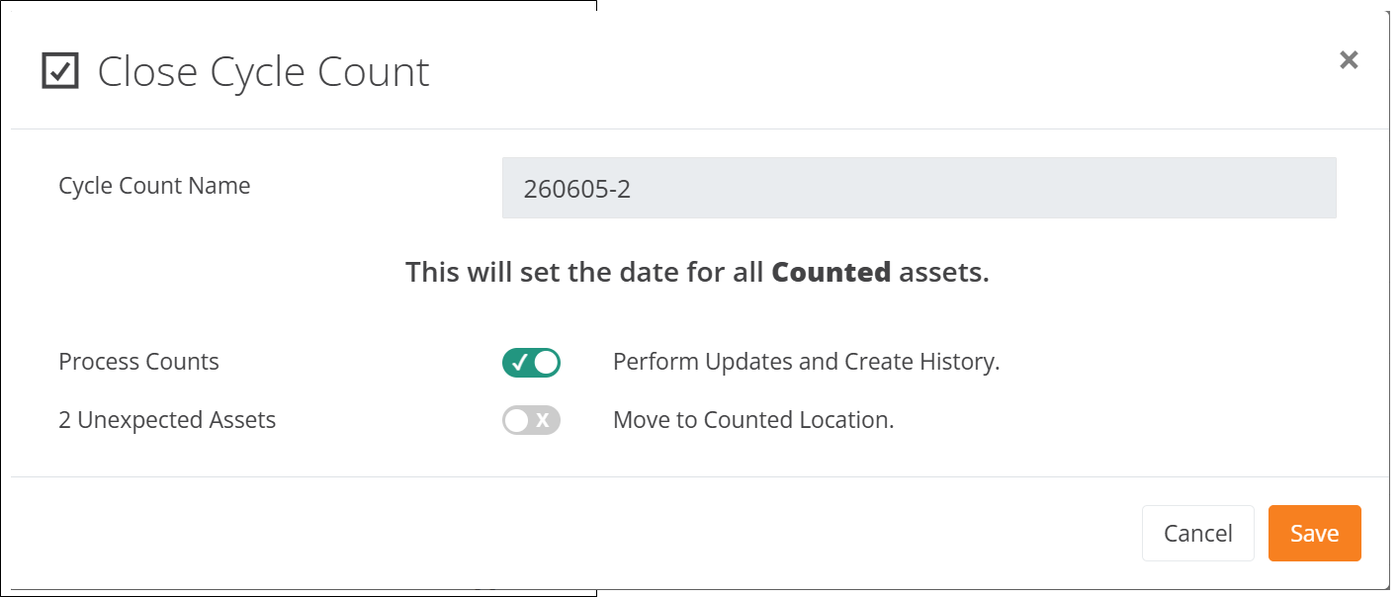
To move the Unexpected Assets into the count: enable the Move to Counted Location setting to Enabled. Press Save. The "expected" assets will have the date set for cycle counted and the "unexpected" assets will be moved to the counted location and have the date set for cycle counted.
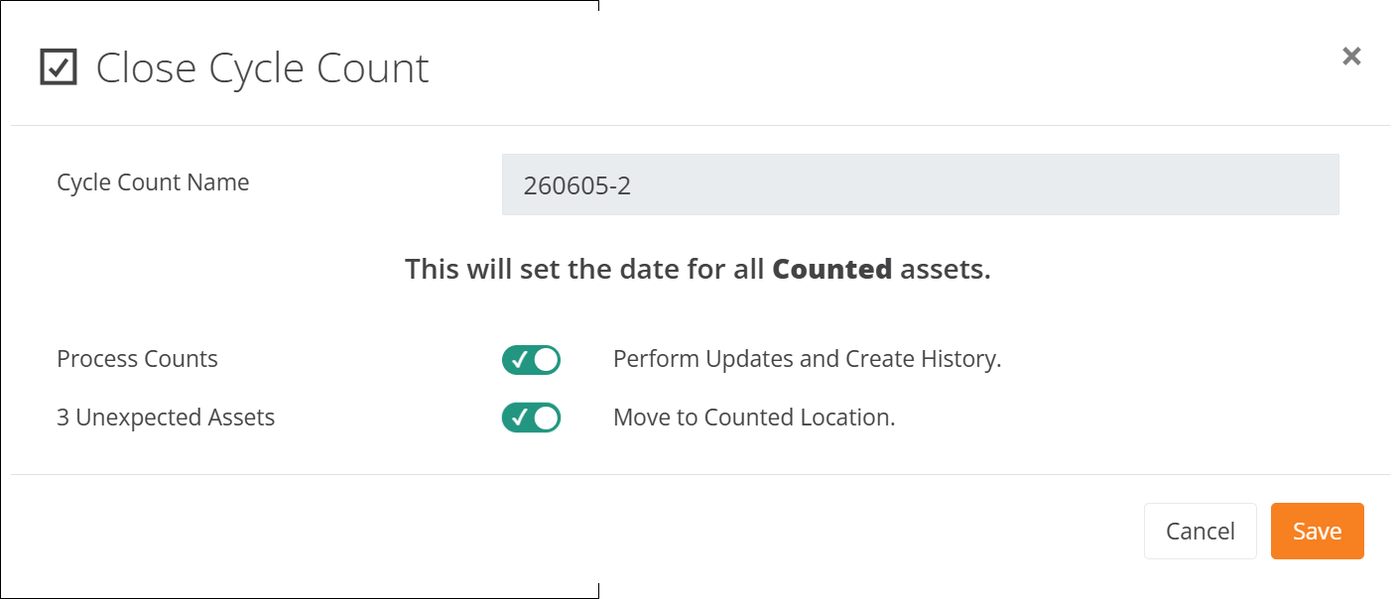
Clone Cycle Count
Press the ... More Actions button to reach the Clone button to create another cycle count by cloning this cycle count.
Delete Cycle Count
Important
The Delete option is only available for a Closed Cycle Count.
When the Cycle Count is Closed, you may delete it from the list by pressing Delete button.
View Cycle Count Details
When the cycle count is submitted from the mobile client, the details of the Cycle Count are available for viewing at the View Cycle Count page. Press the View button in the Actions area of the grid (far right area) to reach the View Cycle Count page.
View Cycle Count Page
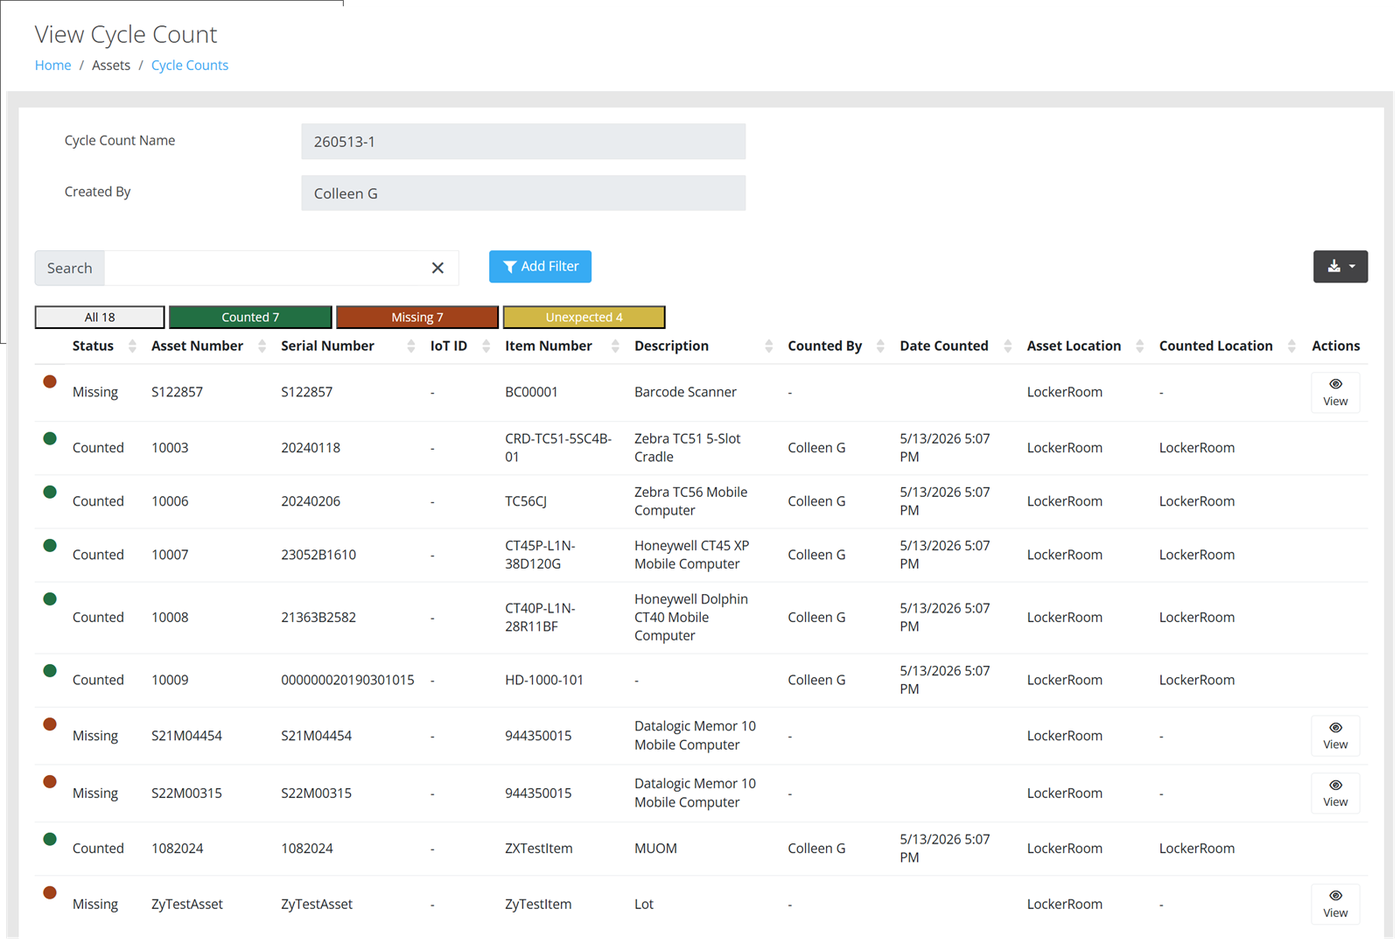
The View Cycle Count page displays the details of the Cycle Count. It includes a Search bar for full text searching.
For each asset, the following information is displayed in the grid area of the page.
Status: Asset count status; either missing from the count or counted.
Asset Number: number of the asset that was counted.
Serial Number: serial number of the asset that was counted.
IoT ID: IoT ID of the asset that was counted.
Item Number: number of the item associated with the asset.
Description: asset's description.
Counted By: name of the User who performed the cycle count.
Date Counted: date of the cycle count.
Asset Location: where the asset currently resides in the system.
Counted Location: where the asset resided the count was conducted.
Actions: At the View Cycle Count page, actions are available for the asset according to their count category.
Counted Assets - The Actions column does not have any actions for assets that are counted as expected in the cycle count.
Missing Assets - A View button is available for assets "missing" from the count. Press the View button to reach the View Asset page for this asset.
Unexpected Assets - The Accept and Remove buttons are available for assets in the count that are "unexpected." Press Accept to move this asset into the count as an accepted asset. Press Remove to remove this asset from the count.
Chapter 9 - Containers
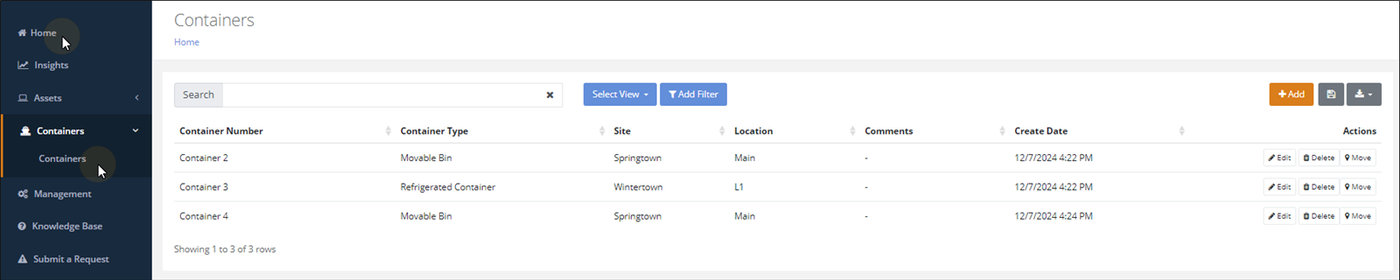
A Container is a movable storage unit. It is separate from the Location list. Containers are managed from the Containers page.
Select Home > Containers > Containers to reach this page.
Adding a Container
From the Containers page, select the Add button.
The Add Container page appears.
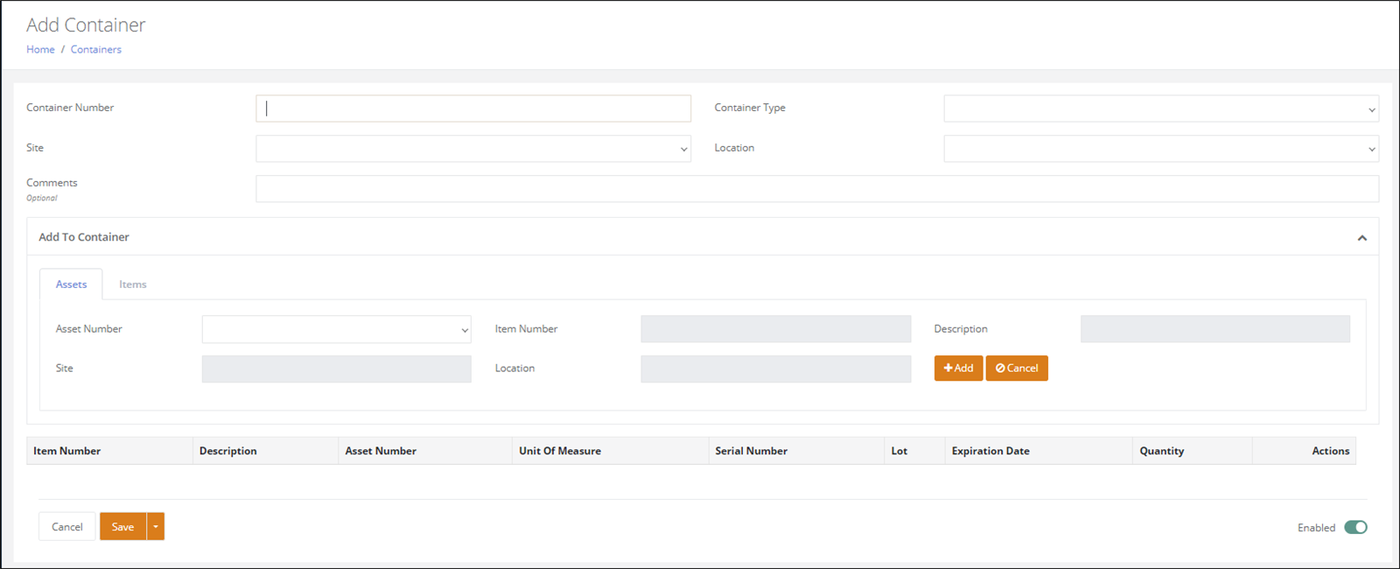
Container Number (required): add a Container Number.
Container Type (required): select a Container Type from the list.
Site: select a Site from the list.
Location: select a Location from the list.
The Container may be saved when this information is added to it. To add an asset or assets into the Container, see the next section.
Adding Assets to a Container
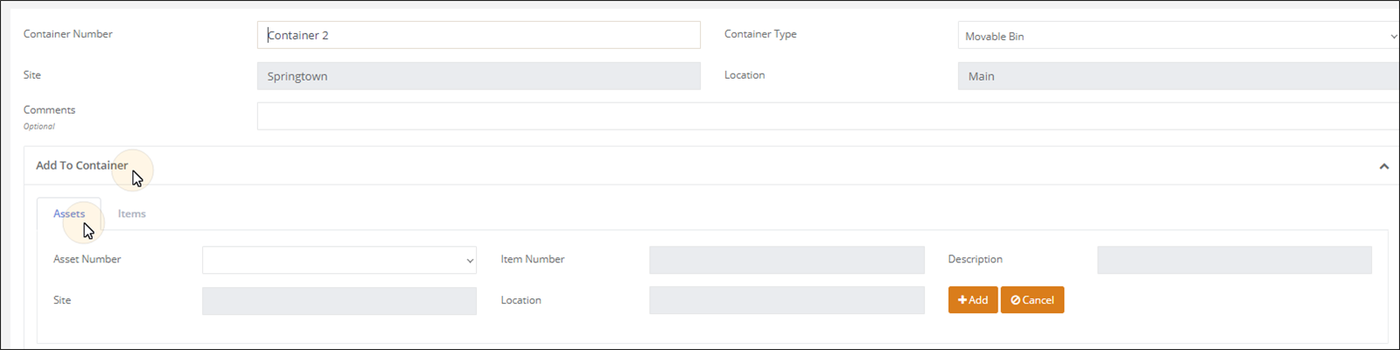
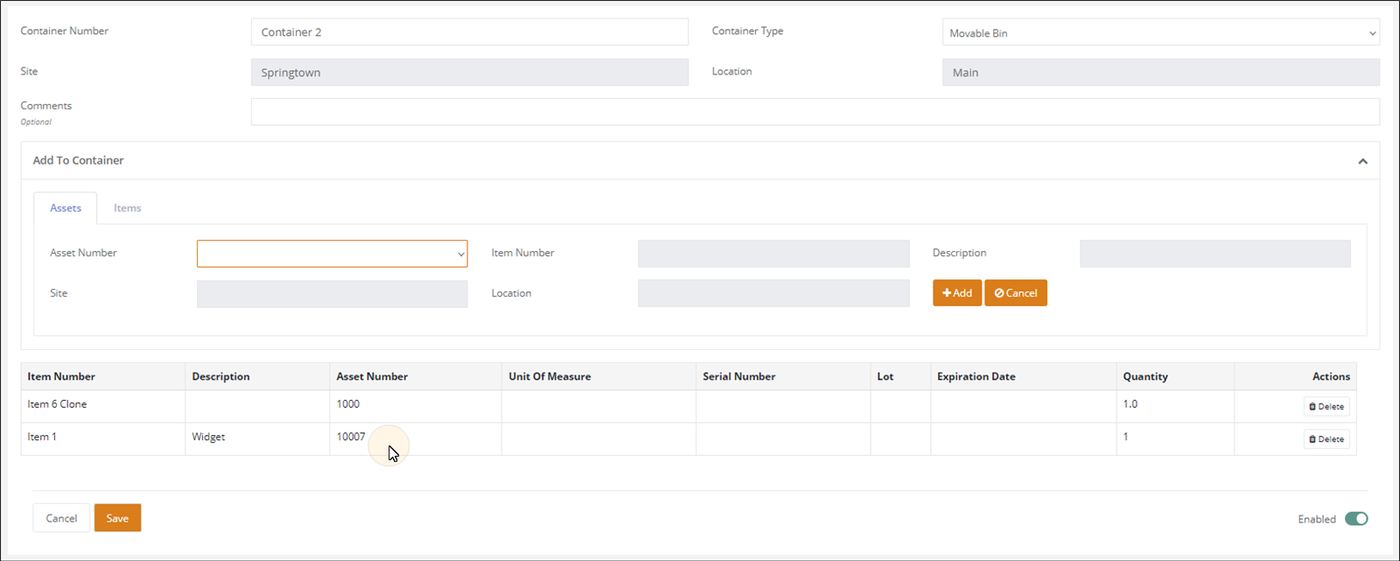
When an asset is added to a Container, it is moved from its site-location into the container. An asset is added to the container at the Add Container page or Edit Container page via the Add to Container section of the page.
Note
The Fixed Assets bundle only supports moving assets into a Container. To move items into a Container, the Consumable Inventory bundle is required.
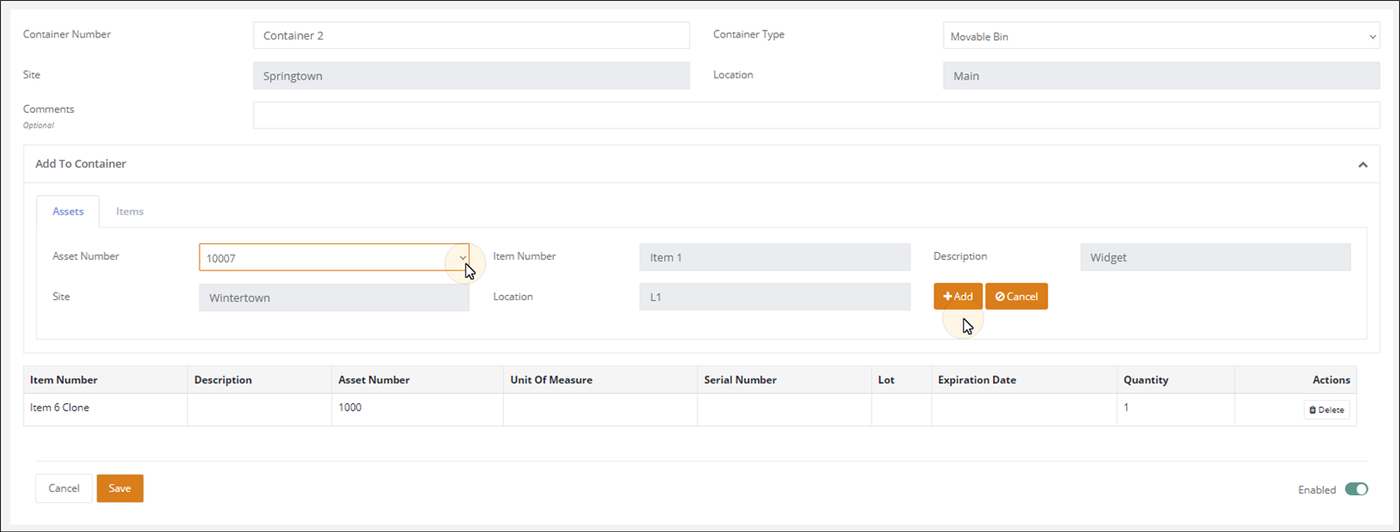
Asset Number: press the drop-down arrow to view the Assets that may be added to the container.
Note
An asset must be in a site-location to be added to a container.
- Item Number: the item associated with this asset automatically appears in this field.
- Description: the description of the item associated with the asset automatically appears in this field, if applicable.
- Site: the site the asset resides in automatically appears in this field.
- Location: the location the asset resides in automatically appears in this field.
Press the Add button to add this Asset to the Container. Continue until you are finished adding the assets and then press the Save button. The Assets are saved to this Container.
Moving a Container
A Container is moved from the Containers page.
Note
Any assets in the container are also moved with it.
To move a container into another Site-Location, press the Move button for the Container. The Move button is found in the Actions column.
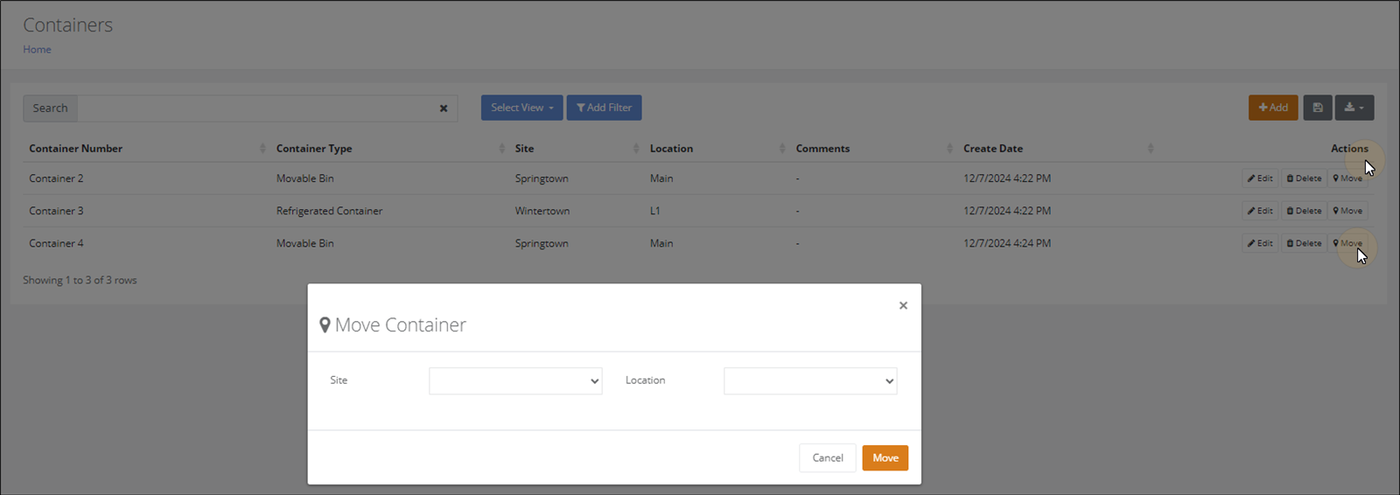
- In the Move Container popup, press the drop-down arrow in the Site field and select the Site for the Container move.
- Next, press the drop-down arrow in the Location field and select the Location for the Container move.
- Then, press the Move button to close the popup and move the Container into this Site-Location.
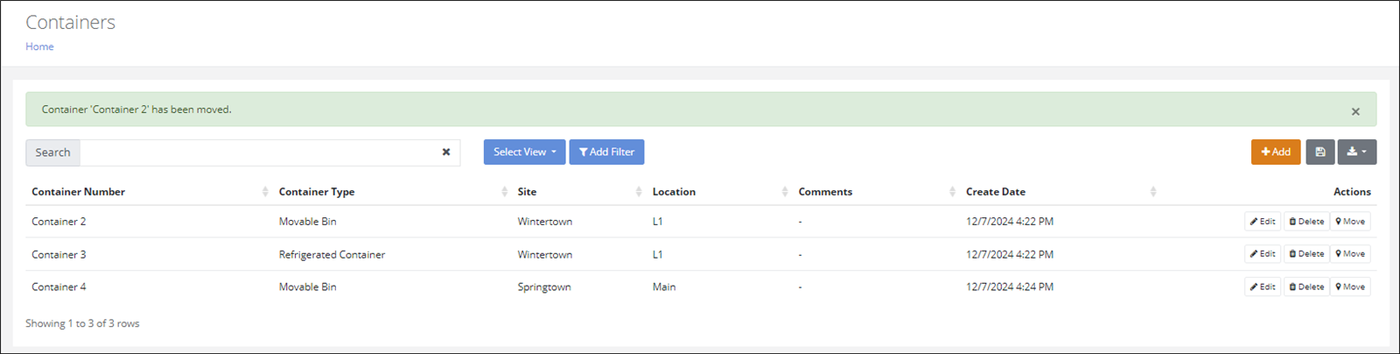
- You are returned to the Containers page, a message appears along the top of the page to notify you that the move was successful.
Chapter 10 - Insights
The system provides you with data insights at the Insights page (Main > Insights). You may mark multiple reports or dashboards as a “Favorite”. When you mark a report or dashboard as a “Favorite” at the Insights page, a link to this page is created at the Home page as well under My Favorite Insights.
Select Home > Insights to reach the Insights page.
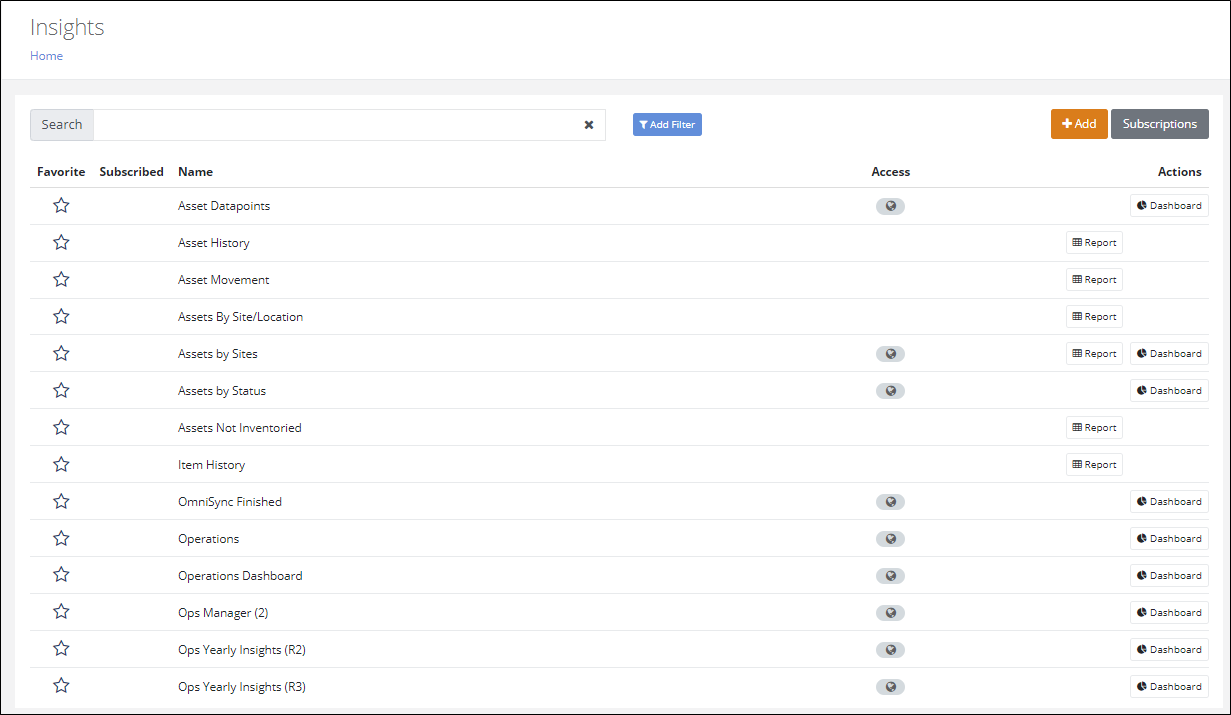
Important Insights for the Fixed Assets bundle are found at this page and are discussed in the section that follows.
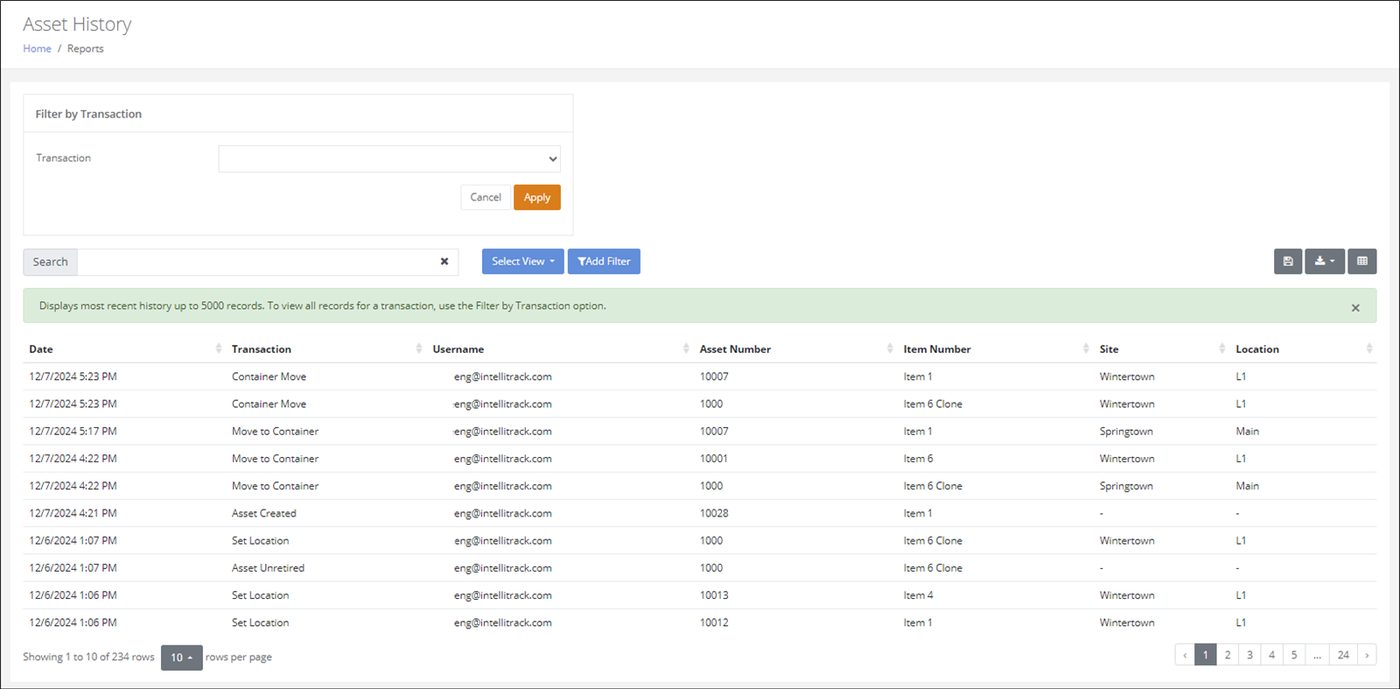
Asset History
The Asset History report (Home > Insights > Asset History > Report button) shows a full asset transaction history log for the Tenant.
Asset Movement Report
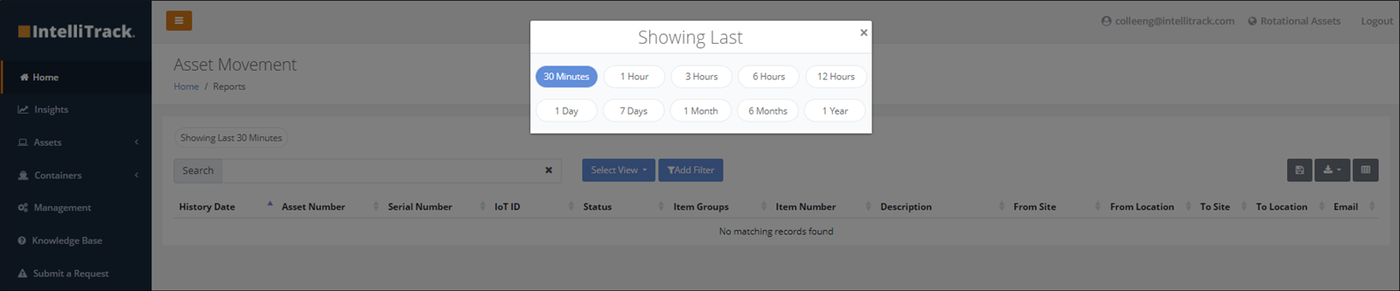
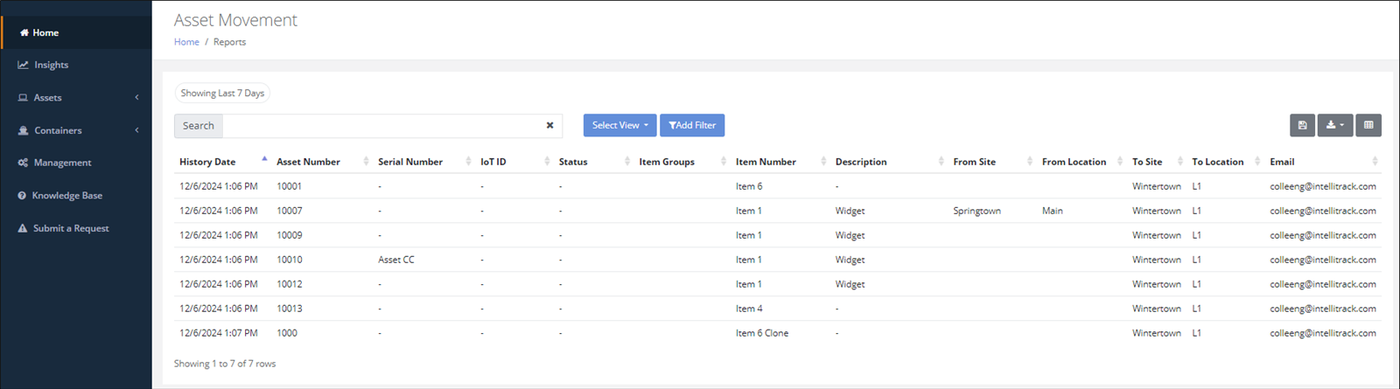
The Asset Movement Report shows asset movement based on a selected time frame. Select Home > Insights > Asset Movement > Report button to reach this report. In the Showing Last popup select the time frame for which you want to see asset movement in the Tenant.
Assets by Site and Location
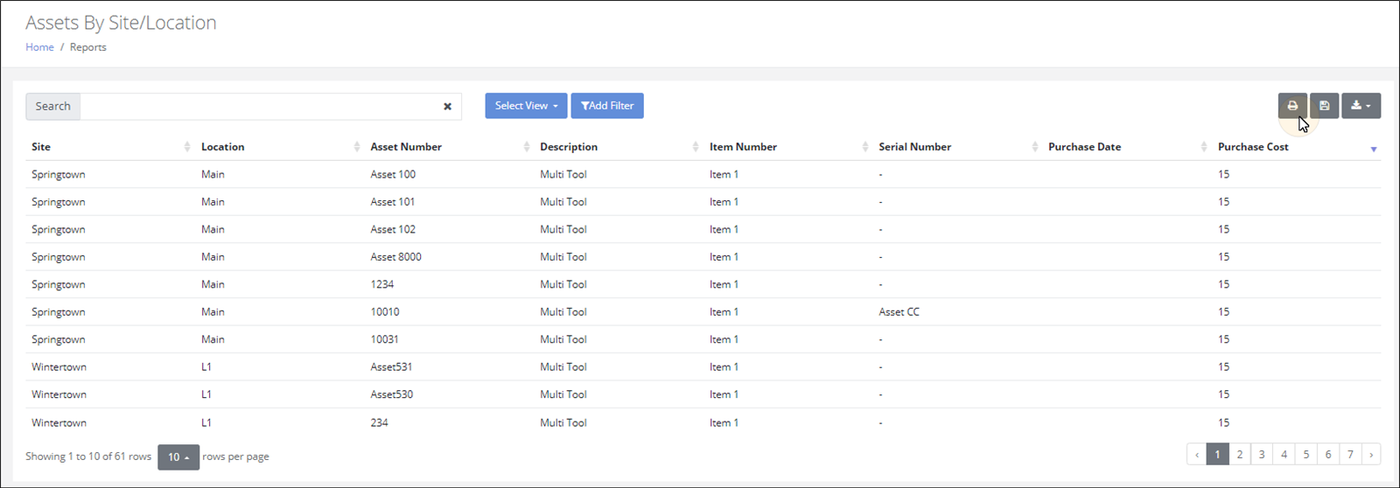
This report shows all assets by site-location and total the cost of the assets in the location when the asset has a purchase cost. This report may be sent to the printer or saved to PDF via the Print button option. It is designed to be a formatted report for printed output. Select Home > Insights > Assets by Site/Location > Report button to reach this report.
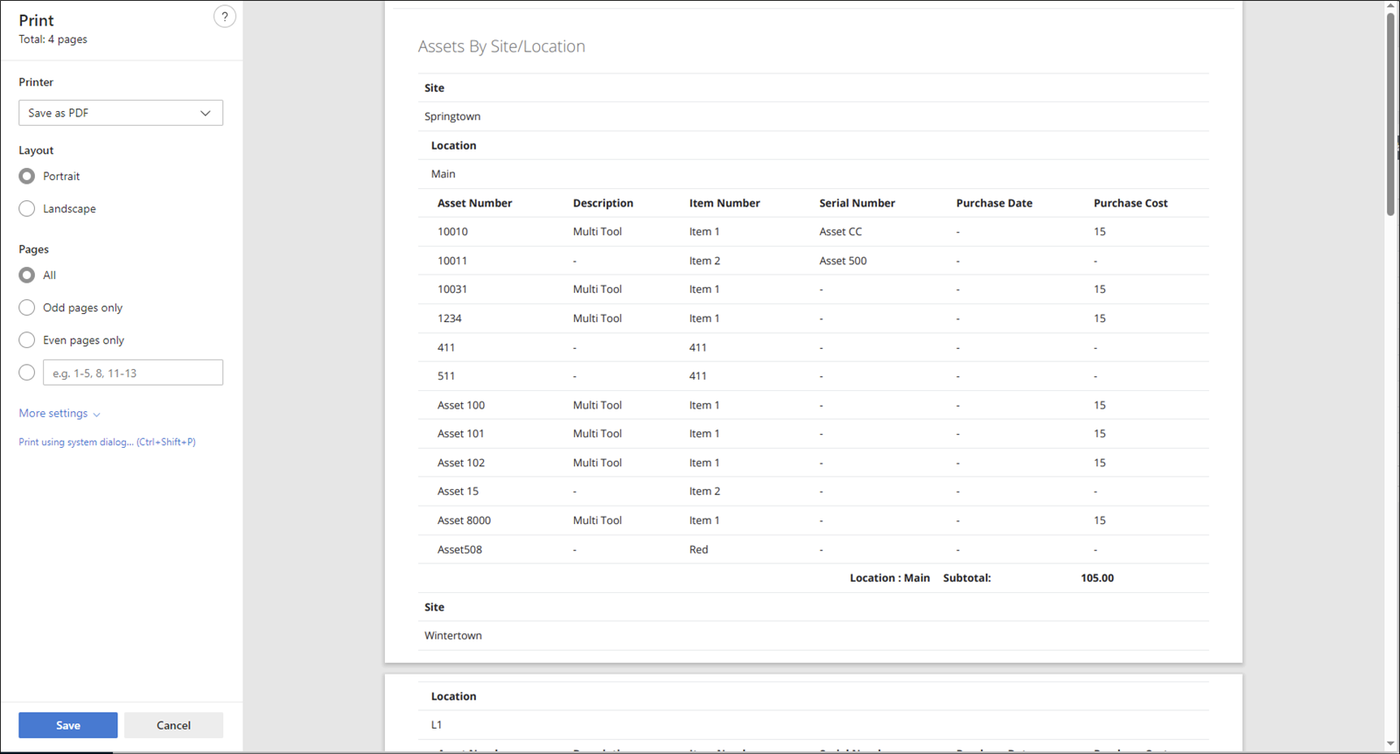
Assets by Sites
This report shows Assets by Sites along with a hyperlink to the Assets page to view the asset list by site there. Select Home > Insights > Assets by Sites > Report button to reach this report.

Assets Not Inventoried
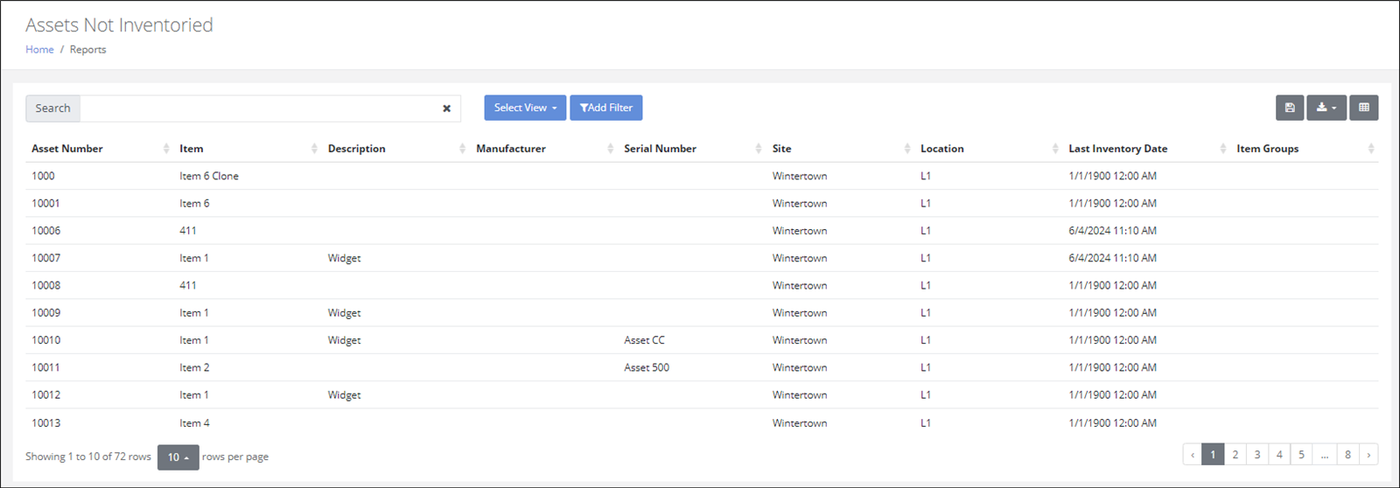
This report is designed to show assets not inventoried in a time frame. Select Home > Insights > Assets Not Inventoried > Report button to reach this report.
Note
If the Asset has never been inventoried, the Last Inventory Date displays 1/1/1900 12:00 AM.
Item History
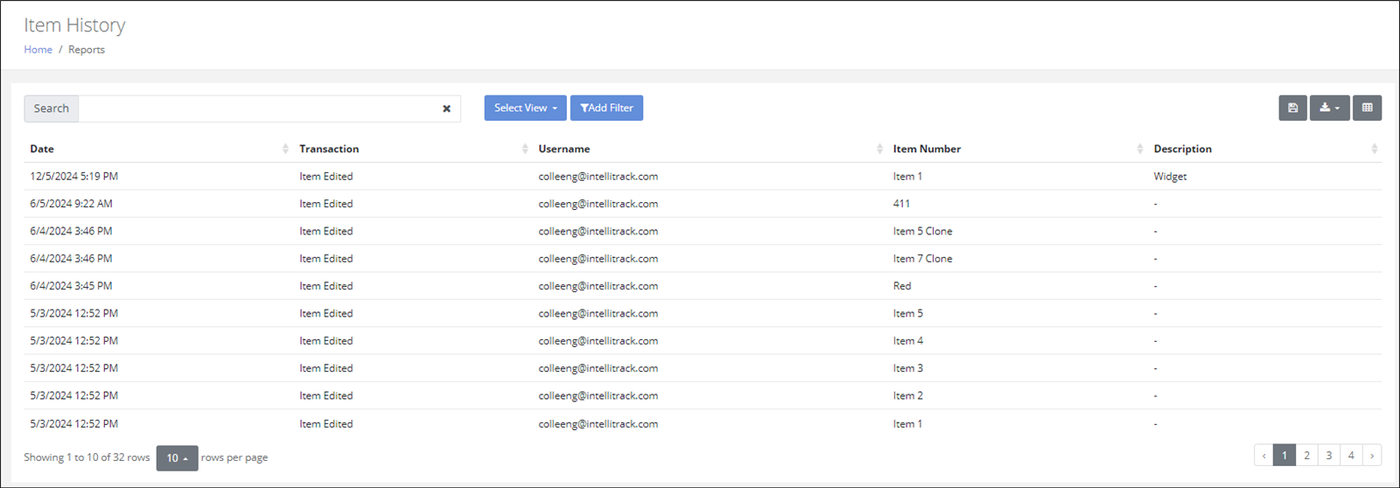
The Item History report (Home > Insights > Asset History > Report button) shows a full item level transaction history log for the Tenant.
Chapter 11 - Fixed Assets Administration
The next Chapters cover options that you will find the Management Menu. They are Administrative functions and are performed by a Tenant Administrator.
- Tenant Settings
- Data Configuration
- Item Lookup Setup
- Item Management
- Asset Lookup Setup
- Assignee Setup
Tenant Settings
The Fixed Assets bundle contains a number of settings for your Tenant. They are found in the Tenant Settings page.
From the Home page select Management.
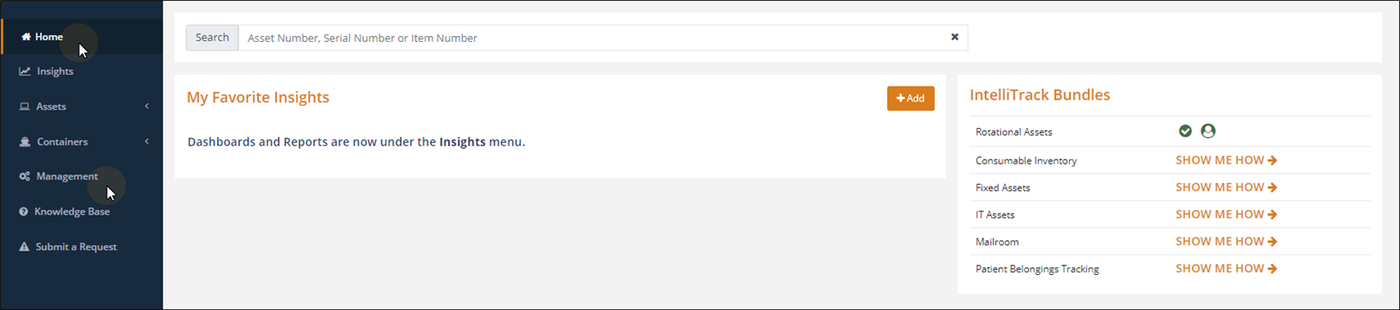
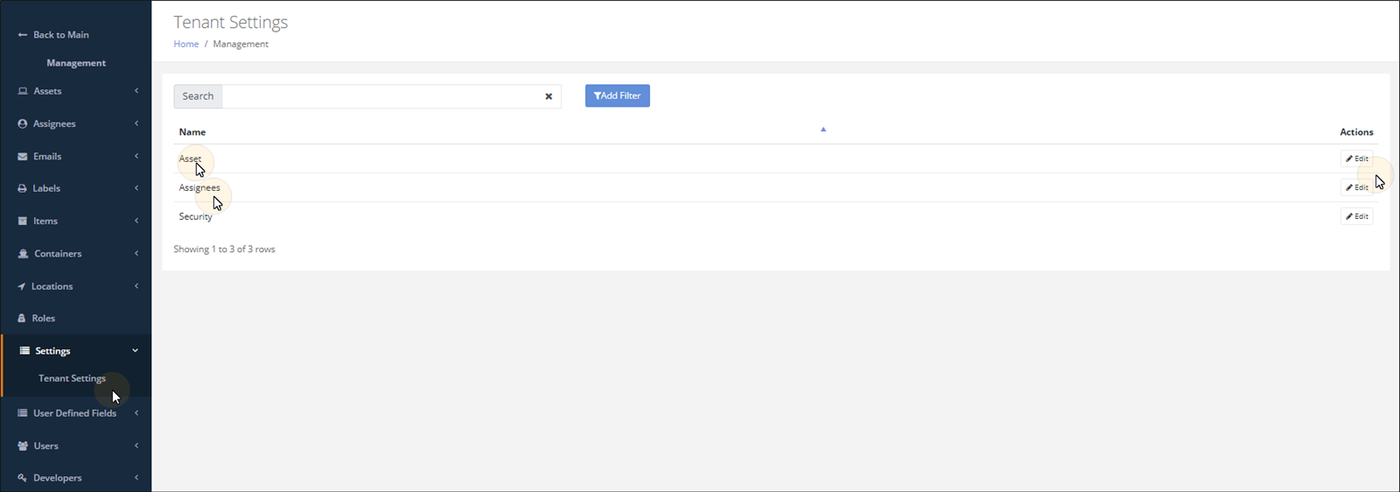
The Management menu options appear in the navigation pane. Select Management > Settings > Tenant Settings to reach this page. At the Tenant Settings page, you will see options for Assets and Assignees.
Settings for Assets
Press the Edit button for the Asset option to reach the Settings for Assets page. The settings for assets include:
- Asset Numbering
- Maintenance/Calibration
- Depreciation
Asset
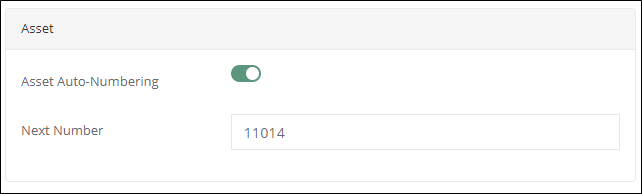
The Asset Tenant setting governs asset auto-numbering.
Asset Number
The Asset Number is used to identify the specific asset and track it. When an asset is added to IntelliTrack, an Asset Number is required. It must be unique. IntelliTrack has an Asset Auto-Numbering setting, which will auto-number the asset when it is added at the Add Asset page in the web application.
Important
The Asset Auto-Numbering feature is not applied during an asset import of new assets. This means that the asset import file must contain a value for Asset Number when importing a new asset. IntelliTrack will not automatically generate one.
Asset Auto-Numbering
This setting may be Enabled or Disabled. When Enabled, the asset number is automatically numbered when it is added at the Add Asset page in the web application. When disabled, the asset number is not automatically numbered at the Add Asset page; the asset number must be entered manually by the User.
Next Number
This setting is used when the Asset Auto-Numbering setting is Enabled. The default starting number is 10000. This number will increment automatically when adding an asset in the web application via the Add Asset page. You may change the Next Number starting number setting.
Maintenance and Calibration
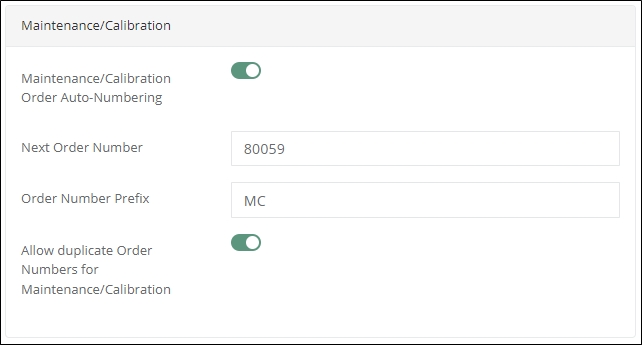
IntelliTrack tracks the Maintenance and Calibration period for an asset in Days. When asset maintenance or calibration is performed, an Order Number is tied to it. The Maintenance and Calibration Order Number is governed by Tenant Settings.
Maintenance / Calibration Order Auto-Numbering
This is a setting that can be Enabled or Disabled. When Enabled, the Maintenance / Calibration Order Number is applied to the Maintenance or Calibration automatically. It is transparent to the User. When Disabled, the Order Number field is displayed when performing an asset maintenance or calibration and the User must provide one.
Next Order Number
This setting is used in conjunction with the Maintenance / Calibration Order Auto-Numbering setting set to Enabled. The default next order number is 80000. This may be changed.
Order Number Prefix
This setting is used in conjunction with the Maintenance / Calibration Order Auto-Numbering setting to Enabled. The default Order Number Prefix is MC.
Allow duplicate Order Number for Maintenance / Calibration
This is a setting that can be Enabled or Disabled. When Enabled, a duplicate Maintenance / Calibration Order Number is allowed. When Disabled, a duplicate Maintenance / Calibration Order Number is not allowed.
Depreciation Settings for the Tenant
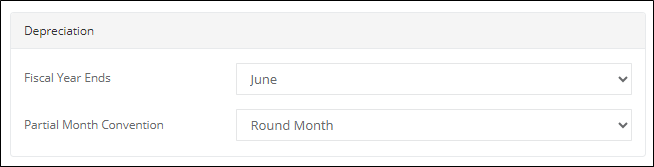
These settings are used to determine asset depreciation.
Fiscal Year Ends
Click the drop-down arrow and select the month that the company’s fiscal year ends from the list that appears.
Partial Month Convention
Select the proper partial month convention for asset depreciation calculation from the options available.
- Full Month: Includes the entire month in the calculation of depreciation regardless of the day of the month the asset was placed into service. For example, if an asset was placed into service on the 17th of the month, that entire month will be included in the depreciation calculation.
- Exclude Month: Depreciation will start the month following the in-service date. For example, if an asset was placed into service on the 8th of May, the depreciation calculation will start with June 1st.
- Round Month: Assets placed into service prior to the 15th of the month will have that month included in the depreciation calculation; assets placed into service on or after the 15th of the month will not have that month included in the depreciation calculation. For example, if the asset was placed into service on the 8th of May, then the depreciation calculation will start with May 1st. If, however, the asset was placed into service on the 20th of May, the depreciation calculation will start with June 1st.
Settings for Assignees
The Assignees Tenant setting governs assignee auto-numbering.
Assignee ID
The Assignee ID is used to identify the specific assignee and track it. When an assignee is added to IntelliTrack, an Assignee ID is required. It must be unique. IntelliTrack has an Assignee Auto-Numbering setting, which will auto-number the assignee ID when it is added at the Add Assignee page in the web application.
Important
The Assignee Auto-Numbering feature is not applied during an assignee import of new assignees. This means that the assignee import file must contain a value for the Assignee ID when importing a new assignee. IntelliTrack will not automatically generate one.
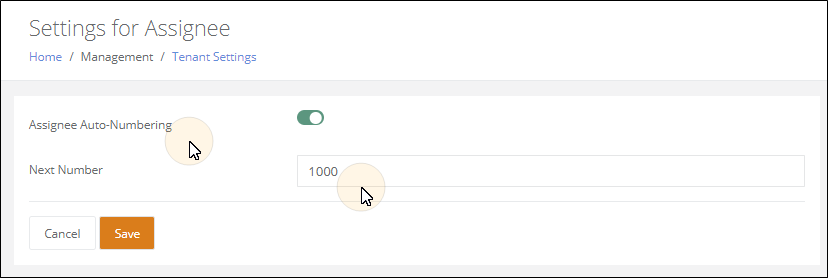
Assignee Auto-Numbering
This setting may be Enabled or Disabled. When Enabled, the assignee ID is automatically numbered when it is added at the Add Assignee page in the web application. When disabled, the assignee ID is not automatically numbered at the Add Assignee page; the assignee ID must be entered manually by the User.
Next Number
This setting is used when the Assignee Auto-Numbering setting is Enabled. The default starting number is 1000. This number will increment automatically when adding an assignee in the web application via the Add Assignee page. You may change the Next Number starting number setting .
Data Configuration
Asset data configuration encompasses user setup, site setup, item setup, asset setup, and assignee setup. The following sections outline each of these areas.
Note
We recommend that you thoroughly evaluate your fixed asset tracking goals and needs BEFORE you begin setting up your data.
Will you track asset movement?
Will you track asset inventory?
Will you track asset depreciation?
User, Site and Location Setup
User, Site, and Location Setup are the cornerstones of the Tenant's data. These topics are addressed in the Getting Started Guide.
Getting Started Guide
For more information about user, site, and location setup, please refer to the Getting Started Guide, which is available under General Platform information in the Knowledge Base
- Log into IntelliTrack.
- Select Knowledge Base from the Main menu to reach the Knowledge Base.
- The Knowledge Base opens in the browser in another Tab.
- In the Knowledge Base, select the IntelliTrack block to reach the IntelliTrack page.
- At the IntelliTrack page, select Platform Basics and Administration > Getting Started Guide.
- You will reach a Getting Started Guide page.
- At this page, select the Download option for the Getting Started PDF file to download the Guide to your computer or device.
Chapter 12 - Item Lookup Setup
Note
Admin access is required to add an item lookup.
Item lookups are optional fields associated with the item and inherited by the asset. They are added by an Admin level user from the Home > Management > Items menu. They include:
- Item Groups: an item may be assigned to multiple item groups. Use the Item Group lookup to sort items and assets by category and model.
- Manufacturers: an item can be associated with a manufacturer. Use the Manufacturer lookup to sort items and assets by manufacturer.
- Units of Measure: The Unit of Measure is the name of the counting unit for the item. The item is required to have a unit of measure with an each count of 1 when it is associated to an asset because the count of an asset is always considered to be 1.
Item Groups
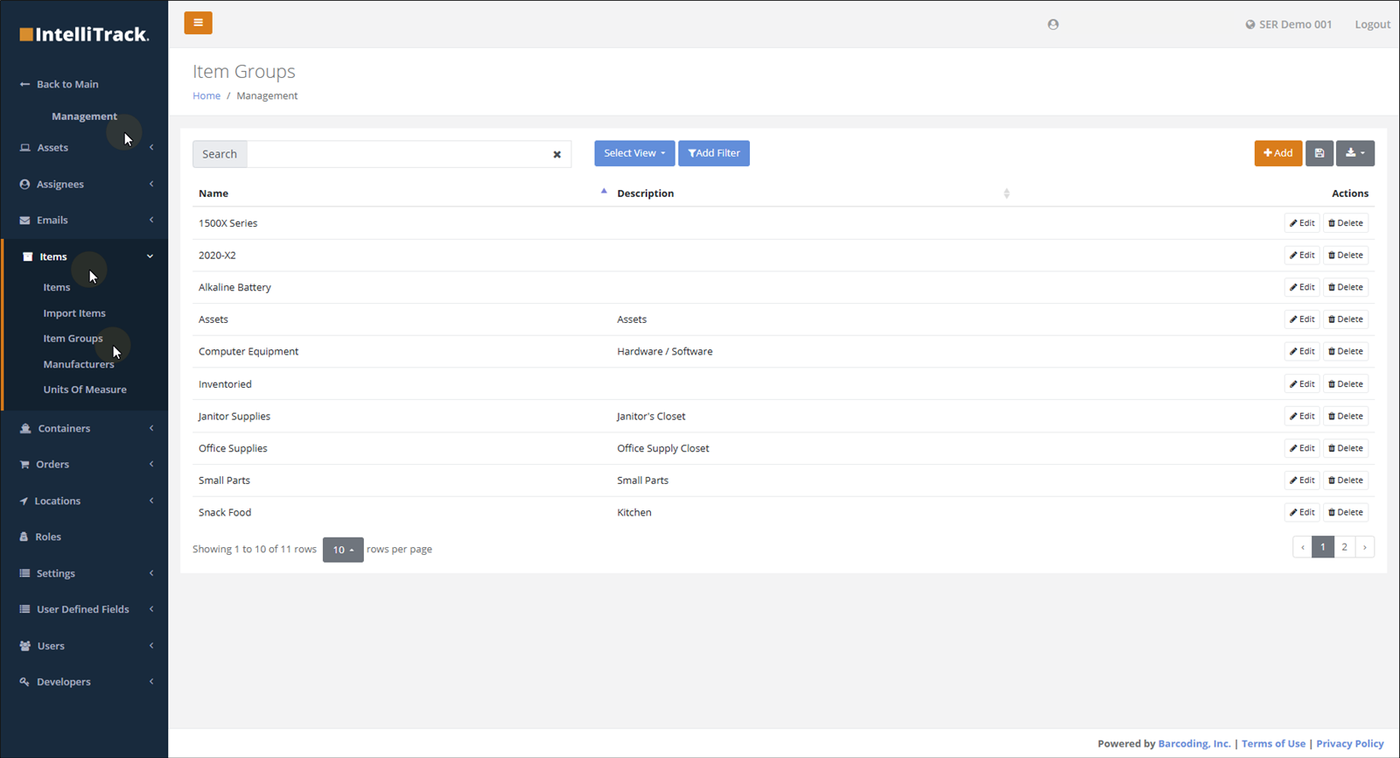
The Item Group list is maintained at the Items Groups page. Once added, the Item Group is available as an option in the Item Groups down-down list when adding or editing an item.
To reach the Item Groups page, follow these steps.
Select Management > from the Home menu bar.
The Management menu options appear in the Menu bar. Select Items > Item Groups from the menu. The Item Groups page appears.
Note
To add, edit, or delete an Item Group, Administrator access is required.
Adding an Item Group
To add a new item group to IntelliTrack, please refer to the steps that follow.
From the Item Groups page, select the Add button.
Note
The Add button is found along the top of the page, above the Actions column.
The Add Item Group page appears.
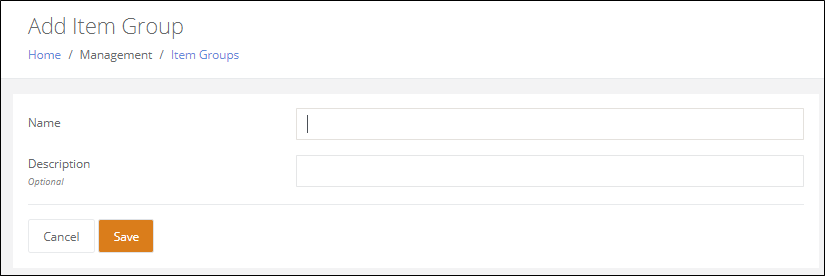
Enter the name of the Item Group in the Name field.
- The Item Group Name is required and must be unique.
Enter the Description for this Item Group in the Description field. The Description is optional.
Press the Save button to save the Item Group.
You are returned to the Item Groups page. A message appears along the top of the page to notify you that the Item Group has been saved.
Editing an Item Group
An Item Group is edited at the Edit Item Group page. From the Items Groups page, select the Edit button for an Item Group that you want to edit. The Edit Item Group page appears for this item group. The Name and Description may be edited. Be sure to press the Save button to save any changes to the Item Group.
Deleting an Item Group
Note
An Item Group that is associated with an item is "in use" and may not be deleted.
From the Item Groups page, select the Delete button for the Item Group that you want to delete. A Confirmation prompt appears asking you if you are sure that you want to delete this Item Group. If the Item Group is being used for an item, you are also notified that this item group is in use and cannot be deleted.
Manufacturers
The Manufacturer list is maintained at the Manufacturers page. Once added, the Manufacturer is available as an option in the Manufacturer down-down list when adding or editing an item.
To reach the Manufacturer page, follow these steps.
Select Management > from the Home menu bar.
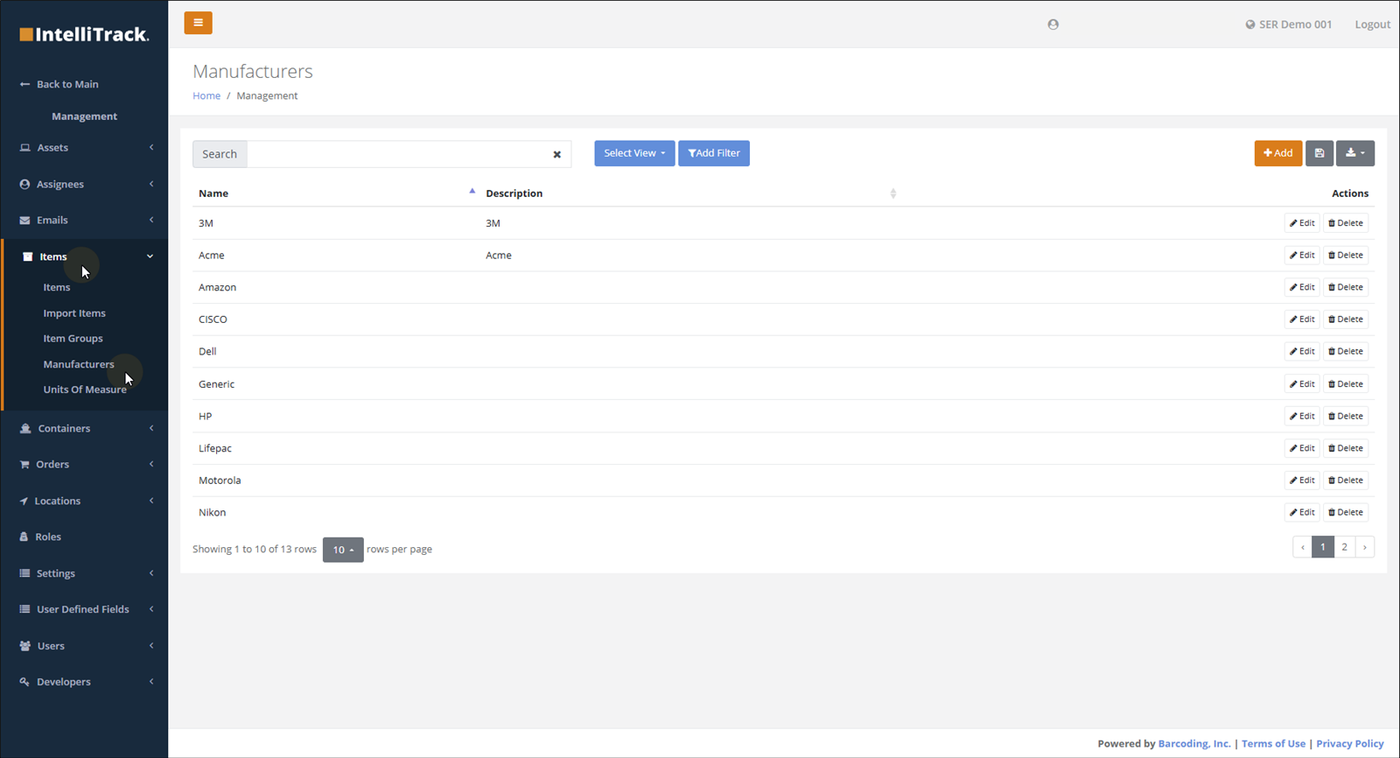
The Management menu options appear in the Menu bar. Select Items > Manufacturers from the menu. The Manufacturers page appears.
Note
To add, edit, or delete a Manufacturer, Administrator level access is required.
Adding a Manufacturer
From the Manufacturers page, select the Add button.
Note
The Add button is found along the top of the page, above the Actions column.
The Add Manufacturer page appears.
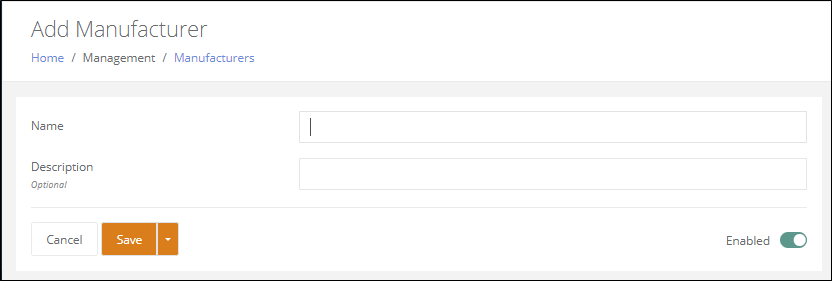
Enter the name of the Manufacturer in the Name field.
- The Name is required and must be unique.
Enter the Description in the Description field. The Description is optional.
Press the Save button to save the Manufacturer.
Save & New option: press the drop-down arrow in the Save button and select this option to save the Manufacturer, clear the page and add another manufacturer.
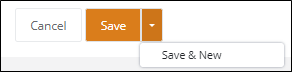
You are returned to the Manufacturers page. A message appears along the top of the page to notify you that the Manufacturer has been saved.
Editing a Manufacturer
A Manufacturer is edited at the Edit Manufacturer page. From the Manufacturers page, select the Edit button for a Manufacturer that you want to edit. The Manufacturer page appears for this manufacturer. The Name and Description may be edited. Be sure to press the Save button to save any changes to the Manufacturer.
Deleting a Manufacturer
Note
A Manufacturer that is associated with an item is "in use" and may not be deleted.
From the Manufacturers page, select the Delete button for the Manufacturer that you want to delete. A Confirmation prompt appears asking you if you are sure that you want to delete this Manufacturer. If the Manufacturer is being used for an item, you are also notified that this manufacturer is in use and cannot be deleted.
Units of Measure
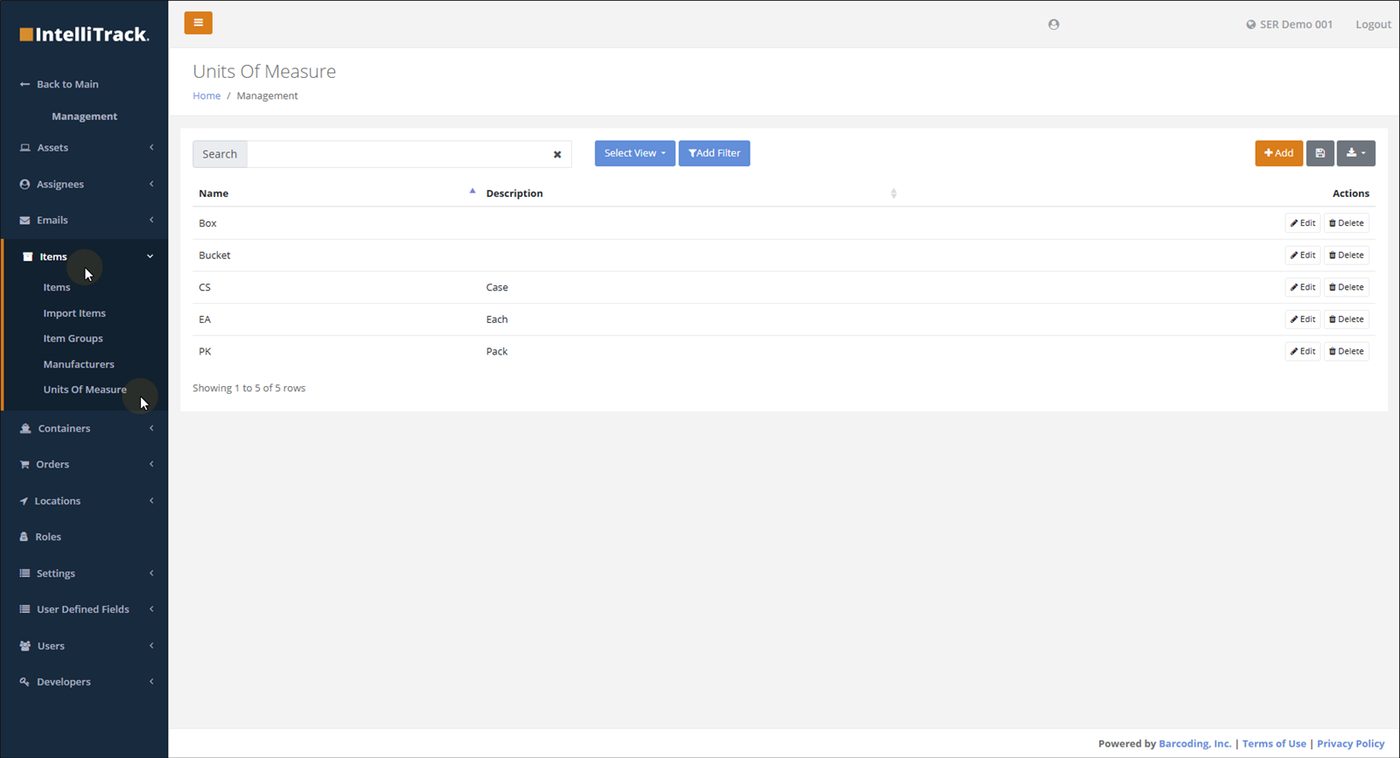
The Unit of Measure list is maintained from the Units of Measure page. To reach this page follow these steps.
Select Management > from the Home menu bar.
The Management menu options appear in the Menu bar. Select Items > Unit of Measure from the menu. The Units of Measure page appears.
Note
To add, edit, or delete a Unit of Measure, Administrator level access is required.
Adding a Unit of Measure
From the Units of Measure page, select the Add button.
Note
The Add button is found along the top of the page, above the Actions column.
The Add Unit of Measure page appears.
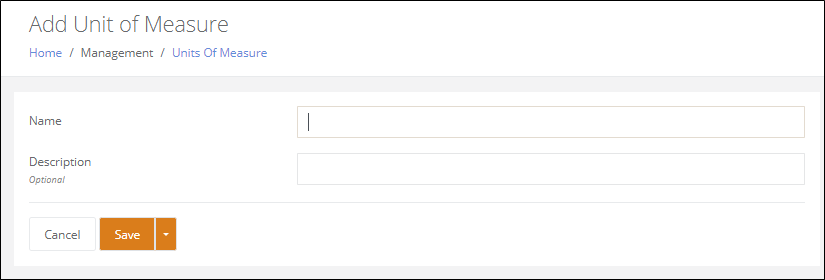
Enter the name of the Unit of Measure in the Name field.
- The Name is required and must be unique.
Enter the Description in the Description field. The Description is optional.
Press the Save button to save the Unit of Measure.
Save & New option: press the drop-down arrow in the Save button to select the Save &New option, save the unit of measure, clear the page, and add another unit of measure.
You are returned to the Units of Measure page. A message appears along the top of the page to notify you that the Unit of Measure has been saved.
Editing a Unit of Measure
From the Units of Measure page, select the Edit button to the right of the Unit of Measure that you want to edit. The Edit Unit of Measure page appears for this Unit of Measure. The name and description may be edited. Be sure to press the Save button to save any changes to the unit of measure.
Deleting a Unit of Measure
Note
A Unit of Measure that is being used for an item is "in use" and may not be deleted.
From the Units of Measure page, select the Delete button for the Unit of Measure that you want to delete. A Confirmation prompt appears asking you if you are sure that you want to delete this Unit of Measure. If the Unit of Measure is being used for an item, you are also notified that this unit of measure is in use and cannot be deleted.
Chapter 13 - Setting Up Items
Items form the basis of the asset record. The item is the parent of the asset and the asset will inherit its general qualities from the item.
- Picture
- Item Number
- Description
- Manufacturer
- Item Groups
- Item Attachments
- Item User Defined Fields
- Display Warranty Information: when this setting is enabled at the item: the Purchase Date, Purchase Cost, and Warranty Expiration Date fields are available for the Asset.
- Cellular Carrier Information: when this setting is enabled at the Asset: the Cellular Carrier, SimlccID1, SimlccID2, MEID / IMEI, and Phone Number fields are available for the Asset.
The items are found at the Items page (Management > Items).
Note
Admin access is required to add an item to IntelliTrack.
Important
The item must have a unit of measure with an each count of 1 to be eligible for asset association.
Important
The Display Warranty Information setting MUST BE ENABLED at the item to view the Purchase Date, Purchase Cost, and Warranty Expiration field at the Asset.
Important
The Display Carrier Information setting MUST BE ENABLED at the item to view the Cellular Carrier, SIM 1, SIM 2, MEID / IMEI and Phone Number fields at the Asset.
Items Page
The Item list is viewed from the Items page. Select Management > Items > Items to reach this page.
Note
To add, edit, or delete an Item, Administrator access is required.
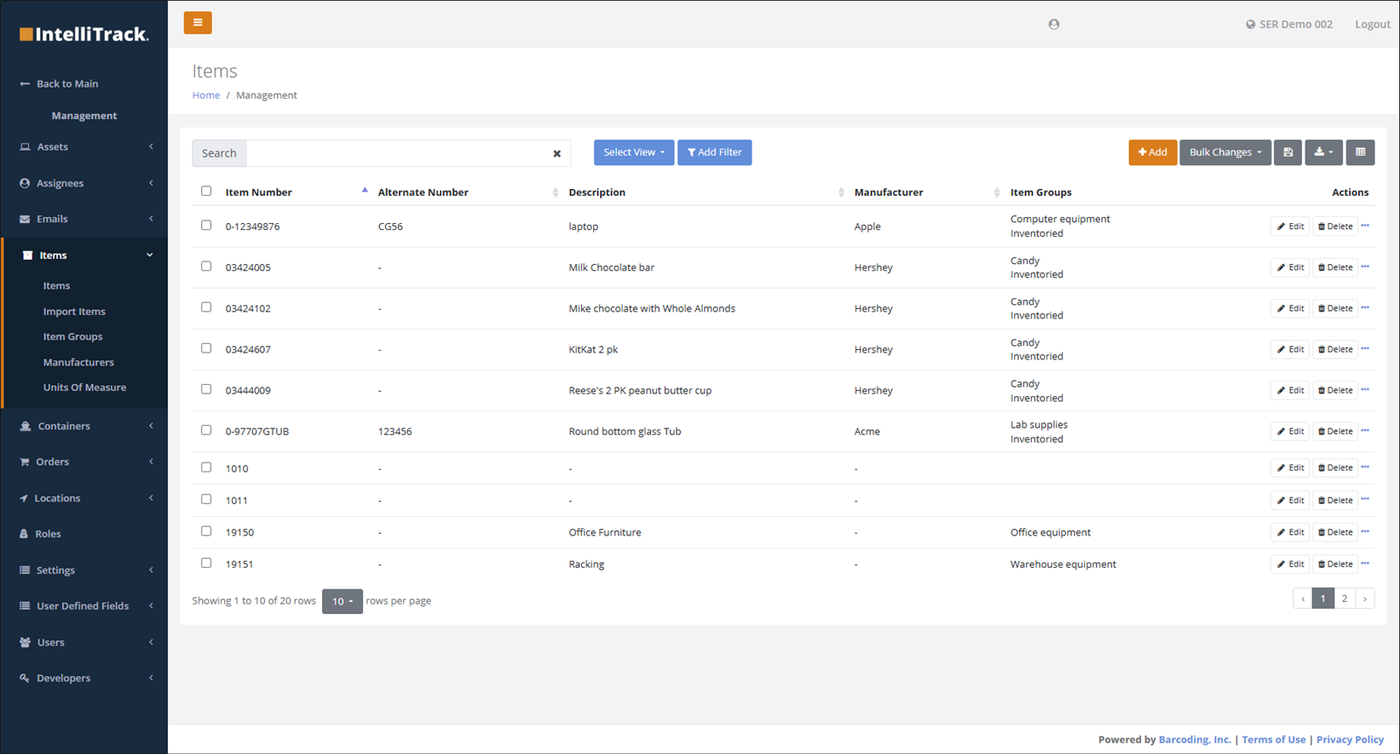
Adding an Item
In IntelliTrack, you may add an item at the Add Item page. The item number and one unit of measure-each count are required to save an item.
Important
The item must have a unit of measure with an each count of 1 to be eligible for asset association.
Important
The Display Warranty Information setting MUST BE ENABLED at the item to view the Purchase Date, Purchase Cost, and Warranty Expiration fields at the Asset.
Important
The Display Carrier Information setting MUST BE ENABLED at the item to view the Cellular Carrier, SIM, and Phone Number fields at the Asset.
However, many optional fields are available to add to the item record. This section shows the basic steps to add an item at the Add Item page.
To add an item, follow the steps below.
- Select Management from the Main menu options in the Navigation pane.
- The Management menu appears in the Navigation pane.
- Select Items > Items from the Management menu.
- The Items page appears.
- Select the Add button in the top right area of the page. The Add Item page appears. The Item Details tab is to the front.
- Item Number: The item number is required.
- Click the Units of Measure tab to bring this tab to the front. Add at least one unit of measure-each count to the grid.
- Press Save to add the item. You are returned to the Items page. The item is now part of the item list.
- Save & New: press the Save button down arrow and select this option to save the Item, clear the page and add another item.
- Save & Clone: press the Save button down arrow and select this option to save the Item, maintain (as applicable) the Description, Manufacturer, Item Groups, Display Carrier Information Setting, Display Warranty Information Setting, Image, Unit of Measure, and User Defined Fields, and add another item. .
To view a detailed explanation of all the optional fields for an item, continue with the following sections.
Items Details
The main item information is added from the Item Details tab. When the Add Item page appears, the Item Details tab is automatically brought to the front. Add the item number and relevant item associations and settings at this tab.
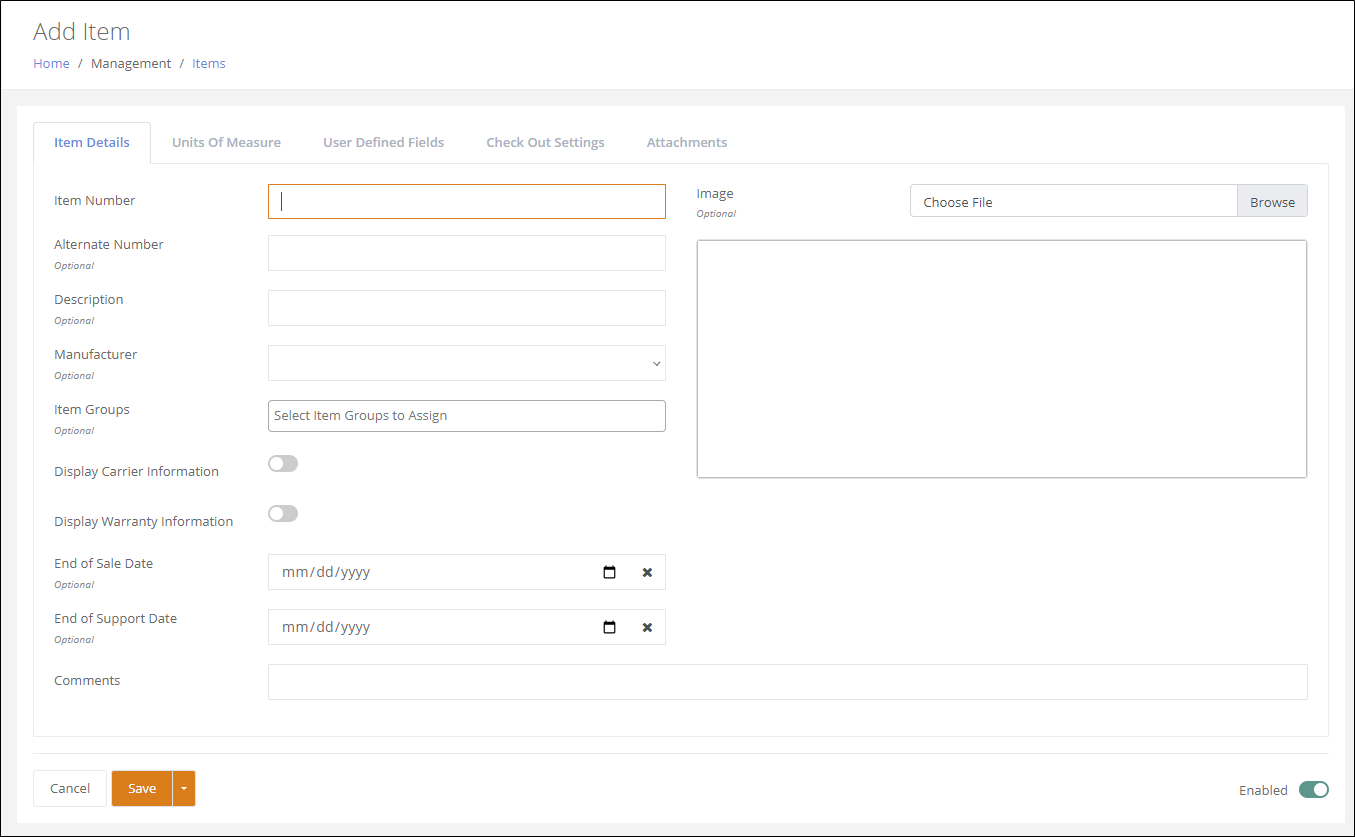
- Item Number field (required): enter the item number (must be unique).
- Alternate Number: enter the alternate number (must be unique).
- Description field: enter an item description.
- Comments field: enter any item comment or comments in this field.
- Manufacturer field: click the drop-down arrow to select a manufacturer from the manufacturer list that appears.
- Item Groups field: An item group is often a model or category. Click the drop-down arrow and select the item group or groups from the item group drop-down list. This field accepts multiple item groups.
- Display Carrier Information setting: Enable this setting to track cell phone carrier data for an asset.
- Display Warranty Information setting: Enable this setting to track purchase date, purchase cost, and warranty expiration for an item.
- End of Sale Date: This is a date field for tracking the end of sale date for an asset.
- End of Support Date: This is a date field for tracking the end of support date for an asset.
- Comments: enter any relevant or necessary comments about the item in this field.
- Image: to add an image to this item, click the Browse button to open the Open dialog. From the Open dialog, browse to the image file and select it for the item. The image will be displayed in the image area.
Item Units of Measure
Each item must have a unit of measure-each count. It is added from the Units of Measure tab. Optionally, the Unit Cost may also be added to the unit of measure-each count.
Important
The item must have a unit of measure with an each count of 1 to be eligible for association with an asset.
- Click the Units of Measure tab to bring this tab to the front.
- Units of Measure field: click the drop-down arrow to view the Units of Measure drop-down list. Select the Unit of Measure for this item from the list.
- Each Count field: enter the each count in this field. The each count is the base unit for this unit of measure.
- For example, when a Unit of Measure of {Each} has an each c count of one, the base counting unit of {Each} is one (1 {Each} equals 1 item).
- The unit of measure-each count must be unique. This means that a single item cannot have two duplicate units of measure or duplicate each counts.
- Unit Cost field (optional): enter the unit cost for this unit of measure in this field. When the unit cost is entered, the system is able to calculate extended item cost based upon the on hand quantity for this item unit of measure-each count.
- Click the Add button to the right of the Units of Measure field. The unit of measure-each count-unit cost is added to the item.
Editing the Unit Cost
The Unit Cost for an Item can be edited at the Edit Item page. To edit the unit cost, follow the steps below.
Important
Editing an Item is an Administrator level privilege.
- Select Management > Items > Items. The Items page appears.
- To edit the Unit Cost for an Item, use the page's Search bar or Add Filter popup to search for the Item.
- In the Actions column for the Item entry, press Edit. The Edit Item page for this Item appears.
- Press the Units of Measure tab to bring this portion to the front.
- Each Unit of Measure-Each Count is found in the unit of measure area.
- To change the Unit Cost for a Unit of Measure-Each Count, press Edit in the Actions column. The Change Unit Cost popup appears.
- Enter the Unit Cost in the Unit Cost field.
- Press Apply to close the popup and apply the new unit cost.
User Defined Fields
IntelliTrack supports up to 25 User Defined Fields for an Item and up to 25 User Defined Fields for an Asset. Item and Asset User Defined Fields are added to the system from the User Defined Field options in the Management menu. Adding User Defined Fields requires Admin access.
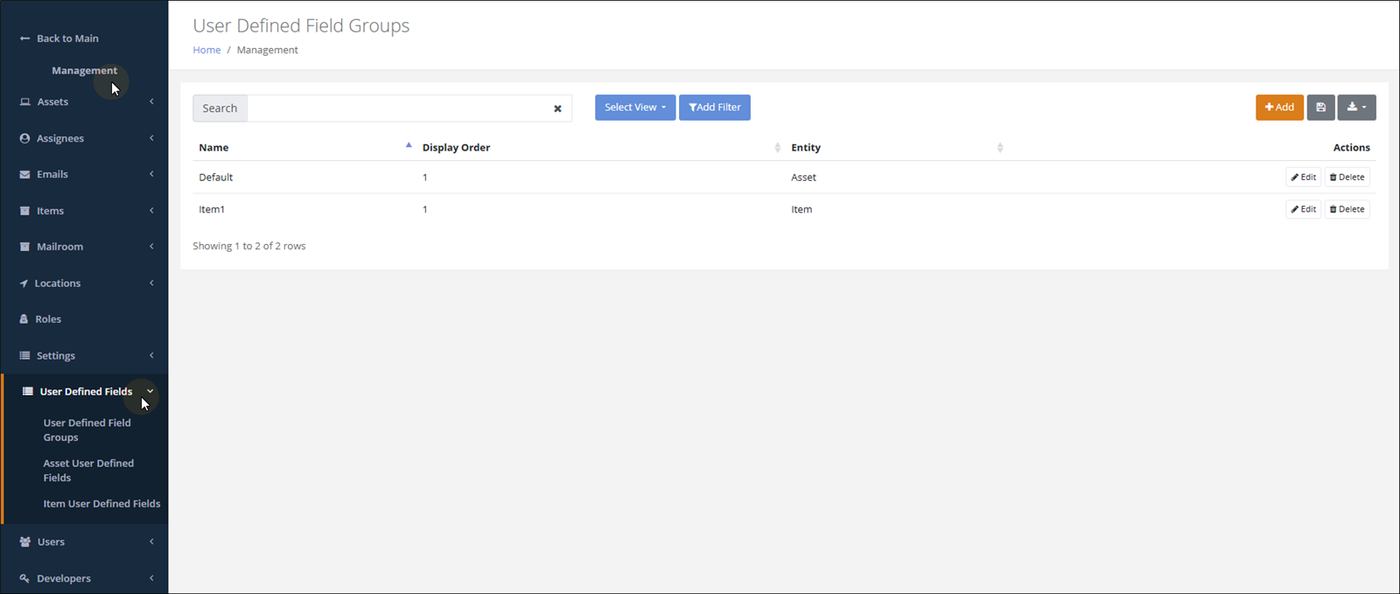
Item User Defined Fields
Item User Defined Fields are added at the Item User Defined Fields page. The Item User Defined Fields must be added and defined BEFORE they can be placed on an item. To create the User Defined Fields, please refer to the sections that follow.
Note
To work with Item User Defined fields, Administrator level access is required.
IntelliTrack supports up to twenty five user defined fields for an item. The fields are fully customizable. Using them requires three basic steps:
- Adding an Item User Defined Field Group to the Tenant.
- Adding an Item User Defined Field to a User Defined Field Group.
- Adding the Item User Defined Field Group to the Item.
They are outlined below.
Step One: Add a User Defined Field Group for Items
An Item User Defined Field Group is used to group like item user defined fields together. Before you add an Item User Defined Field, you must add a group for it. To add an Item User Defined Field Group, refer to the steps that follow.
Important
An Item User Defined Field Group is required to add an Item User Defined Field.
Select Management > User Defined Fields > User Defined Field Groups.
The User Defined Field Groups page appears.
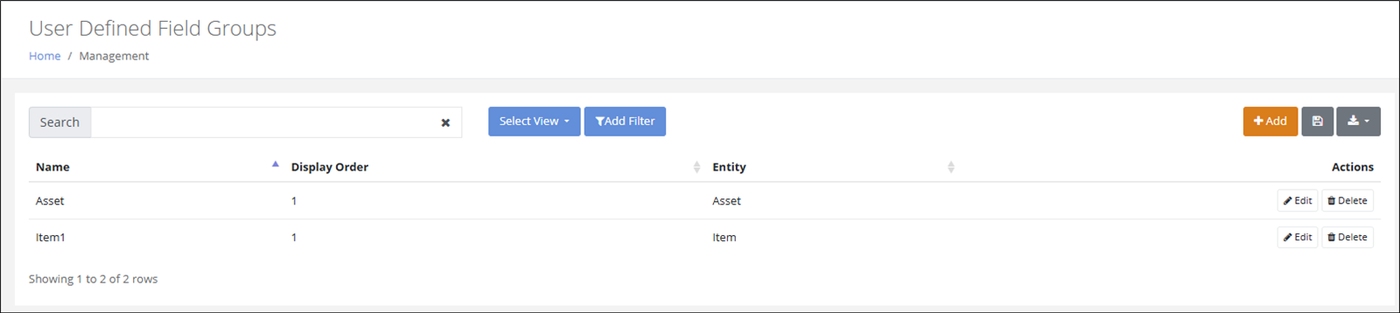
Press the Add button.
The Add User Defined Field Group page appears.
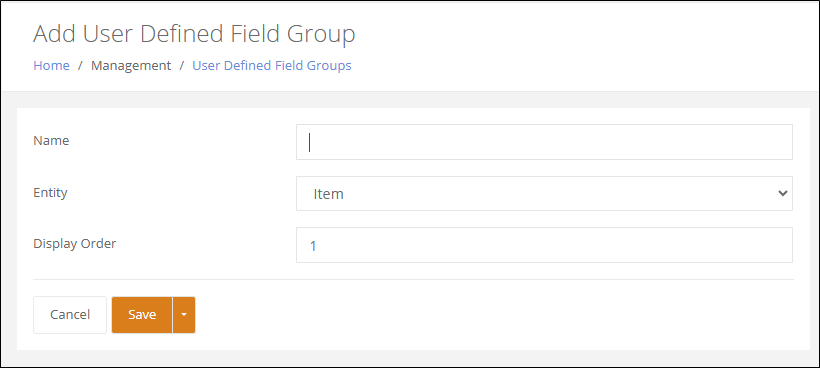
Name field: enter a name for the User Defined Field group in this field.
Entity: press the drop-down arrow and select Item since we are adding a User Defined Field Group for use with Items.
Display Order: the Display Order matters when you have more than one User Defined Field Group for Items because it dictates the order that the field group appears in the Add/Edit Item User Defined Fields tab. if this is the first User Defined Field Group that you are adding, enter 1.
Press Save. You are returned to the User Defined Fields Group page. The new Item User Defined Field Group has been added.
- Save & New option: press the drop-down arrow in the Save button to select the Save & New option to save the User Defined Field, clear the page, and add another User Defined Field Group.
Step Two: Add an Item User Defined Field
An Item User Defined Field is managed from the Item User Defined Fields page. It must be part of an Item User Defined Field Group.
Important
An Item User Defined Field Group is required to add an Item User Defined Field. For more information about adding an Item User Defined Field Group, see "Step One: Add a User Defined Field Group for Items".
Please refer to the steps that follow to add an Item User Defined Field.
Select Management > User Defined Fields > Item User Defined Fields. The Item User Defined Fields page appears.

Press the Add button. The Add User Defined Field for Item page appears.
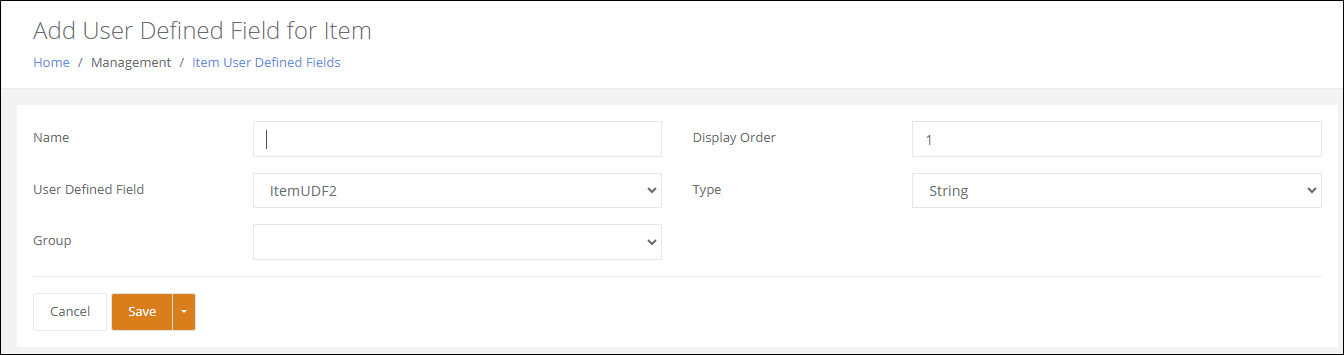
Name: enter a Name for the User Defined Field in this field.
User Defined Field: a total of 25 Item User Defined Fields are available. Select from the available user defined fields.
Group: click the drop-down arrow in this field and select the Item User Defined Group that this Item User Defined Field belongs to from the list that appears.
Display Order: dictates where this User Defined Field appears in the User Defined Field Group. It matters when you add more than one User Defined Field to this User Defined Field Group because the Display Order Number determines the placement of the User Defined Field inside this User Defined Field Group.
Type: select the field type for this field from the following options:
- String: the field will accept alphanumeric characters.
- Numeric: the field will accept numeric characters.
- DateTime: the field will accept a calendar date-time stamp.
- Boolean: the field may be toggled on or off.
- Date: the field will accept a calendar date.
Press Save to save the Item User Defined Field to the Item User Defined Field Group.
Save & New option: press the drop-down arrow in the Save button to select the Save & New option to save the User Defined Field, clear the page, and add another User Defined Field.
Save & Clone option: press the drop-down arrow in the Save button to select the Save & Clone option to save the User Defined Field, maintain certain fields, and add another User Defined Field.
Repeat steps 1-8 until you have added all the Item User Defined Fields to this group.
Adding a User Defined Field to an Item
Once the Item User Defined Field is saved to an Item User Defined Field Group, the User Defined Field Group is ready to be added to the item at the Add/Edit Item page\User Defined Fields Tab. All User Defined Fields added to the User Defined Field Group are also added to the item.
Important
The User Defined Fields must be added to each item that will use them.
To add the Item User Defined Fields to an Item, please refer to the steps that follow.
Select Management > Items > Items from the navigation pane. The Items page appears. The User Defined Fields may be added to an item at the Add Item page or the Edit Item page.
- Add Item page: select the Add button to reach this page. The Add Item page appears.
- Edit Item page: locate the item for editing and select the Edit button in the Actions column. The Edit Item page appears for this item.
Press the User Defined Fields tab to bring this tab to the front.
Click the drop-down arrow in the User Defined Fields Group field. The Item User Defined Fields Group or Groups that have been added to the Tenant appear. Select the User Defined Field Group that you want to add to this item.
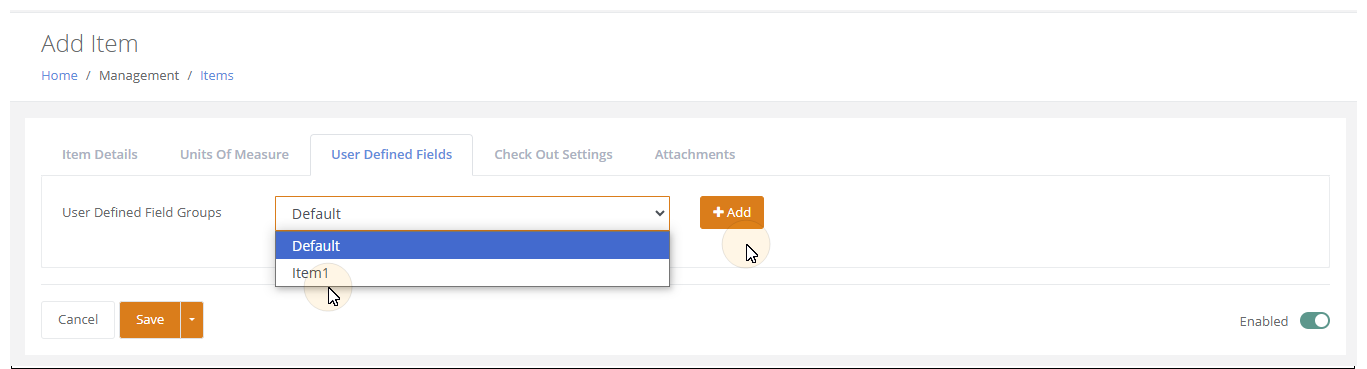
Press the Add button.
The User Defined Field Group and the Item User Defined Field or Fields that are part of it are added to the item.
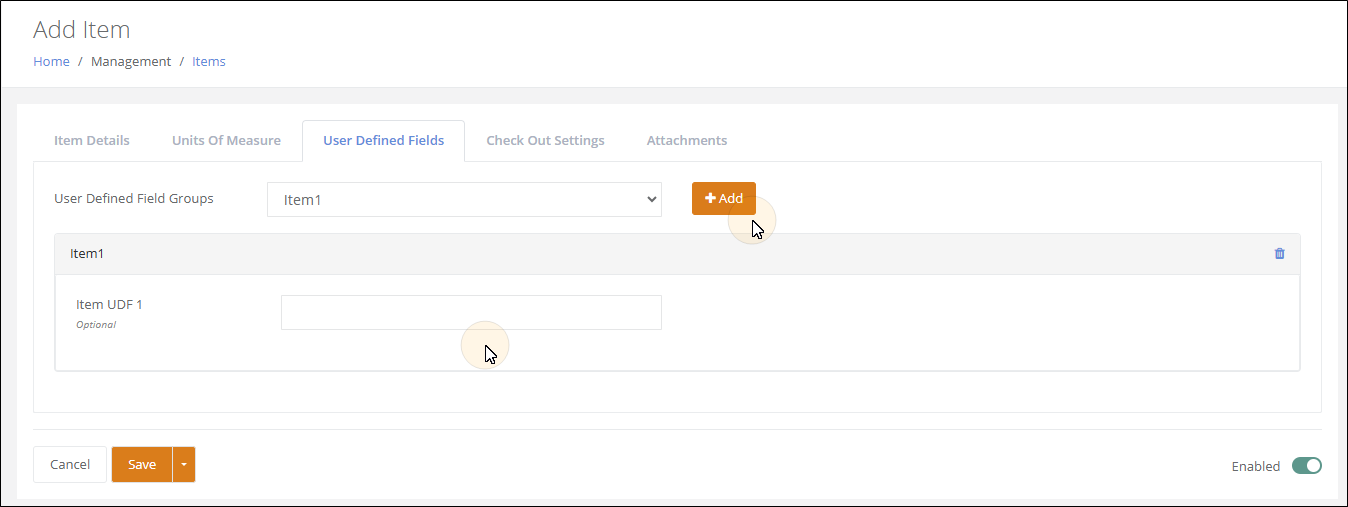
Press the Save button to save the User Defined Fields in the User Defined Field Group are saved to the item. They are available now to be used for the item.
Asset User Defined Fields
Asset User Defined Fields are added at the Asset User Defined Fields page. The Asset User Defined Fields must be added and defined first. Once they are created, they can be added to an ITEM; which will automatically place them on an asset when the asset is associated with this item. To create the User Defined Fields, please refer to the sections that follow.
IntelliTrack supports up to twenty five user defined fields for an asset. The fields are fully customizable. Using them requires these basic steps:
- Adding an Asset User Defined Field Group to the Tenant.
- Adding an Asset User Defined Field to a User Defined Field Group.
- Adding the Asset User Defined Field Group to the Item.
- Associating the Item to an Asset.
They are outlined below.
Step One: Add a User Defined Field Group for Assets
An Asset User Defined Field Group is used to group like asset user defined fields together. Before you add an Asset User Defined Field, you must add a group for it. To add an Asset User Defined Field Group, refer to the steps that follow.
Important
An Asset User Defined Field Group is required to add an Asset User Defined Field.
Select Management > User Defined Fields > User Defined Field Groups.
The User Defined Field Groups page appears.
Press the Add button.
The Add User Defined Field Group page appears.
Name field: enter a name for the User Defined Field group in this field.
Entity: press the drop-down arrow and select Asset since we are adding a User Defined Field Group for use with Assets.
Display Order: the Display Order matters when you have more than one User Defined Field Group for Items because it dictates the order that the field group appears in the Add/Edit Asset User Defined Fields tab. if this is the first User Defined Field Group that you are adding, enter 1.
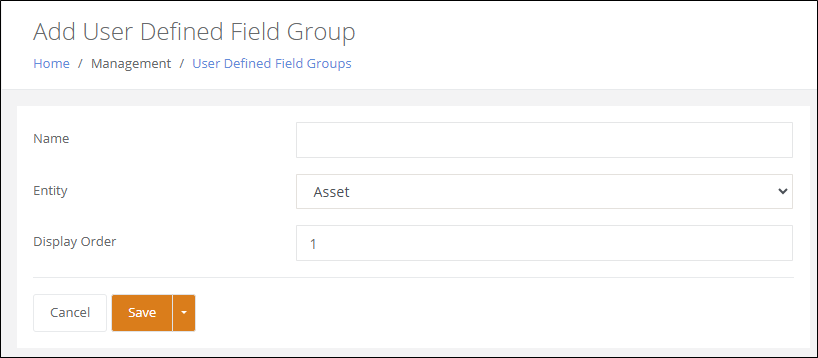
Press Save. You are returned to the User Defined Fields Group page. The new Asset User Defined Field Group has been added.
- Save & New: press the drop-down arrow in the Save button to reach the Save & New option to save the Asset User Defined Field Group, clear the page, and add another one.
Step Two: Add an Asset User Defined Field
An Asset User Defined Field is managed from the Asset User Defined Fields page. It must be part of an Asset User Defined Field Group.
Important
An Asset User Defined Field Group is required to add an Asset User Defined Field. For more information about adding an Asset User Defined Field Group, see "Step One: Add a User Defined Field Group for Assets".
Please refer to the steps that follow to add an Asset User Defined Field.
Select Management > User Defined Fields > Asset User Defined Fields. The Asset User Defined Fields page appears.

Press the Add button. The Add User Defined Field for Asset page appears.
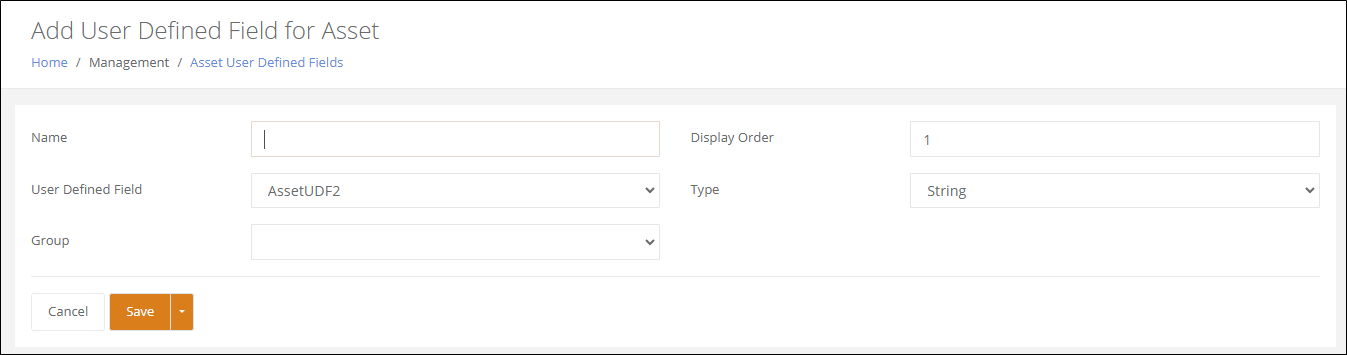
Name: enter a Name for the User Defined Field in this field.
User Defined Field: a total of 25 Asset User Defined Fields are available. Select from the available user defined fields.
Group: click the drop-down arrow in this field and select the Asset User Defined Group that this Asset User Defined Field belongs to from the list that appears.
Display Order: dictates where this User Defined Field appears in the User Defined Field Group. It matters when you add more than one User Defined Field to this User Defined Field Group because the Display Order Number determines the placement of the User Defined Field inside this User Defined Field Group.
Type: select the field type for this field from the following options:
- String: the field will accept alphanumeric characters.
- Numeric: the field will accept numeric characters.
- DateTime: the field will accept a calendar date-time stamp.
- Boolean: the field may be toggled on or off.
- Date: the field will accept a calendar date.
Press Save to save the Asset User Defined Field to the Asset User Defined Field Group.
Save & New option: press the Down arrow in the Save button and select the Save & New option to save the asset user defined field, clear the page, add another asset user defined field.
Save & Clone option: press the Down arrow in the Save button to select the Save & Clone option to save the asset user defined field, maintain certain information, and add another asset user defined field.
Repeat steps 1-8 until you have added all the Asset User Defined Fields to this group.
Adding a User Defined Field to an the Item for Use on an Asset
Once the Asset User Defined Field is saved to an Asset User Defined Field Group, the User Defined Field Group is ready to be added to the item at the Add/Edit Item page\User Defined Fields Tab. All User Defined Fields added to the User Defined Field Group are also added to the item.
Important
When the Asset User Defined Fields are added to the item, the asset user defined fields will be available to the asset when this asset is associated with this item.
To add the Asset User Defined Fields to an Item, please refer to the steps that follow.
Select Management > Items > Items from the navigation pane. The Items page appears. The User Defined Fields may be added to an item at the Add Item page or the Edit Item page.
- Add Item page: select the Add button to reach this page. The Add Item page appears.
- Edit Item page: locate the item for editing and select the Edit button in the Actions column. The Edit Item page appears for this item.
Press the User Defined Fields tab to bring this tab to the front.
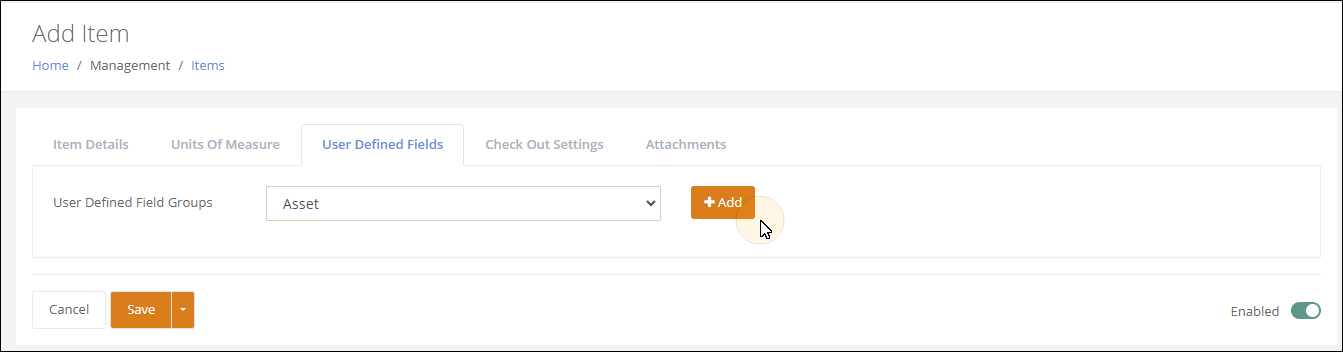
Click the drop-down arrow in the User Defined Fields Group field. The Asset User Defined Fields Group or Groups that have been added to the Tenant appear. Select the User Defined Field Group that you want to add to this item.
Press the Add button.
The User Defined Field Group and the Asset User Defined Field or Fields that are part of it are added to the item. NOTE: Asset User Defined Fields are read-only at the item. They will become enabled at the asset, for an asset that is associated to this item.
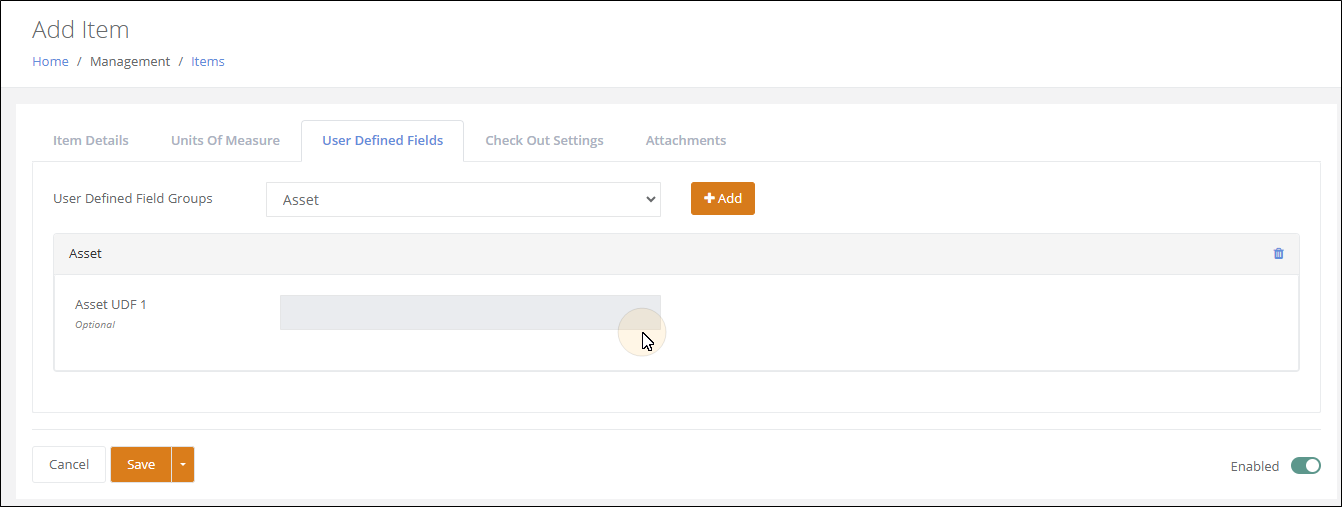
Press the Save button to save the User Defined Fields in the User Defined Field Group to the item. They are available now to be used for the asset when this item is associated to the Asset.
Asset User Defined Fields Available at the Asset
At the Add Asset page, when the Item Number for the Asset contains asset user defined fields, they are placed on the asset.
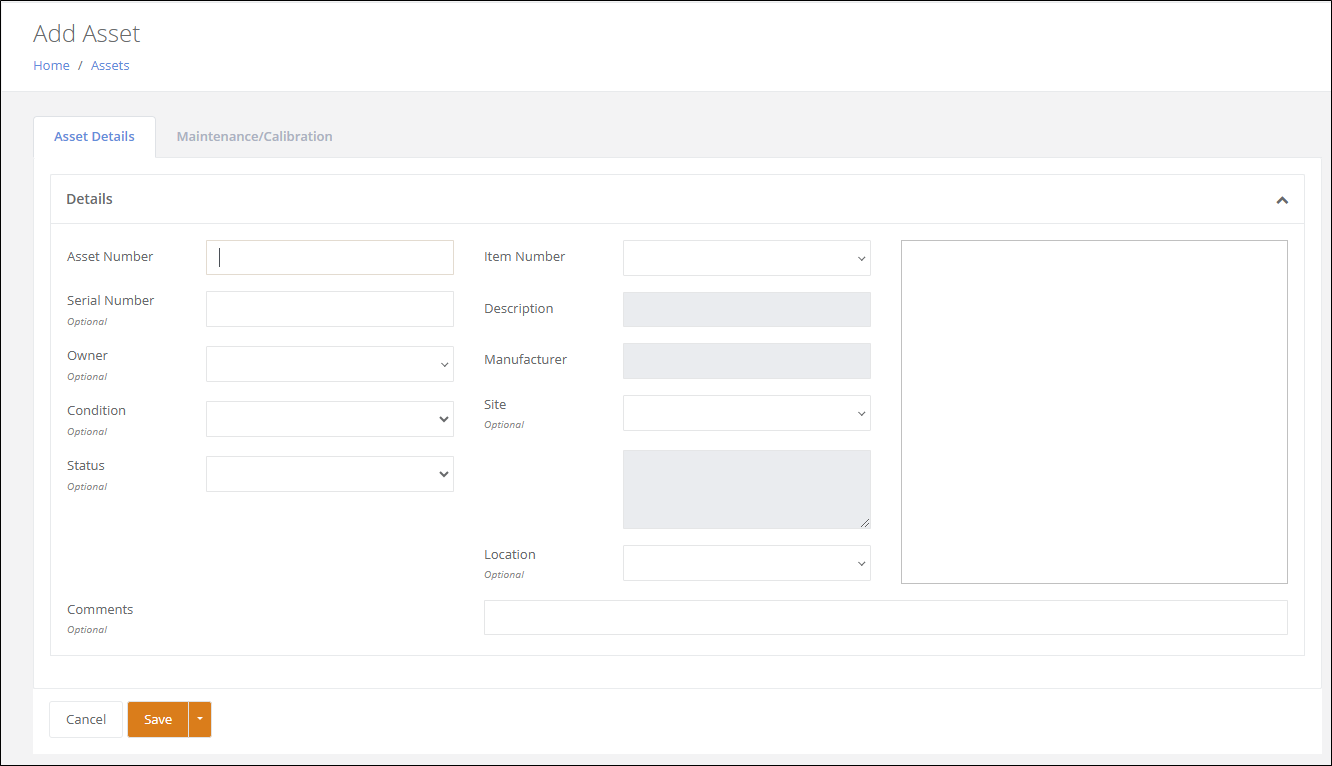
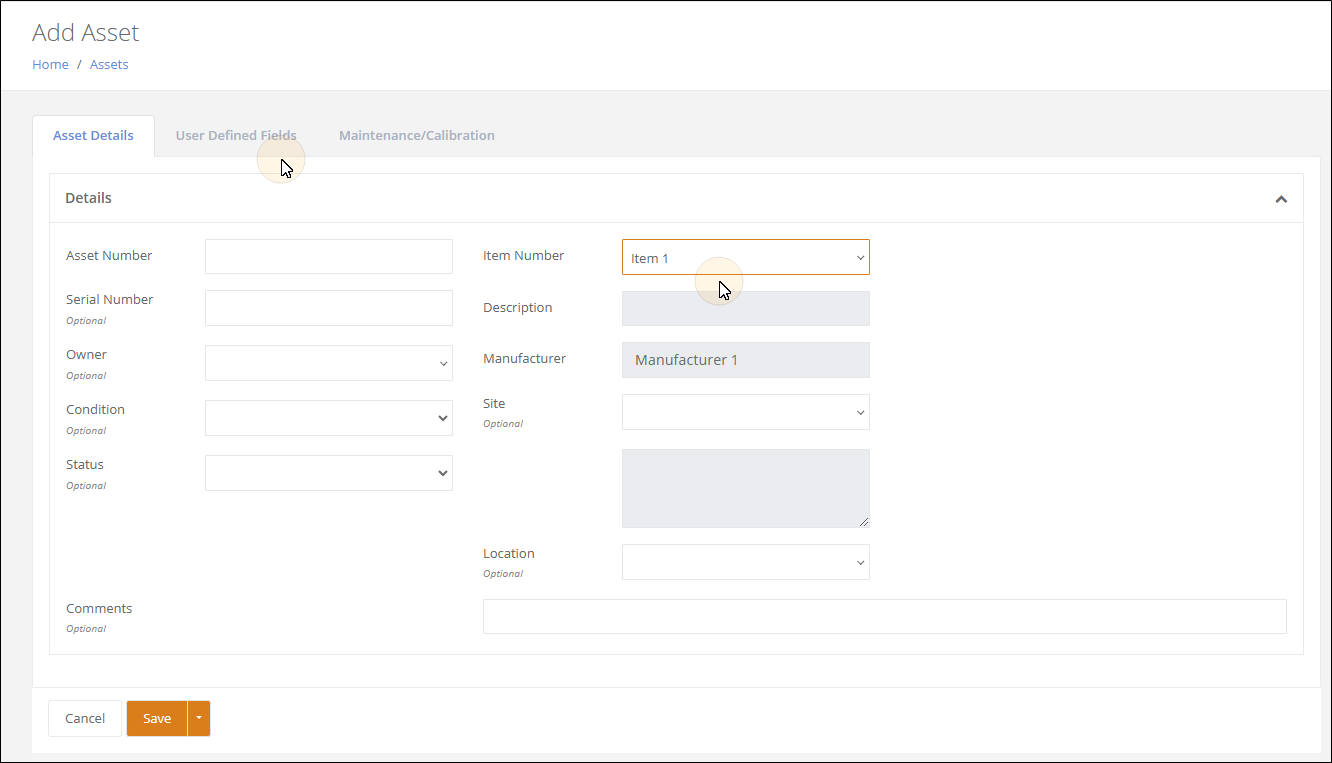
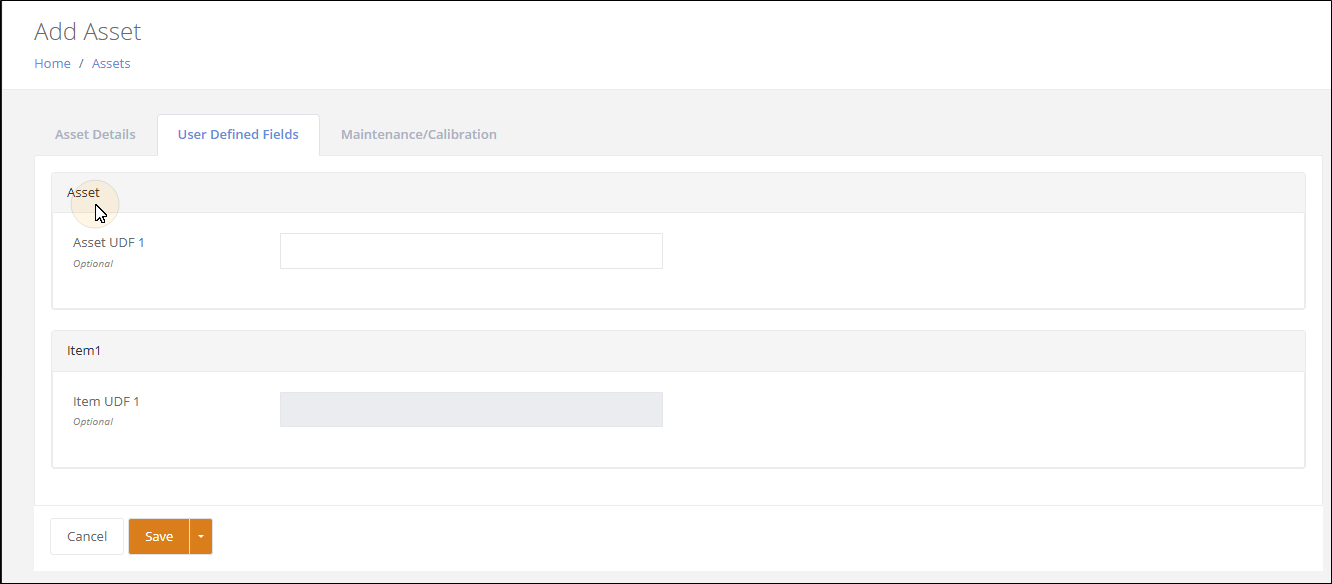
Item Attachments
A maximum of five files may be attached to an item from the Attachments tab, which is available from the Add Item page and the Edit Item page. The maximum file size is 50 MB.
Browse to the file via the Browse button in the Attachment field.
Select the file so that it appears in the Attachment field.
Upload it via the Add button.
The file is placed in the file attachment grid.
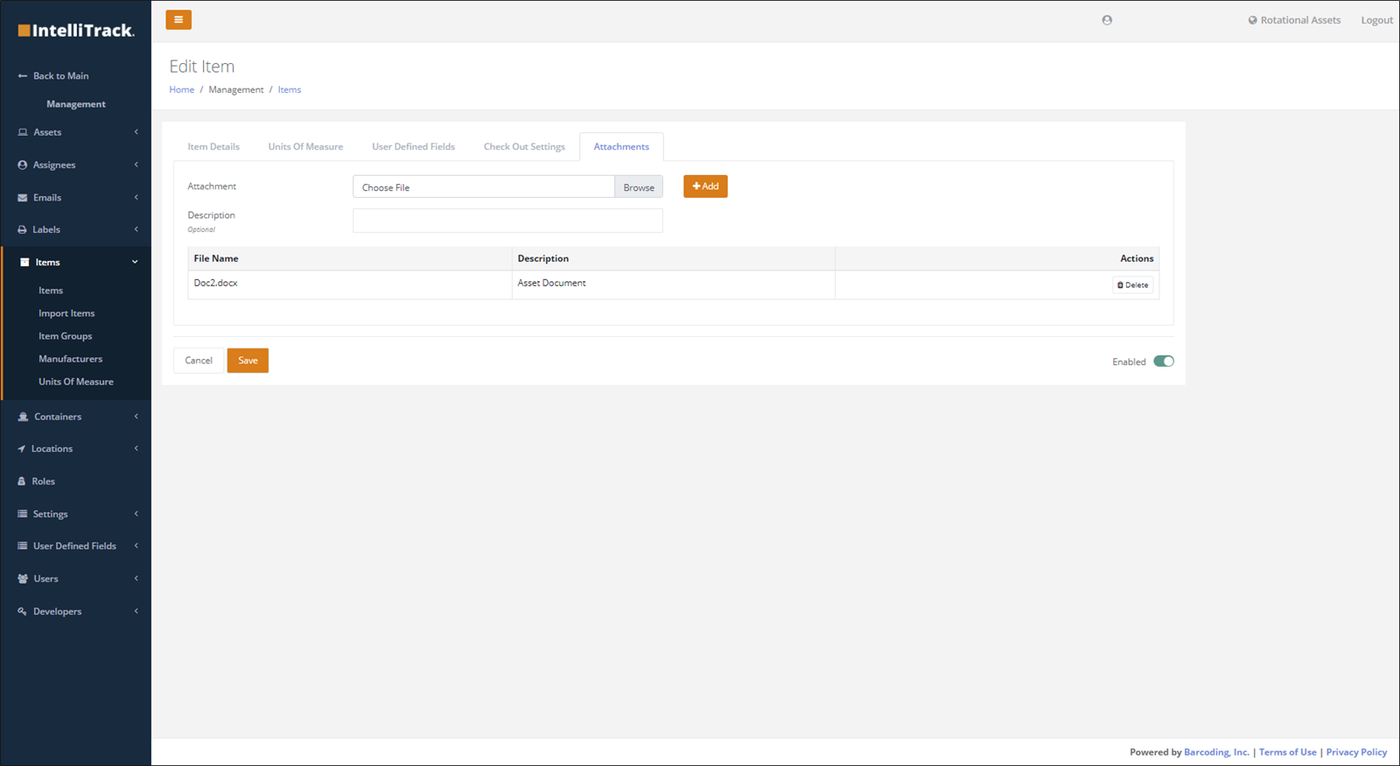
Press the Save button to save the file attachment(s) to the item. They are available for Download at any time.
Item Clone
The Clone feature gives you an accelerated way to add an item to the system. This feature is useful when you are adding an item that is similar to one that already exists. Many relevant fields automatically carry over to the new record, including:
- Description
- Manufacturer
- Item Groups
- Comments
- Picture
- Serial Number Setting
- Lots Setting
- Expiration Dates Setting
- Units of Measure
- User Defined Fields
Cloning an Item
An item is added via the clone feature at the Items page.
- Select Management > Items. The Items page appears.
- Find the item that you want to clone.
- In the Actions column, click the ... More Options icon. The Clone option appears.
- Select the Clone button. The Add Item page appears.
- All fields that carry over and contain a value are set for this new item. Enter the Item Number in the Item Number field.
- If you do not want to make any more adjustments to this item, press the Save button to save it.
Item Edit
All fields in the item may be edited from the Edit Item page. The Edit Item page is reached from the Items page.
Editing an Item
Refer to the steps below to edit an item.
- Click Management > Items > Items from the navigation pane.
- The Items page appears.
- In the Actions column, select the Edit button for the item that you want to edit.
- The Edit Item page appears for this item.
- Perform the changes that you want to make to the item.
- Press the Save button to save the updates to the item.
Item Delete
An item is deleted from the Items page. To delete an item, refer to the steps below.
Note
An item in use cannot be deleted.
- Select Management > Items > Items from the menu.
- The Items page appears.
- Select the Delete button for the item that you want to delete.
- A Confirmation prompt appears, asking you to confirm this action.
- To continue, press Yes.
- The prompt closes.
- If the item is not currently being used, it is deleted.
- If the item is currently being used, it will not be deleted: a message appears to notify you that the item is currently being used and cannot be deleted.
Item Labels
The capability to print Item labels is found at the Items page (Management > Items > Items). It is a Print operation, which is completed from the Print button, found along the top of the page.
The label sizes that IntelliTrack supports are:
- 2 x 1,
- 3 x 1,
- 3 x 2,
- 3 x 5,
- 4 x 2.
To print Item labels:
Select the records to be printed as labels by marking the check box to the left of the Item. Next, select the Print button.
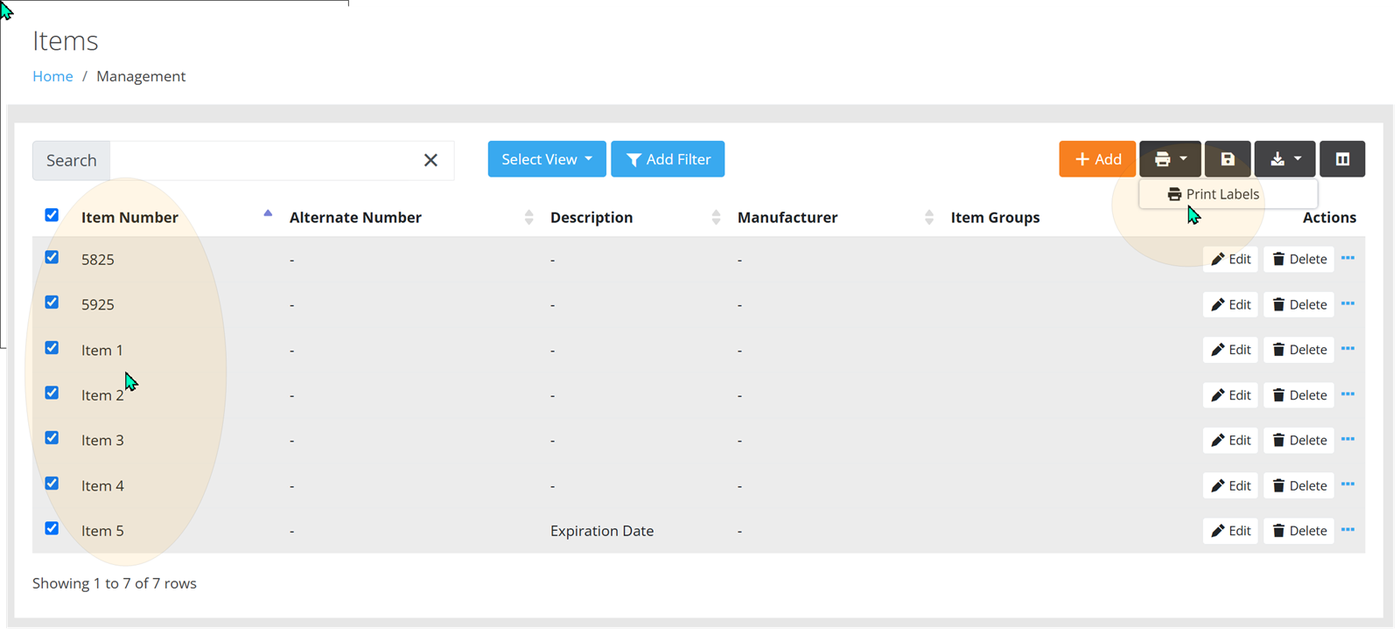
The Print Labels popup appears.
Label Size: select the label size that corresponds with the printer.
Include Description: enable this setting to include the item's description in the label.
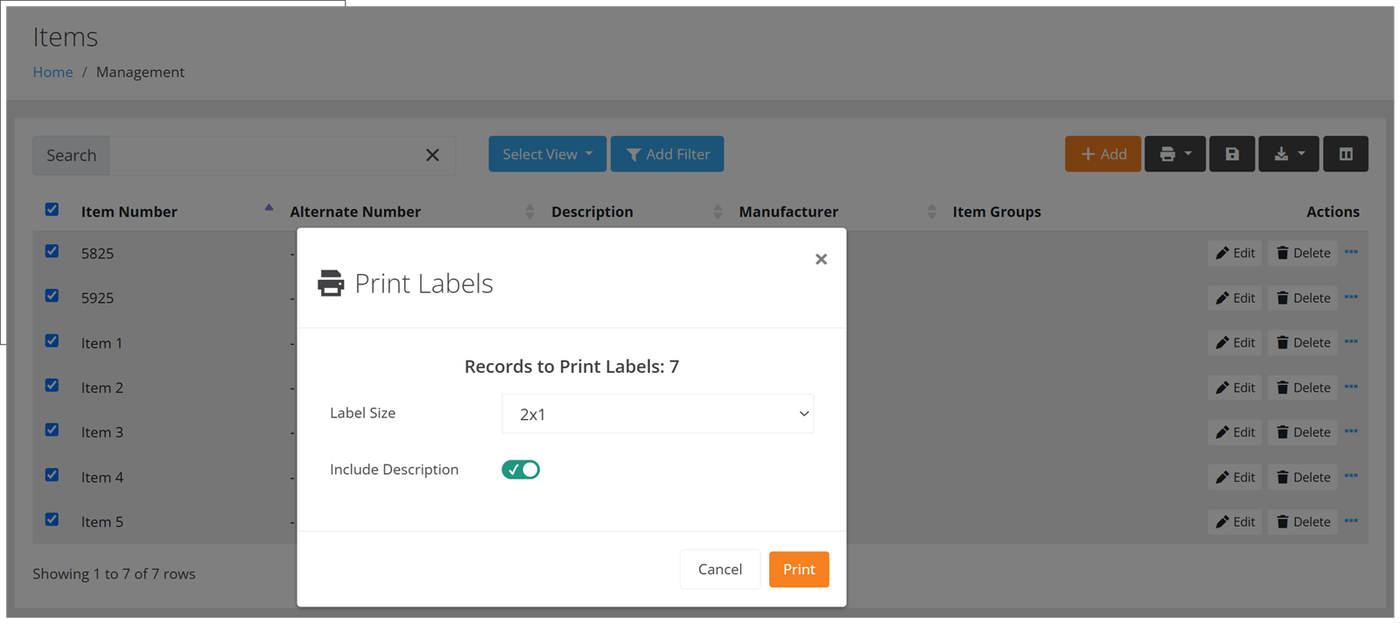
Select the Print button to close the prompt.
The Print window appears with a preview of the selected labels.
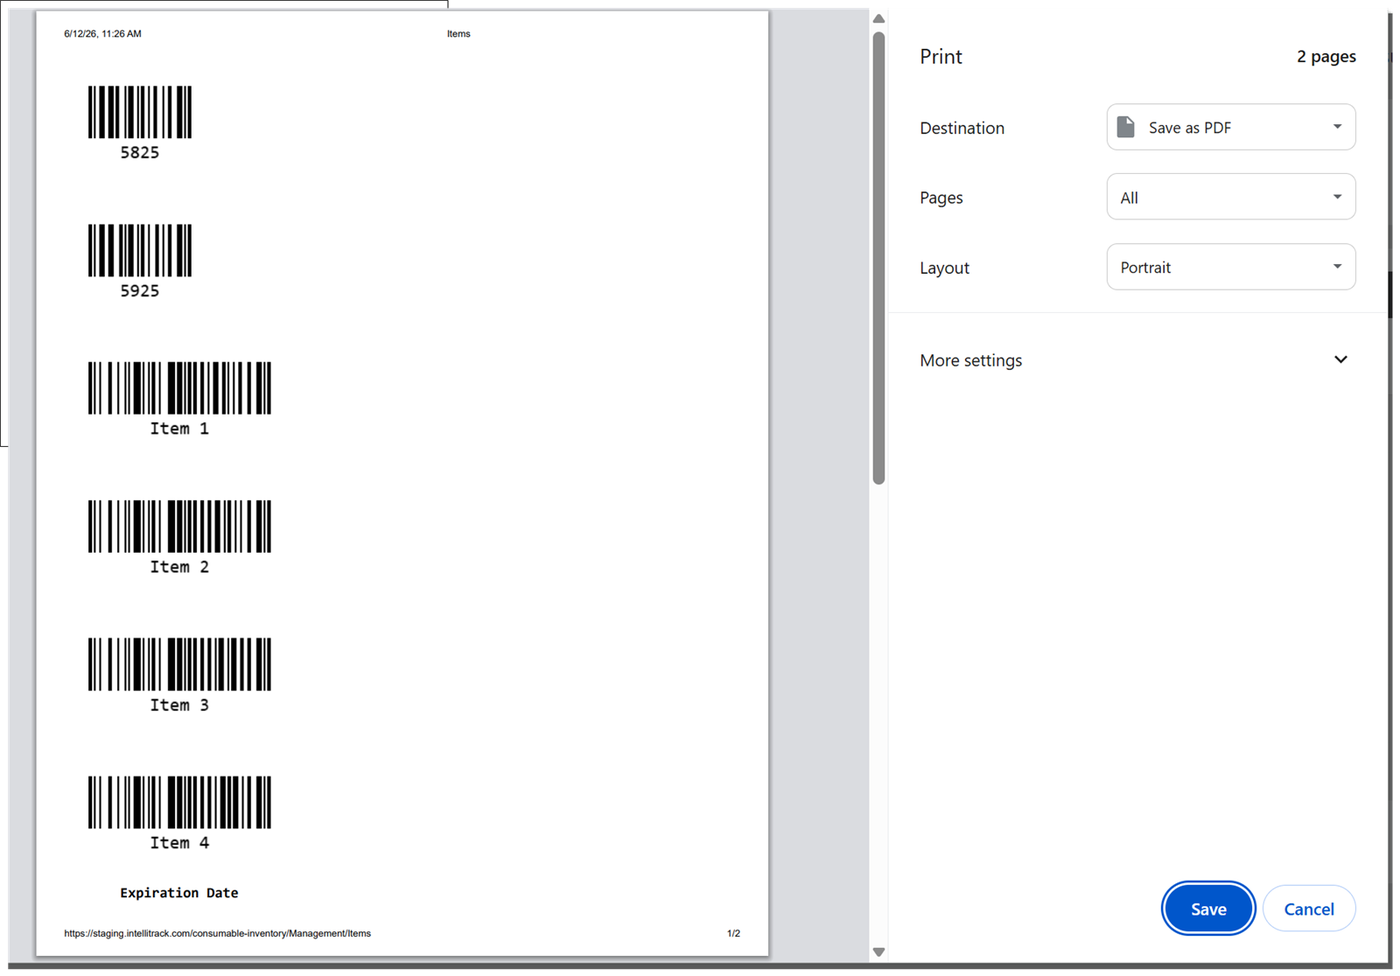
Select the Printer from the list of installed printers via the Printer or Destination options (dependent on your browser). Depending on your browser press Save or Print.
The Labels are sent to this printer and then printed.
Importing Items
The item import capability provides for importing new item data or updating existing item data. The Item Import feature uses a CSV file, created from a downloadable template to import the data. Refer to the steps that follow to import item data:
- Select Management > Items > Import Items from the navigation pane.
- The Item Import page appears.
- Press the Download Template button to download the Item Import Template file. This file is a CSV file.
- Be sure to include the required fields for each item that you are importing.
- When preparing your import file, be sure to follow these guidelines:
- Maintain the Header name, as it is entered in the template. This is the database name of the field and it is what the import process uses to add the data in the template into the appropriate fields.
- Note the required fields. The required fields must be part of the template for the item to be imported.
- The optional fields may be removed from the template.
- For fields that require a On/Off, True/False, or Yes/No value, the import file will recognize True/False, T/F, or 1/0.
- Save the import file that you create.
- From the Item Import page, select the Choose File button. Navigate to the file and select it.
- Press the Upload File button.
- A message will appear to notify you that the import is being processed.
- When the import is finished, a results message is sent to your email. The message contains details about the results of the import.
Chapter 14 - Asset Lookup Setup
Lookups allow you to create specific group options for various parameters within the asset. You will find the lookup options in the Management menu. If you want to use lookups to further define the asset, we recommend that you define them BEFORE you begin adding the assets.
Note
Lookup data is optional. However, it helps with data sorting and reporting once you are tracking your fixed assets on a daily basis.
Note
Admin access is required to add an asset lookup.
Asset lookups are added by an Admin level user from the Management > Assets menu. They include:
- Statuses: an asset status is used to show the status of an asset. Some examples of asset status are: In Field, In Stock, Lost. It is an optional lookup setting and is not required.
- Conditions: an asset condition is used to denote the condition of an asset. Some examples of an asset condition are: Broken, New, Refurbished, Fair, Bad, Good. It is an optional lookup setting and is not required.
Conditions
The Conditions list is maintained at the Conditions page. Once added, the Condition is available as an option in the Condition down-down list when adding or editing an asset.
To reach the Conditions page, follow these steps.
Select Management > from the Home menu bar.
The Management menu options appear in the Menu bar. Select Assets> Conditions from the menu. The Conditions page appears.
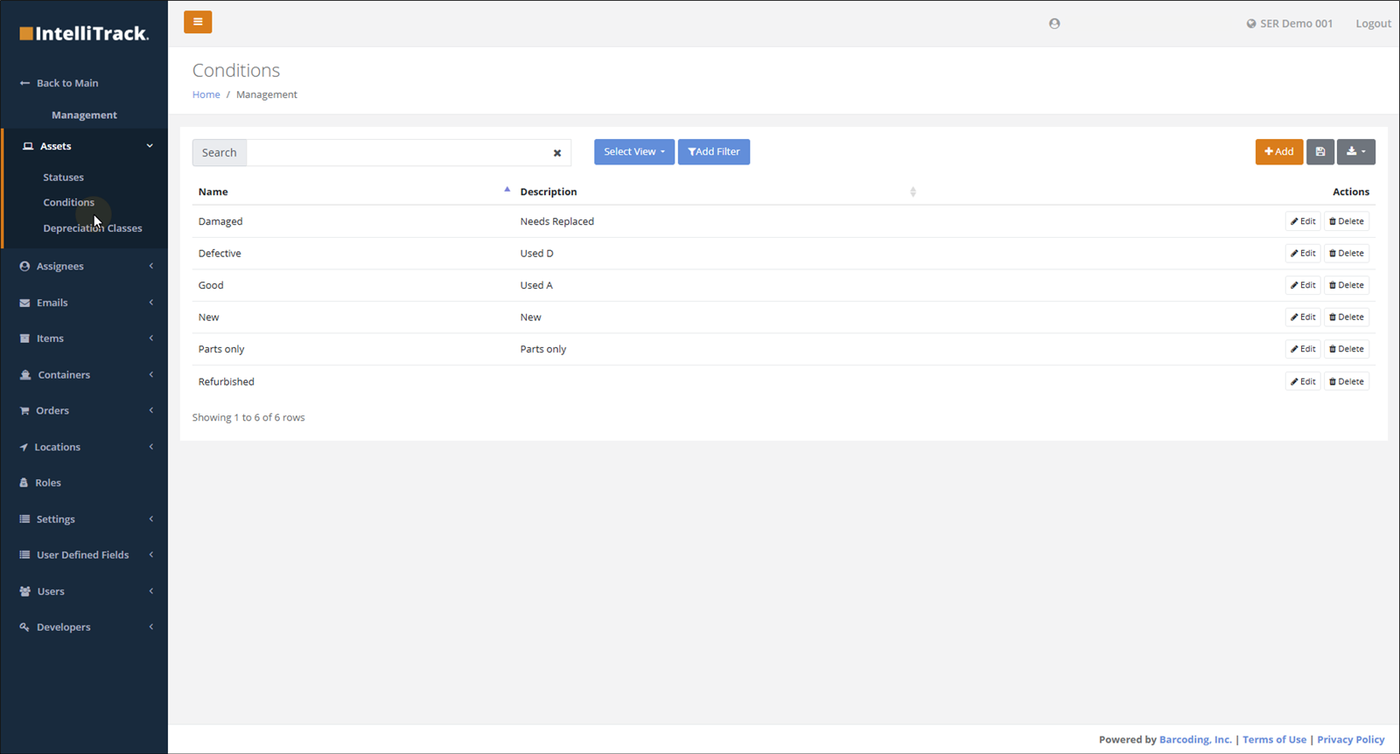
Note
To add, edit, or delete a Condition, Administrator access is required.
Adding a Condition
To add a new condition to IntelliTrack, please refer to the steps that follow.
From the Conditions page, select the Add button.
Note
The Add button is found along the top of the page, above the Actions column.
The Add Condition page appears.
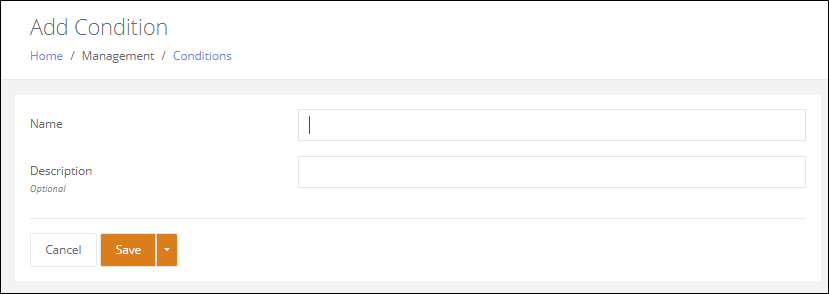
Enter the name of the Condition in the Name field.
- The Condition Name is required and must be unique.
Enter the Description for this Condition in the Description field. The Description is optional.
Press the Save button to save the Condition.
Save & New option: press the drop-down arrow in the Save button to select the Save & New option, the condition is saved, the page clears, and you can add another condition.
You are returned to the Conditions page. A message appears along the top of the page to notify you that the Condition has been saved.
Editing a Condition
A Condition is edited at the Edit Condition page. From the Conditions page, select the Edit button for a Condition that you want to edit. The Edit Condition page appears for this condition. The Name and Description may be edited. Be sure to press the Save button to save any changes to the Condition.
Deleting a Condition
Note
A Condition that is associated with an asset is "in use" and may not be deleted.
From the Conditions page, select the Delete button for the Condition that you want to delete. A Confirmation prompt appears asking you if you are sure that you want to delete this Condition. If the Condition is being used for an asset, you are also notified that this condition is in use and cannot be deleted.
Statuses
The Status list is maintained at the Statuses page. Once added, the Status is available as an option in the Status down-down list when adding or editing an asset.
To reach the Statuses page, follow these steps.
Select Management > from the Home menu bar.
The Management menu options appear in the Menu bar. Select Assets> Statuses from the menu. The Statuses page appears.
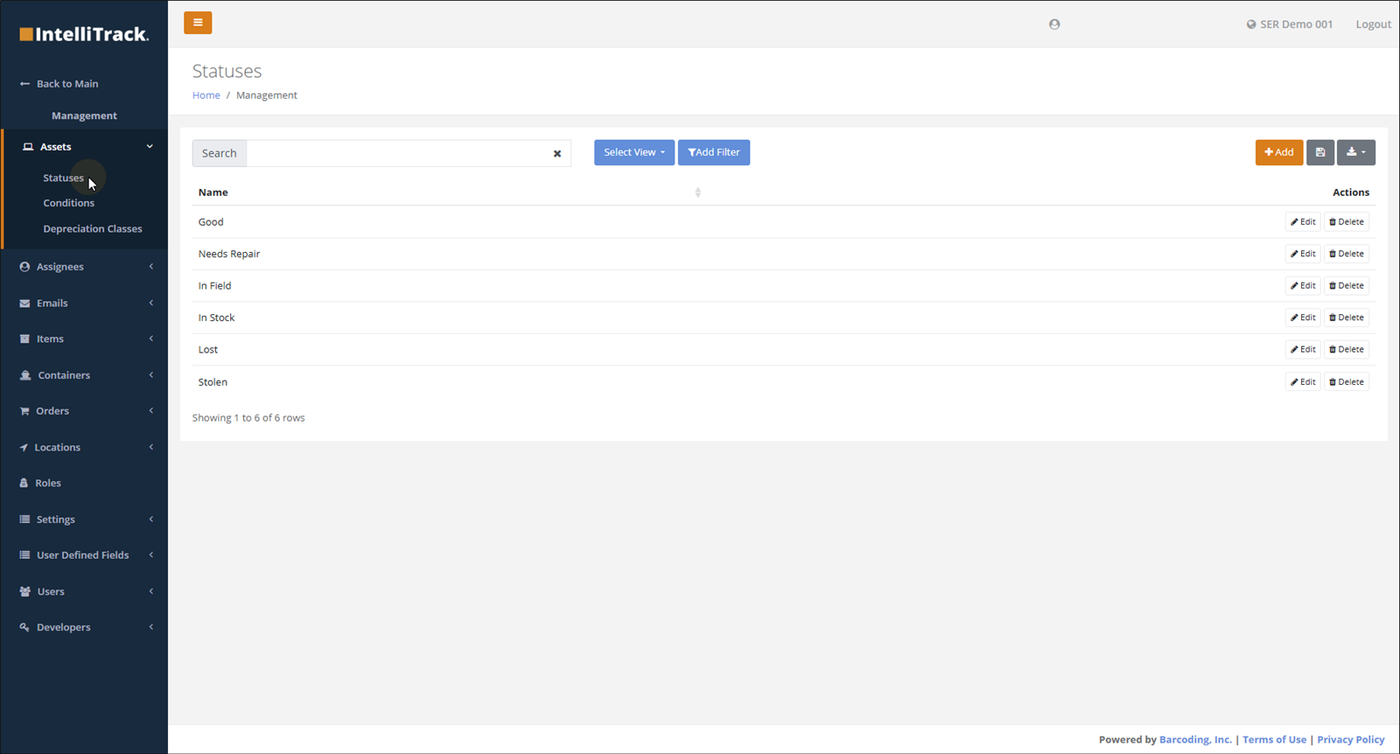
Note
To add, edit, or delete a Status, Administrator access is required.
Adding a Status
To add a new status to IntelliTrack, please refer to the steps that follow.
From the Statuses page, select the Add button.
Note
The Add button is found along the top of the page, above the Actions column.
The Add Status page appears.
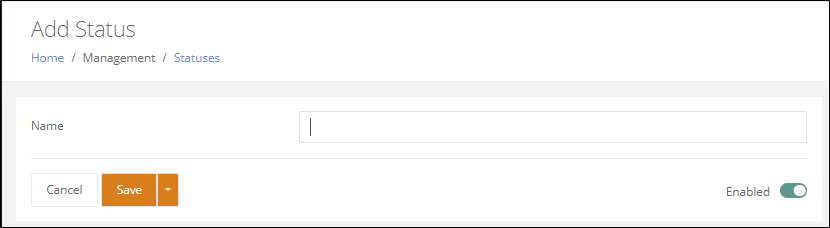
Enter the name of the Status in the Name field.
- The Status Name is required and must be unique.
Enter the Description for this Status in the Description field. The Description is optional.
Press the Save button to save the Status.
Save & New option: press the drop-down arrow in the Save button to select the Save & New option, save the status, clear the page, and add another status.
You are returned to the Statuses page. A message appears along the top of the page to notify you that the Status has been saved.
Editing a Status
A Status is edited at the Edit Status page. From the Statuses page, select the Edit button for a Status that you want to edit. The Edit Status page appears for this status. The Name and Description may be edited. Be sure to press the Save button to save any changes to the Status.
Deleting a Status
Note
A Status that is associated with an asset is "in use" and may not be deleted.
From the Statuses page, select the Delete button for the Status that you want to delete. A Confirmation prompt appears asking you if you are sure that you want to delete this Status. If the Status is being used for an asset, you are also notified that this status is in use and cannot be deleted.
Cellular Carriers
The Cellular Carriers list is maintained at the Cellular Carriers page. Once added, the Cellular Carrier is available as an option in the Cellular down-down list when adding or editing an asset that displays Carrier Information.
To reach the Cellular Carriers page, follow these steps.
Select Management > from the Home menu bar.
The Management menu options appear in the Menu bar. Select Assets> Cellular Carriers from the menu. The Cellular Carriers page appears.
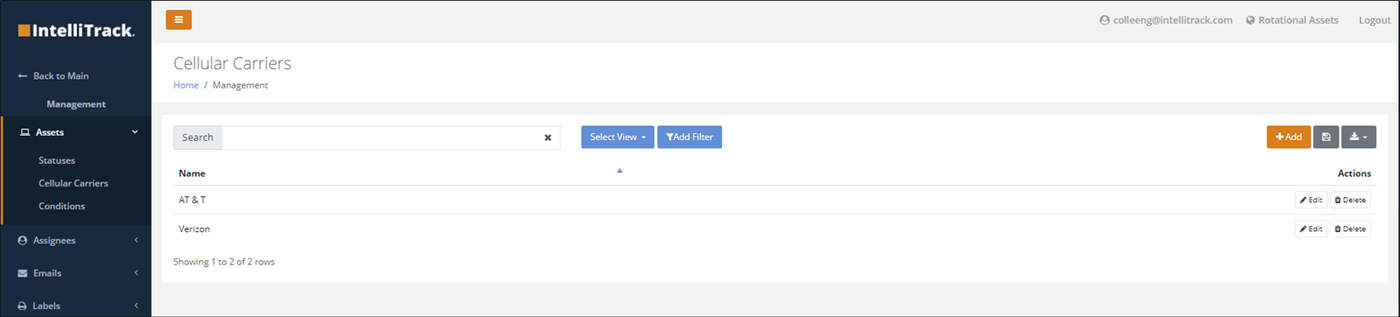
Note
To add, edit, or delete a Cellular Carrier, Administrator access is required.
Adding a Cellular Carrier
To add a new cellular carrier to IntelliTrack, please refer to the steps that follow.
From the Cellular Carriers page, select the Add button.
Note
The Add button is found along the top of the page, above the Actions column.
The Add Cellular page appears.
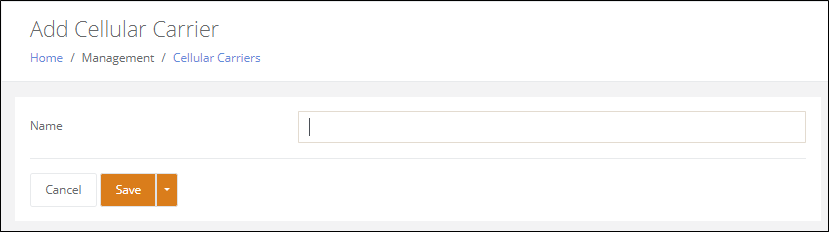
Enter the name of the Cellular Carrier in the Name field.
- The Cellular Carrier Name is required and must be unique.
Enter the Description for this Cellular Carrier in the Description field. The Description is optional.
Press the Save button to save the Cellular Carrier.
Save & New option: select the drop-down arrow in the Save button to select the Save & New option, save the cellular carrier, clear the page, and add another one.
You are returned to the Cellular Carriers page. A message appears along the top of the page to notify you that the Cellular Carrier has been saved.
Editing a Cellular Carrier
A Cellular Carrier is edited at the Edit Cellular page. From the Cellular Carriers page, select the Edit button for a Cellular Carrier that you want to edit. The Edit Cellular Carrier page appears for this cellular carrier. The Name and Description may be edited. Be sure to press the Save button to save any changes to the Cellular Carrier.
Deleting a Cellular Carrier
Note
A Cellular Carrier that is associated with an asset is "in use" and may not be deleted.
From the Cellular Carriers page, select the Delete button for the Cellular Carrier that you want to delete. A Confirmation prompt appears asking you if you are sure that you want to delete this Cellular Carrier. If the Cellular Carrier is being used for an asset, you are also notified that this cellular carrier is in use and cannot be deleted.
Chapter 15 - Assignees
An Assignee is used with Fixed Asset Management in IntelliTrack. The assignees are displayed for the Tenant at the Assignees page.
An Assignee can function as an asset owner and / or as a site contact.
Assignee Types
The type of the assignee determines how the assignee functions in IntelliTrack.
- Owner: the owner of an asset; this assignee is associated with the asset when it is not checked out. To be eligible for asset ownership, the assignee must be an Owner type.
- Site Contact: the contact for a site; this assignee is associated with a Site and can be referenced at the Site level by name and email address. To be eligible to be a site contact, the assignee must be a Site Contact type.
Note
Enabling a Type for an Assignee is optional. An Assignee may have all types, one type, or no type. However, if an Assignee does not have a type, the Assignee with be ineligible for use in IntelliTrack. Part of Assignee Management is determining the type or types for each assignee.
Managing Assignees
Note
Admin access is required to create, edit, or delete an assignee.
Assignees are managed at the Assignees page
Select Management > from the Home menu bar.
The Management menu options appear. Select Assignees > Assignees from the Management menu bar. The Assignees page appears.
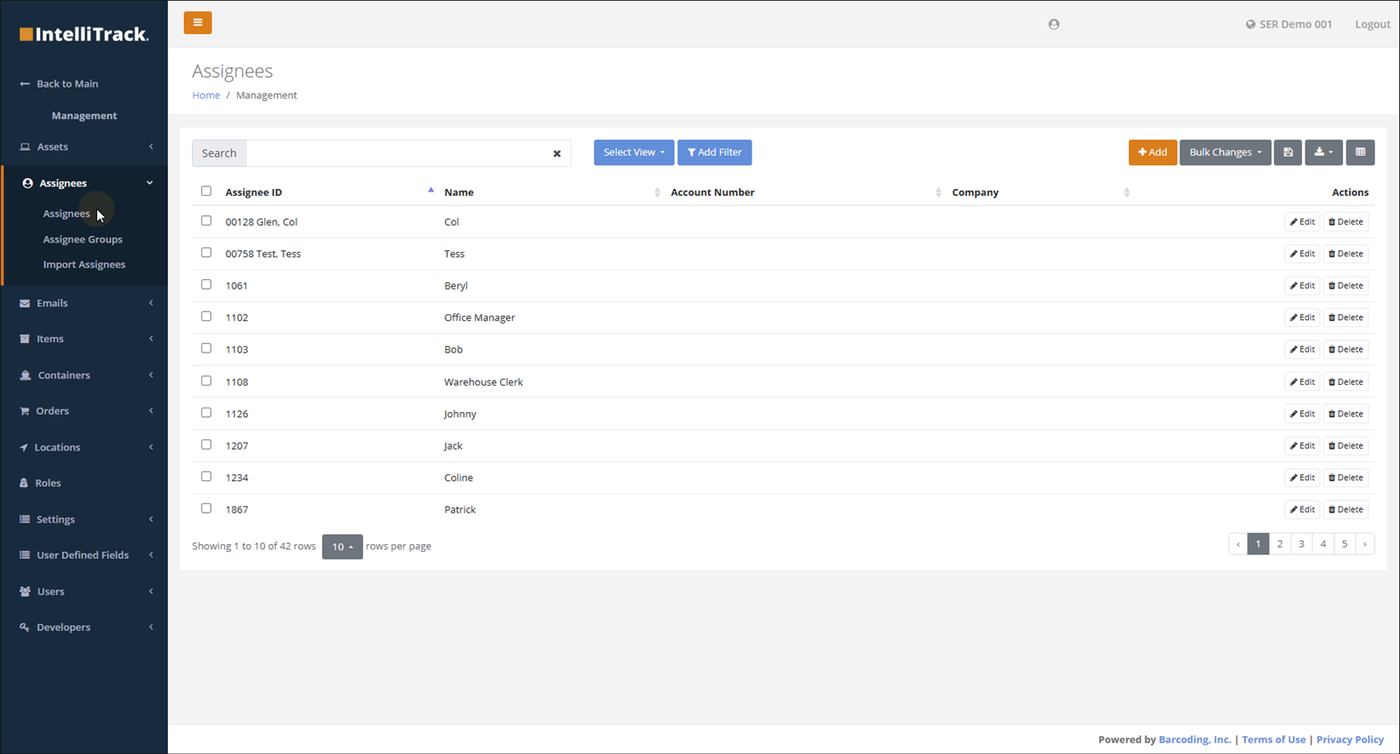
Note
To add, edit, or delete an Assignee, Administrator access is required.
Adding an Assignee
To add an Assignee, please refer to the steps that follow.
From the Assignees page, select the Add button.
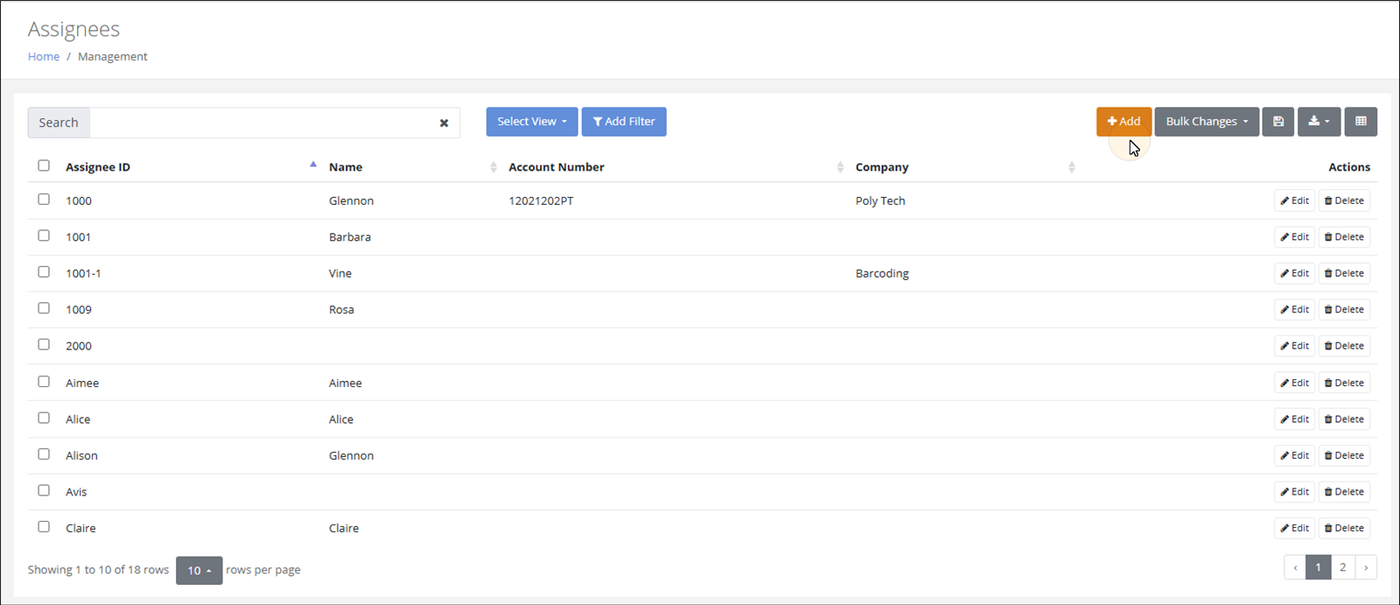
The Add Assignee page appears.
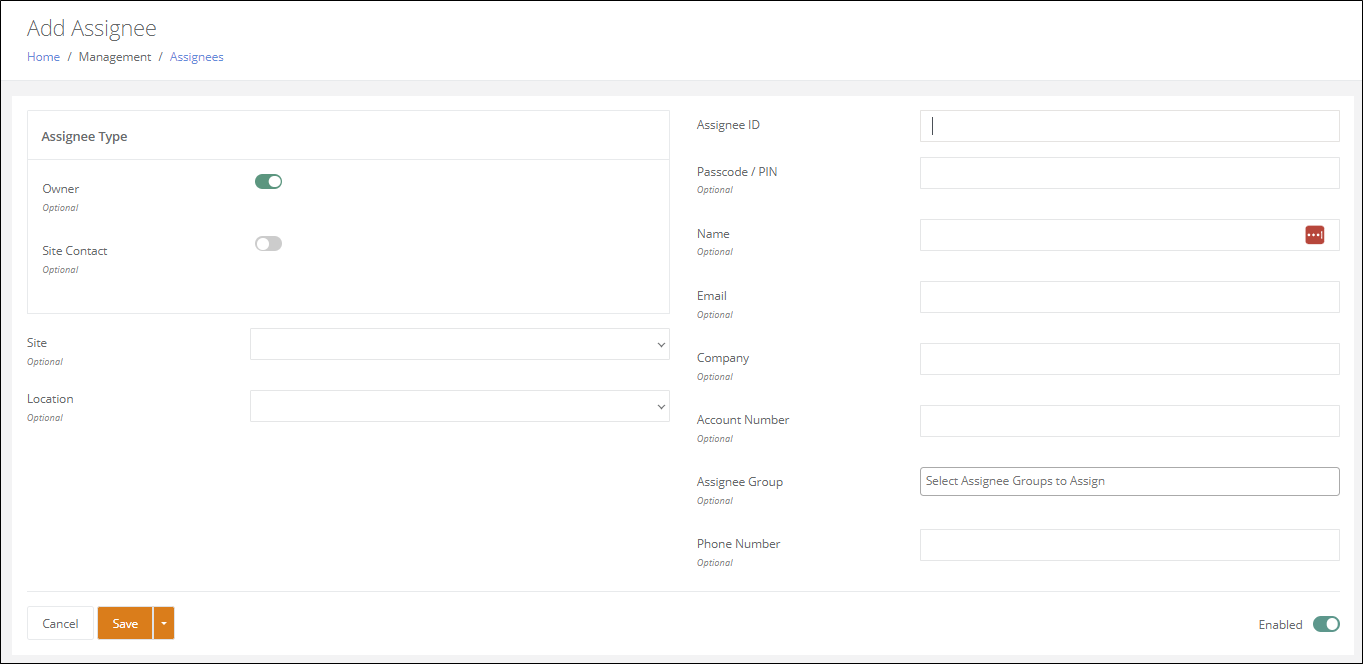
In the Assignee Type section of the page, enable the settings that determine how this Assignee will function in the Tenant.
- Owner: automatically enabled by default. When enabled, this Assignee is eligible to be designated as the owner of an asset.
- Site Contact: automatically disabled by default. When enabled, this Assignee becomes eligible to be set as a Site Contact.
Site field: select a Site from the list options that appear. When the Site Contact type is enabled, this field is required.
Location field: select a Location from the list options that appear.
- When the Site Contact type is enabled, this field is required.
Assignee ID field: enter the ID for this Assignee; this field is a required field for the Assignee.
Passcode / PIN field: enter the Passcode / PIN for this Assignee, if desired. This field is optional.
Name field: enter the Name of the Assignee.
- This field is required when the Site Contact type is enabled.
Email field: enter the Email Address of the Assignee.
- This field is required when the Site Contact type is enabled.
Company field: enter the Company name of the Assignee. This field is optional.
Account Number field: enter the Account Number of the Assignee. This field is optional.
Assignee Group field: enter the Assignee Group of the Assignee. This field is optional. This Assignee Group options are pulled from the list of Assignee Groups found at the Assignee Groups page.
Phone Number field: enter the Phone Number of the Assignee. This field is optional.
Press the Save button to save this Assignee and return to the Assignees page.
- Save & New: press the drop-down arrow in the Save button to save the Assignee, clear the Add Assignee page, and add another Assignee.
- Save & Clone: press the drop-down arrow in the Save button to save the Assignee, clone specific Assignee fields, and add another Assignee.
Site Contact Assignee
When you add a Site Contact Assignee, the following fields are required for the Assignee:
- Assignee Name
- Site
- Name
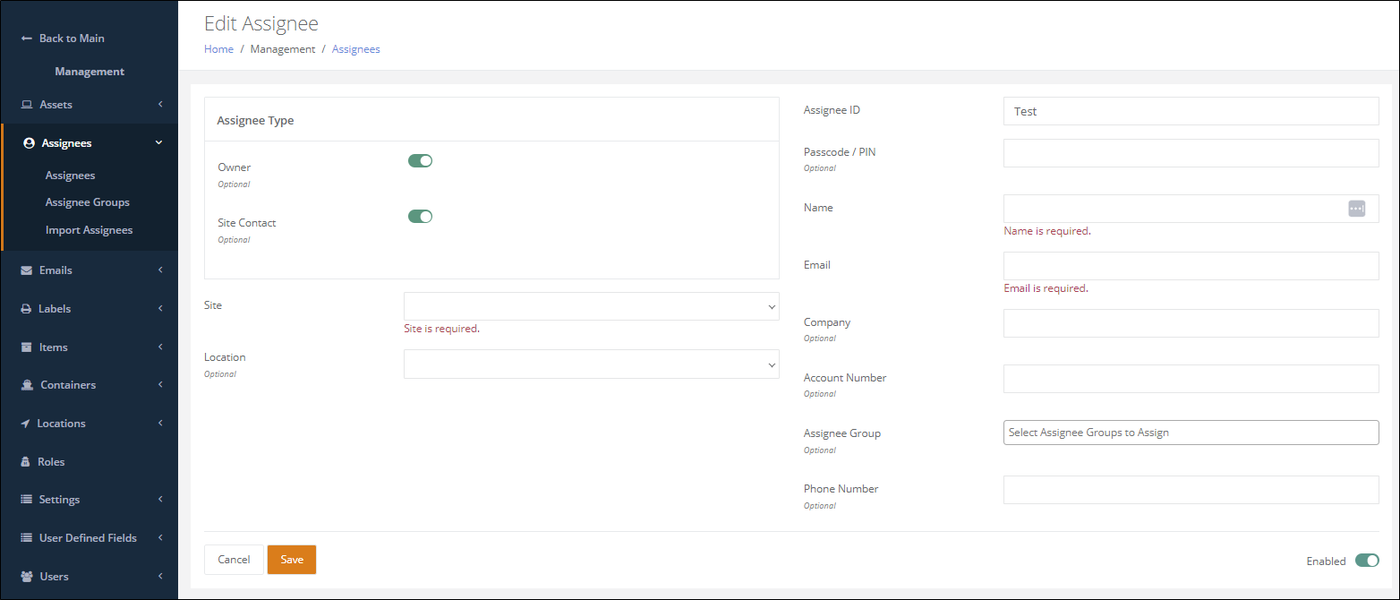
The Site Contact's information is displayed at the Edit Site page (Management > Locations > Site > Edit).
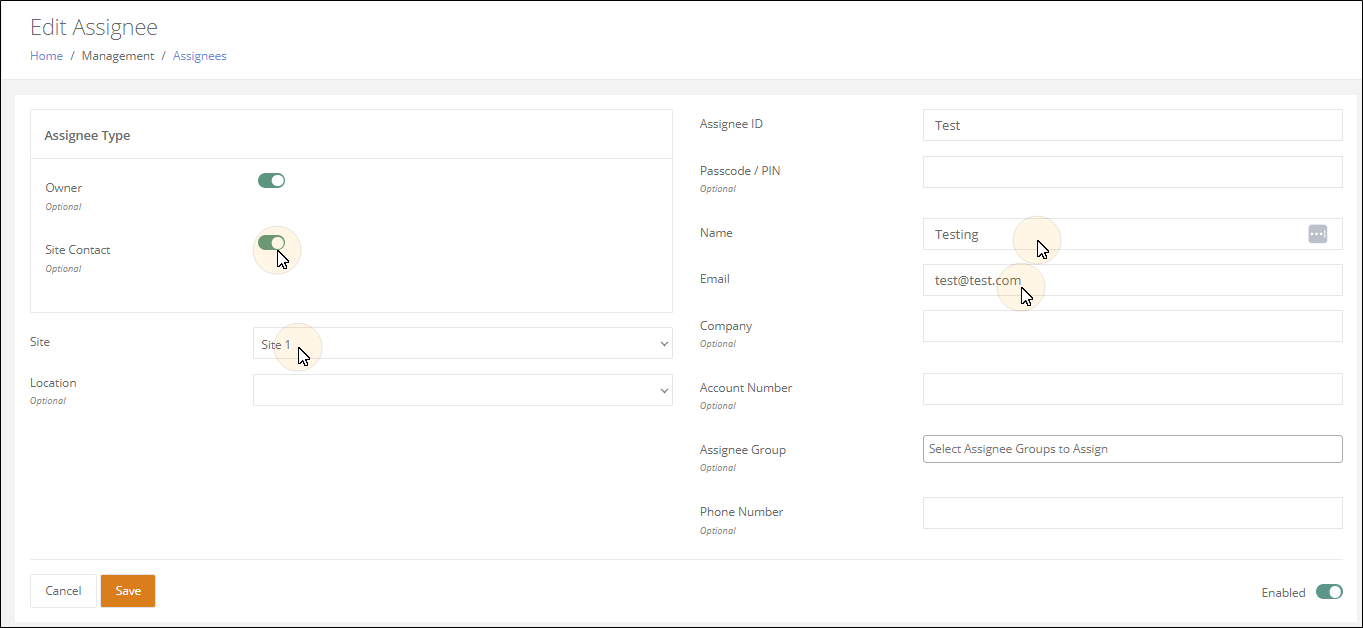
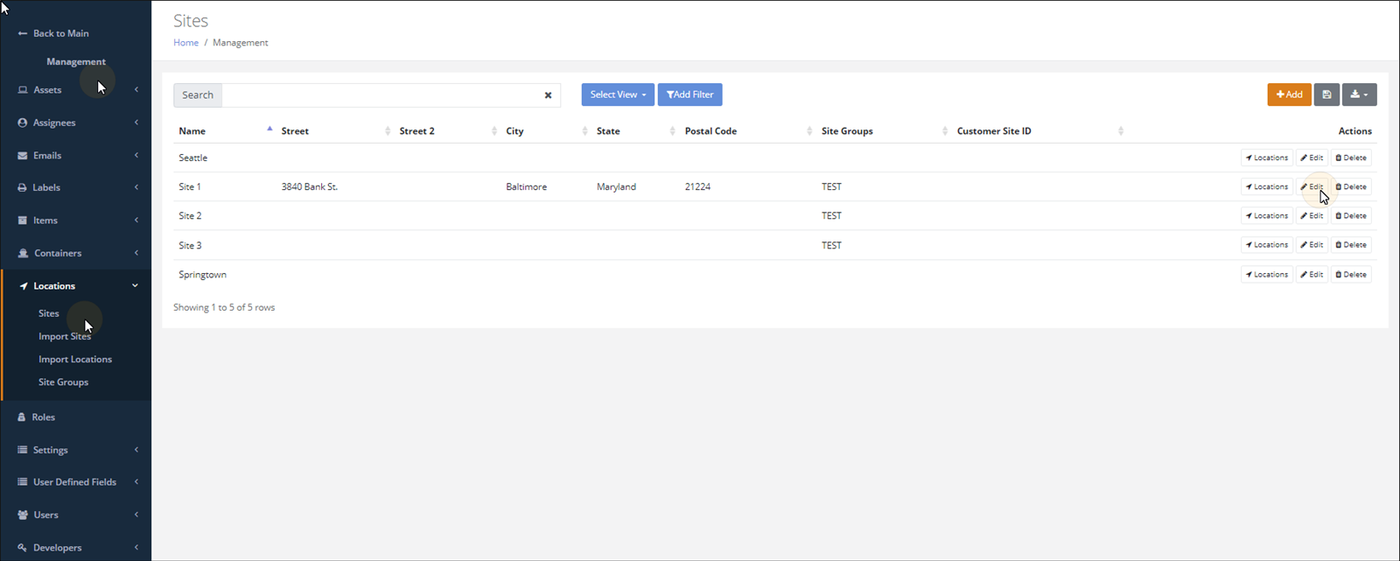
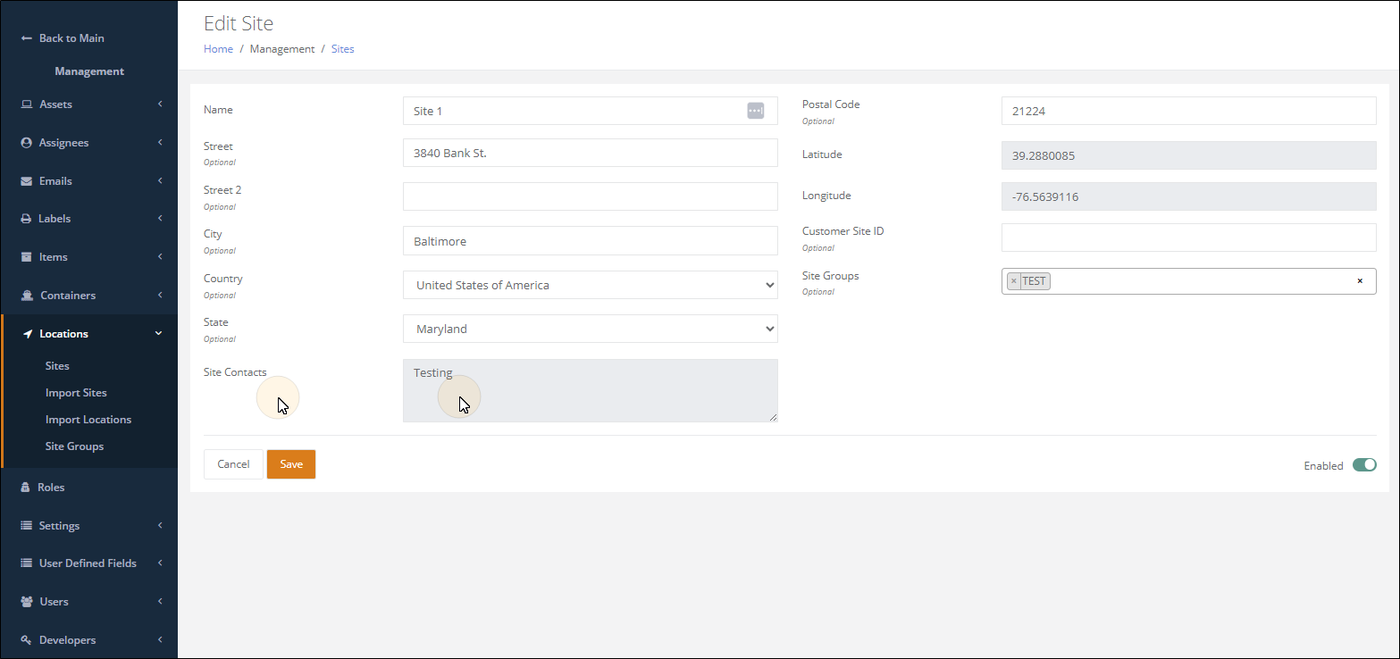
Editing an Assignee
An Assignee is edited at the Edit Assignee page.
From the Assignees page, select the Edit button for an Assignee that already exists.
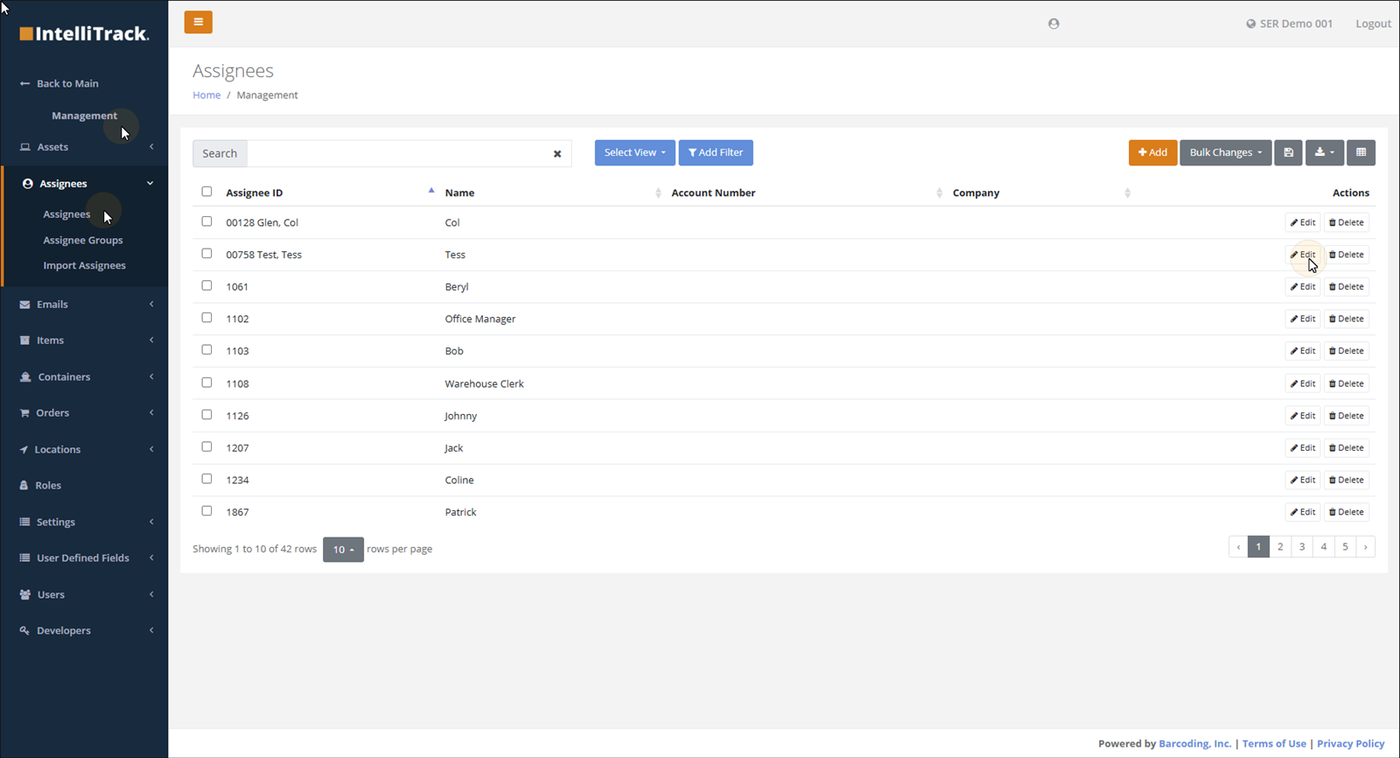
The Edit Assignee page for this assignee appears.
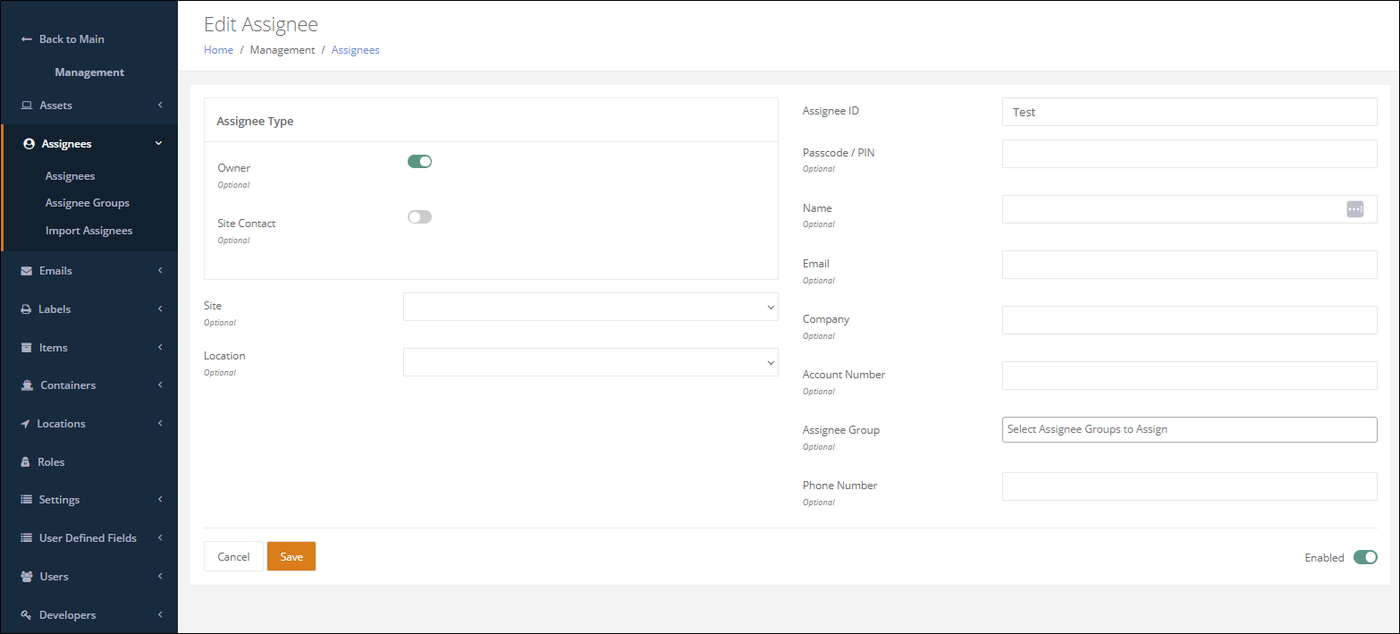
All fields are editable; however, when editing an Assignee's Type, be aware of these situations.
- The Owner type may not disabled when this Assignee is an Owner of at least one asset.
- If the Assignee is a Site Contact and this type is disabled the Assignee will be removed as a contact for this Site.
Deleting an Assignee
Note
An Owner Assignee type cannot be deleted when in use on an asset.
An Assignee may be deleted when it is not in use. To delete an Assignee, please refer to the steps below.
- From the Assignees page, select the Delete button for the Assignee.
- A prompt appears asking the User to confirm this actions.
- After confirming that the User wants this Assignee to be deleted, the prompt closes.
- The Assignee is deleted if it is not in use.
Assignee Labels
The capability to print Assignee labels is found at the Assignees page (Management > Assignees> Assignees). It is a Print operation, which is completed from the Print button, found along the top of the page.
The label sizes that IntelliTrack supports are:
- 2 x 1,
- 3 x 1,
- 3 x 2,
- 3 x 5,
- 4 x 2.
To print Assignee labels:
Select the records to be printed as labels by marking the check box to the left of the Assignee.
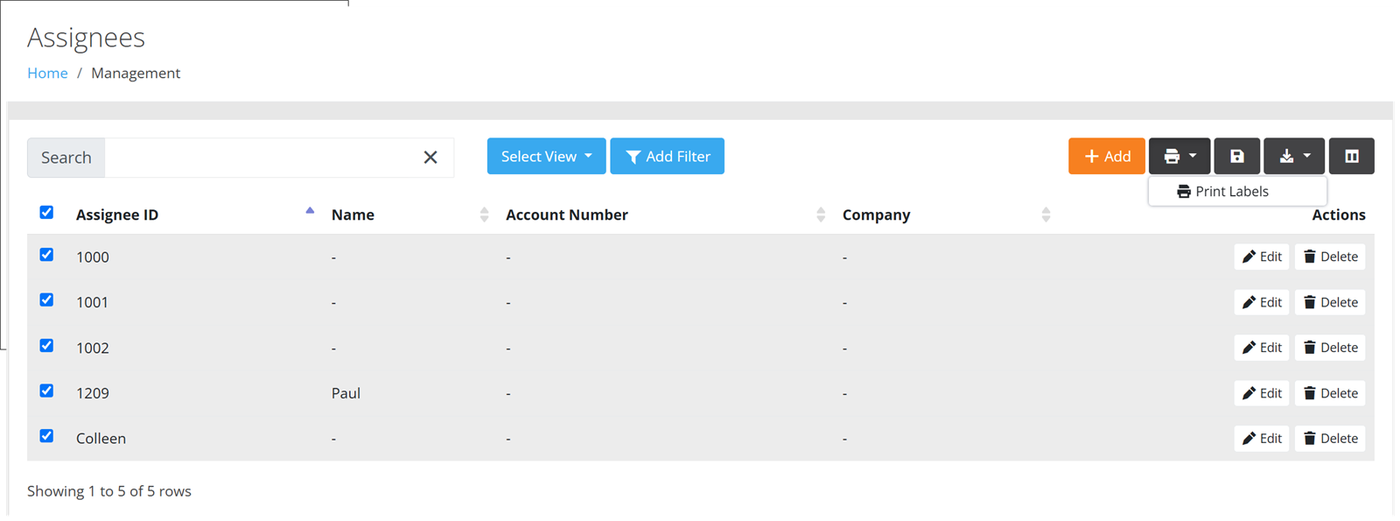
Select Print > Print Labels. The Print Labels prompt appears. Select the Label Size that corresponds to your printer.
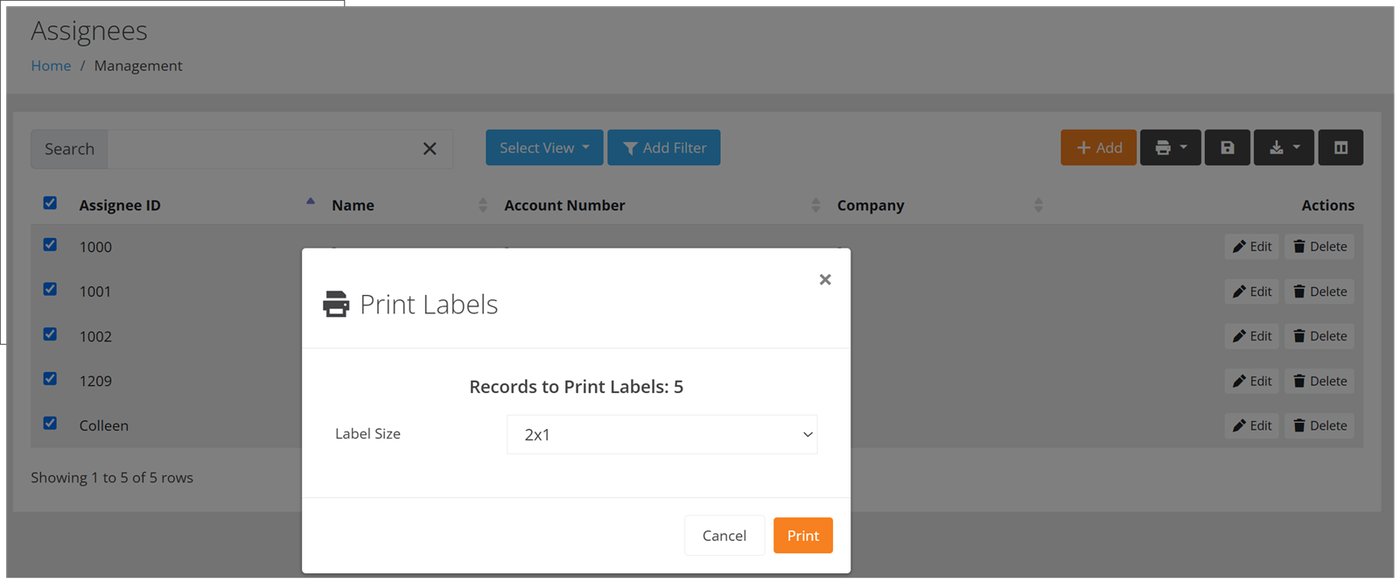
Select the Print button to close the prompt and continue with printing the labels.
The Print window appears. It contains a Preview of the Labels that will be printed.
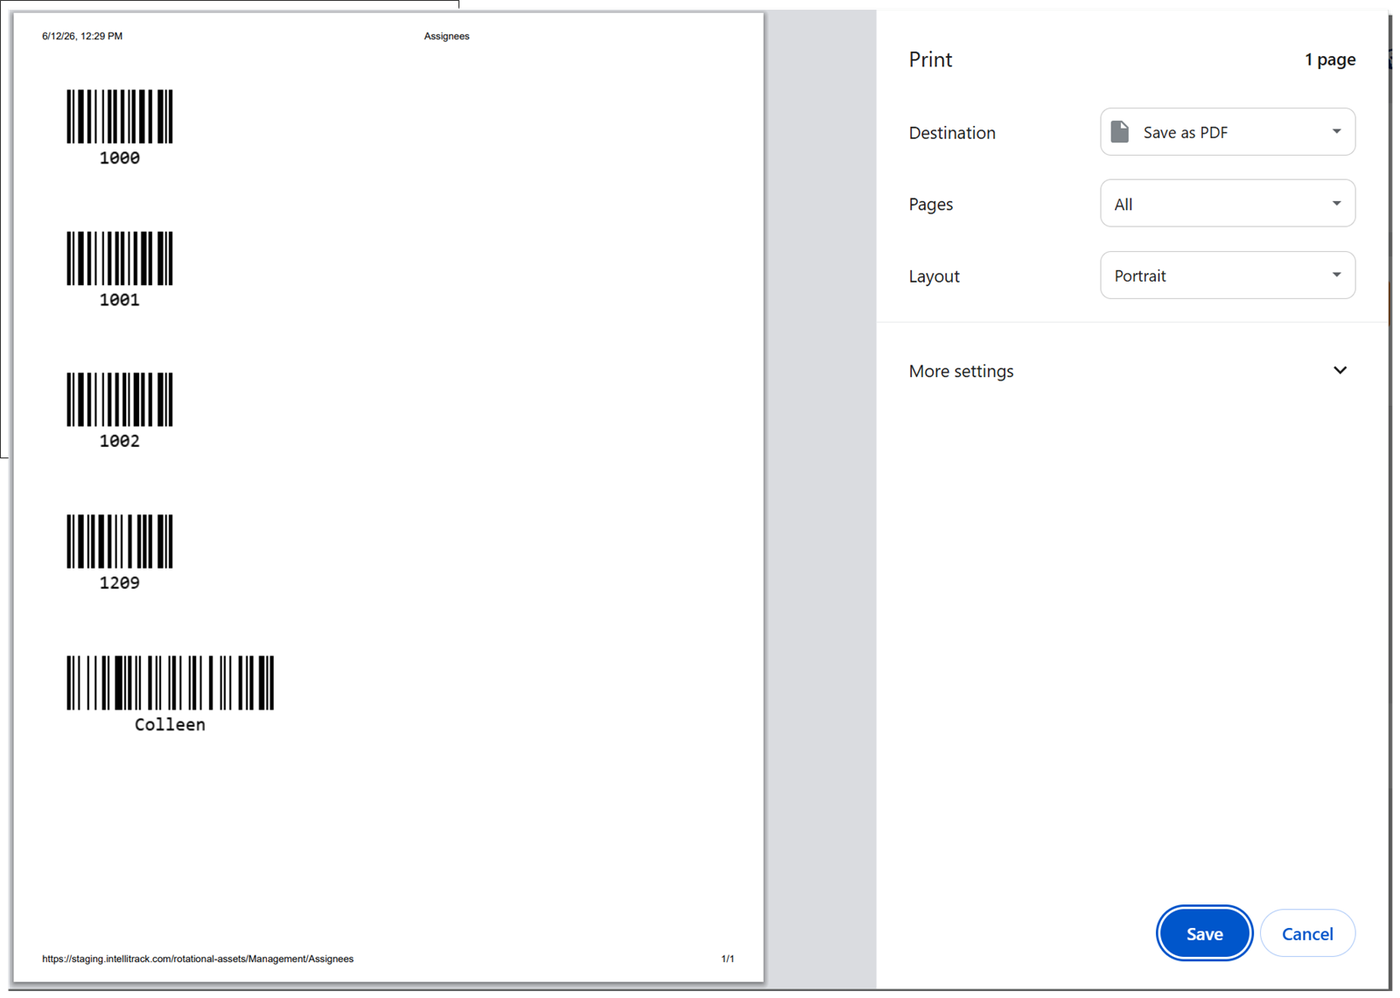
Select the Printer from the list of installed printers via the Destination field or the Printer field depending on your browser.
Select the Print button.
The Labels are sent to this printer and then printed.
Importing Assignees
Assignees may also be imported into IntelliTrack via a CSV Import Template. It is available from the Import Assignees page. Select Home > Management> Assignees > Import Assignees to reach this page.
Important
When Assignee Auto-Numbering is ON the assignee import file must still contain a value for the Assignee ID when importing a new assignee for the import to process; however, the resulting imported assignees will still follow the auto-numbering schema. This means that the Assignee ID for the imported assignees will be auto-numbered instead of using the Assignee ID value in the Auto Number field.
To import assignee data into a tenant, follow these guidelines:
- Download the template.
- Follow the field requirements and field order in the template.
- Upload the template file (it is in .csv format).
- An email will be sent to your Inbox detailing the results of the import.
For best results:
- A fresh template should be used each time you perform an import.
- The Header row is required. Do not remove it.
- Make sure to include all required fields.
- Follow the field order of the template.
- Optional fields may be removed from the template. If an optional field is not present, it will be skipped over.
- The import file type must be CSV.
Assignee Groups
The Assignee Group lookup is an assignee lookup. It gives you a way to group assignees. Enter each assignee group may be assigned to an assignee. Select Home > Management > Assignees > Assignee Groups to reach the Assignee Groups page.

From this page you may Add, Edit, or Delete an assignee group.
Adding an Assignee Group
To add a new assignee group to IntelliTrack, please refer to the steps that follow.
From the Assignee Groups page, select the Add button.
Note
The Add button is found along the top of the page, above the Actions column.
The Add Assignee Group page appears.
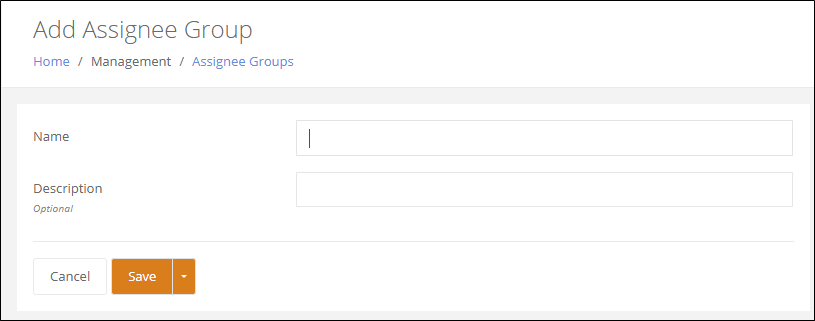
Enter the name of the Assignee Group in the Name field.
- The Assignee Group Name is required and must be unique.
Enter the Description for this Assignee Group in the Description field. The Description is optional.
Press the Save button to save the Assignee Group.
Save & New option: press the drop-down arrow in the Save button to select the Save & New option, the assignee group is saved, the page clears, and you can add another assignee group.
You are returned to the Assignee Groups page. A message appears along the top of the page to notify you that the Assignee Group has been saved.
Editing an Assignee Group
An Assignee Group is edited at the Edit Assignee Group page. From the Assignee Groups page, select the Edit button for a Assignee Group that you want to edit. The Edit Assignee Group page appears for this Assignee Group. The Name and Description may be edited. Be sure to press the Save button to save any changes to the Assignee Group.
Deleting an Assignee Group
From the Assignee Groups page, select the Delete button for the Assignee Group that you want to delete. A Confirmation prompt appears asking you if you are sure that you want to delete this Assignee Group. If the Assignee Group is being used for an asset, you are also notified that this assignee group is in use and cannot be deleted.
Chapter 16 - Container Lookup Setup
The Container Type is a lookup that is required for a Container. It defines the type of container that you have.
Container Types
The Container Type option takes you to the Container Types page. The Container Type is required for a Container. The Container Type list is maintained at the Container Types page. Once added, the Container Type is available as an option in the Container Type down-down list when adding or editing a Container.
To reach the Container Types page, follow these steps.
Select Management > from the Home menu bar.
The Management menu options appear in the Menu bar. Select Containers> Container Types from the menu. The Container Types page appears.
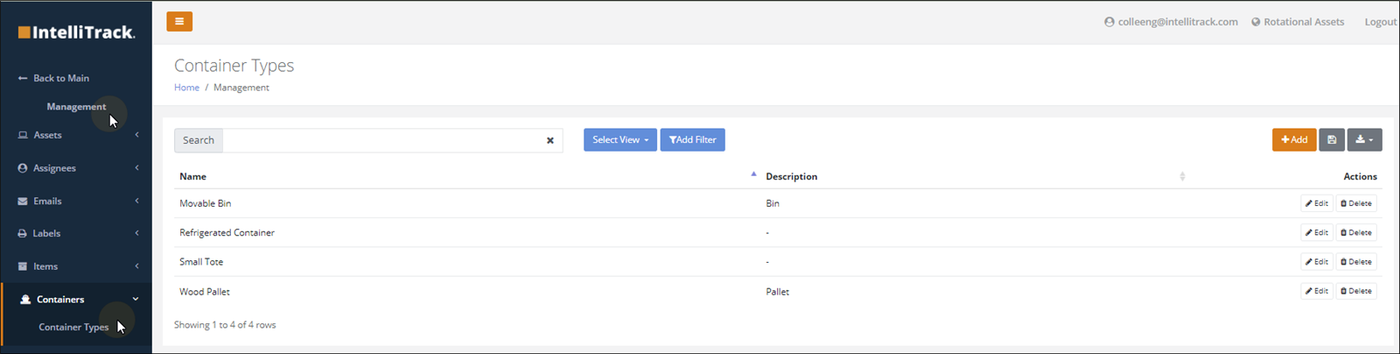
Note
To add, edit, or delete a Container Type, Administrator access is required.
Adding a Container Type
To add a new container type to IntelliTrack, please refer to the steps that follow.
From the Container Types page, select the Add button.
Note
The Add button is found along the top of the page, above the Actions column.
The Add Container Type page appears.
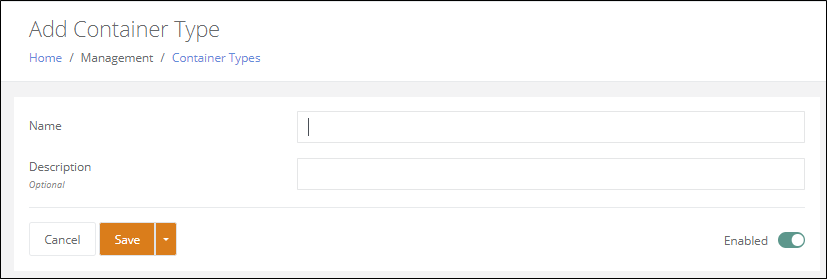
Enter the name of the Container Linotype the Name field.
- The Container Type Name is required and must be unique.
Enter the Description for this Container Type in the Description field. The Description is optional.
Press the Save button to save the Container Type.
Save & New option: press the drop-down arrow in the Save button to select the Save & New option, save the container type, clear the page, and add another container type.
You are returned to the Container Types page. A message appears along the top of the page to notify you that the Container Type has been saved.
Editing a Container Type
A Container Type is edited at the Edit Container Type page. From the Container Types page, select the Edit button for a Container Type that you want to edit. The Edit Container Type page appears for this container type. The Name and Description may be edited. Be sure to press the Save button to save any changes to the Container Type.
Deleting a Container Type
Note
A Container Type that is associated with a Container is "in use" and may not be deleted.
From the Container Types page, select the Delete button for the Container Type that you want to delete. A Confirmation prompt appears asking you if you are sure that you want to delete this Container Type. If the Container Type is being used on a Container, you are also notified that this container type is in use and cannot be deleted.
Chapter 17 - Depreciation Setup
A fixed asset is any asset that has a useful life and is expected to be in use for a period of time. In IntelliTrack a fixed asset has these qualities:
- a purchase cost
- an in service date
- a salvage value, which is the asset’s worth at the end of its useful life.
For many assets (such as a vehicle, computer, or piece of specialized equipment), its value decreases over time. To account for this decrease in value, you may use a proven formula to calculate it; this is called the asset’s depreciation. Depreciation setup in IntelliTrack involves these steps:
- Setting the Tenant Depreciation settings.
- Setting up depreciation classes.
- Assigning the depreciation classes to the item.
- Adding the depreciation data to the asset (purchase cost, in service date, and salvage value).
Depreciation Settings for the Tenant
These settings are used to determine asset depreciation.
Fiscal Year Ends
Click the drop-down arrow and select the month that the company’s fiscal year ends from the list that appears.
Partial Month Convention
Select the proper partial month convention for asset depreciation calculation from the options available.
- Full Month: Includes the entire month in the calculation of depreciation regardless of the day of the month the asset was placed into service. For example, if an asset was placed into service on the 17th of the month, that entire month will be included in the depreciation calculation.
- Exclude Month: Depreciation will start the month following the in-service date. For example, if an asset was placed into service on the 8th of May, the depreciation calculation will start with June 1st.
- Round Month: Assets placed into service prior to the 15th of the month will have that month included in the depreciation calculation; assets placed into service on or after the 15th of the month will not have that month included in the depreciation calculation. For example, if the asset was placed into service on the 8th of May, then the depreciation calculation will start with May 1st. If, however, the asset was placed into service on the 20th of May, the depreciation calculation will start with June 1st.
Depreciation Class
The depreciation class contains the information used to calculate the asset depreciation over its useful life. A depreciation class is linked to an item and the information contained in the class is used to calculate the depreciation for the assets associated with this item.
To set up a depreciation class, we recommend that you group the capital assets used by your organization into categories and set up depreciation classes based upon them. Examples of depreciation classes include:
- Computers
- Furniture
- Machinery
- Software
- Vehicles
A depreciation class is added to IntelliTrack from the Depreciation Classes page. When you add a depreciation class and set up its definitions, you are defining the parameters that calculate depreciation for any asset linked to this class. Each class is assigned the following:
- Depreciation method
- Depreciation period
- Useful life of the asset
Depreciation Methods
IntelliTrack Assets contains the most common depreciation methods used in accounting. They include:
- Straight Line,
- 150% Declining Balance ,
- 200% Declining Balance,
- Sum of the Years Digits (SYD).
You may also choose a Manual depreciation method. This allows you to track the depreciation in another system and record it in IntelliTrack. The depreciation methods are explained in the sections that follow.
Straight Line
Provides for equal year deductions over an asset’s useful life. The system calculates depreciation using the straight line depreciation formula.
Straight Line Formula: Period Depreciation = (cost - salvage value)/(life)
150% Declining Balance
Provides a greater deduction during the earlier recovery years and the method changes to straight line when it provides an equal or greater deduction. The system calculates depreciation based on the 150% declining balance formula.
150% Declining Balance Formula: Period Depreciation = [(cost - total depreciation from prior periods) * 1.5]/(life)
200% Declining Balance
Provides a greater deduction during the earlier recovery years and the method changes to straight line when it provides an equal or greater deduction. The system calculates depreciation based on the 200% declining balance formula.
200% (Double) Declining Balance Formula: Period Depreciation = [(cost - total depreciation from prior periods) * 2]/(life)
Sum of the Years Digits
Provides a deduction based on the assumption that an asset is more productive when it is new and less productive as it ages.
Sum of the Years Digits (SYD) Formula: Period Depreciation = [(cost - salvage value) * (life - period + 1) * 2] / (life)(life + 1)
Manual
The system does not calculate the asset’s depreciation. Manually enter depreciation information at the Asset form when entering or modifying asset data.
Depreciation Period
Each depreciation class must have a specified period.
- Annual: Depreciation is calculated through the end of the fiscal year.
- Monthly: Depreciation is calculated through the end of the current month.
Depreciable Life
The depreciable life of the asset is used to specify the useful life of the asset for a depreciation class. The life may be specified annually or monthly. When an asset reaches the end of its useful life, its value is zero or its salvage value. Depreciation will be calculated for an asset until it reaches the end of its useful life.
Depreciation Class Management
A depreciation class in IntelliTrack is managed from the Depreciation Classes page. Here, you are able to add, edit, and delete depreciation classes. This section provides an overview on working with the depreciation classes.
Adding a Depreciation Class
A Depreciation Class is added from the Depreciation Classes page. To add a depreciation class, please refer to the steps below.
Note
Administrator access is required to add a depreciation class.
Select Management > Assets > Depreciation Class. The Depreciation Classes page appears.

Press the Add button. The Add Depreciation Class page appears.
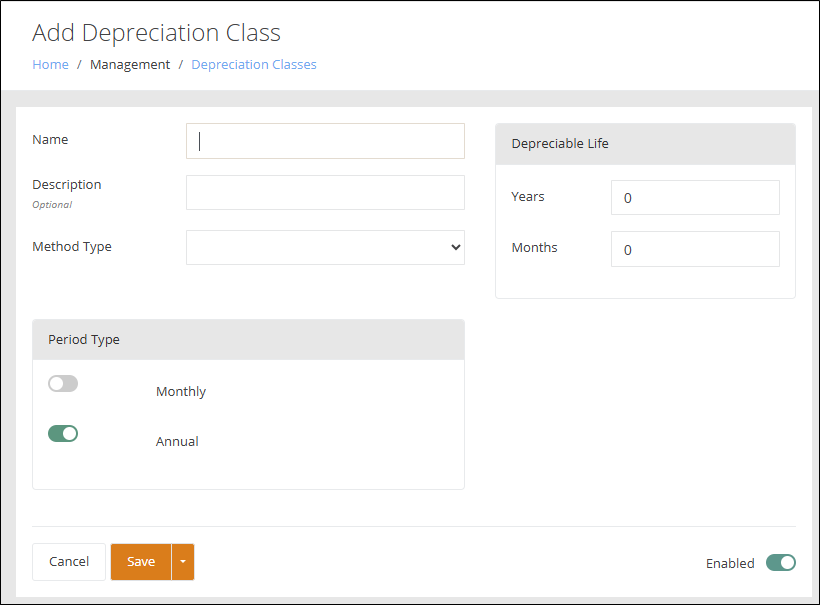
Name (required): Enter a name for the depreciation class.
Description (optional): Enter a description for this depreciation class, if desired.
Method Type (required): Click the drop-down and select the method type for this depreciation class from the list that appears. For more information about the depreciation method type, see "Depreciation Methods" for more information.
- Manual
- Straight Line
- 150% Declining Balance
- 200% Declining Balance
- Sum of the Years Digits
Period Type Area: select the period type for the depreciation.
- Monthly: select this option to calculate deprecation based upon a monthly period. Depreciation will be calculated on a monthly basis based upon the amount the depreciable life of the asset.
- Annual: select this option to calculate depreciation based upon an annual period. Depreciation will be calculated on an annual basis based upon the depreciable life of the assets.
Depreciable Life Area: The depreciable life represents how long the asset is useful after which the asset’s value is zero or its salvage value. Enter the number of years and/or months over which the asset’s cost is depreciated. When Monthly is selected as the depreciation period, enter the asset’s useful life in months. When Annual is selected as the depreciation period, enter the asset’s useful life in years or years and months.
- Years and Months: For Depreciable Life that is Annual: Enter the number of years-months over which the asset's cost is depreciated.
- Months: For Depreciable Life that is Monthly: Enter the number of months over which the asset's cost is depreciated.
Save: Press the Save button to save the depreciation class and return to the Depreciation Classes page.
- Save and New: Press the drop-down arrow and select the Save & New option to save the depreciation class, clear the fields, and add another depreciation class.
- Save and Clone: Press the drop-down arrow and select the Save & Clone option to save the depreciation class, clear the Name field only, and add another depreciation class.
Editing a Depreciation Class
After a Depreciation Class is saved to IntelliTrack, it may be edited at the Edit Depreciation Class page. This page is reached from the Depreciation Classes page by pressing the Edit button to the right of the Depreciation Class that you want to edit.
Important
You may edit any field in a depreciation class; however, be aware that changing the depreciation method or the useful life of the asset will alter any future depreciation calculated for an asset assigned to this class.
Deleting a Depreciation Class
When a depreciation class is not being used, it may be deleted. If a depreciation class is in use it cannot be deleted. Press the Delete button to the right of the Depreciation Class that you want to delete and follow the prompts to delete it.
Selecting a Depreciation Class to an Item
A depreciation class is linked to an item. The asset will pick up this depreciation class when it is associated to the item.
Note
When an asset is associated with the item, the asset will use the depreciation class associated to the item when calculating depreciation for the asset.
To link a depreciation class with an item, please follow these steps.
Add a Depreciation Class (see "Depreciation Class Management" for more information).
Go to the Items page by selecting Management > Items > Items.
When adding a new item or editing an existing item, you re able to associate a Depreciation Class with this item in the Item Details tab of the Add Item page or the Edit Item page.
Press the drop-down arrow in the Depreciation Class field and select a Depreciation Class from the options that appear in the drop-down list.
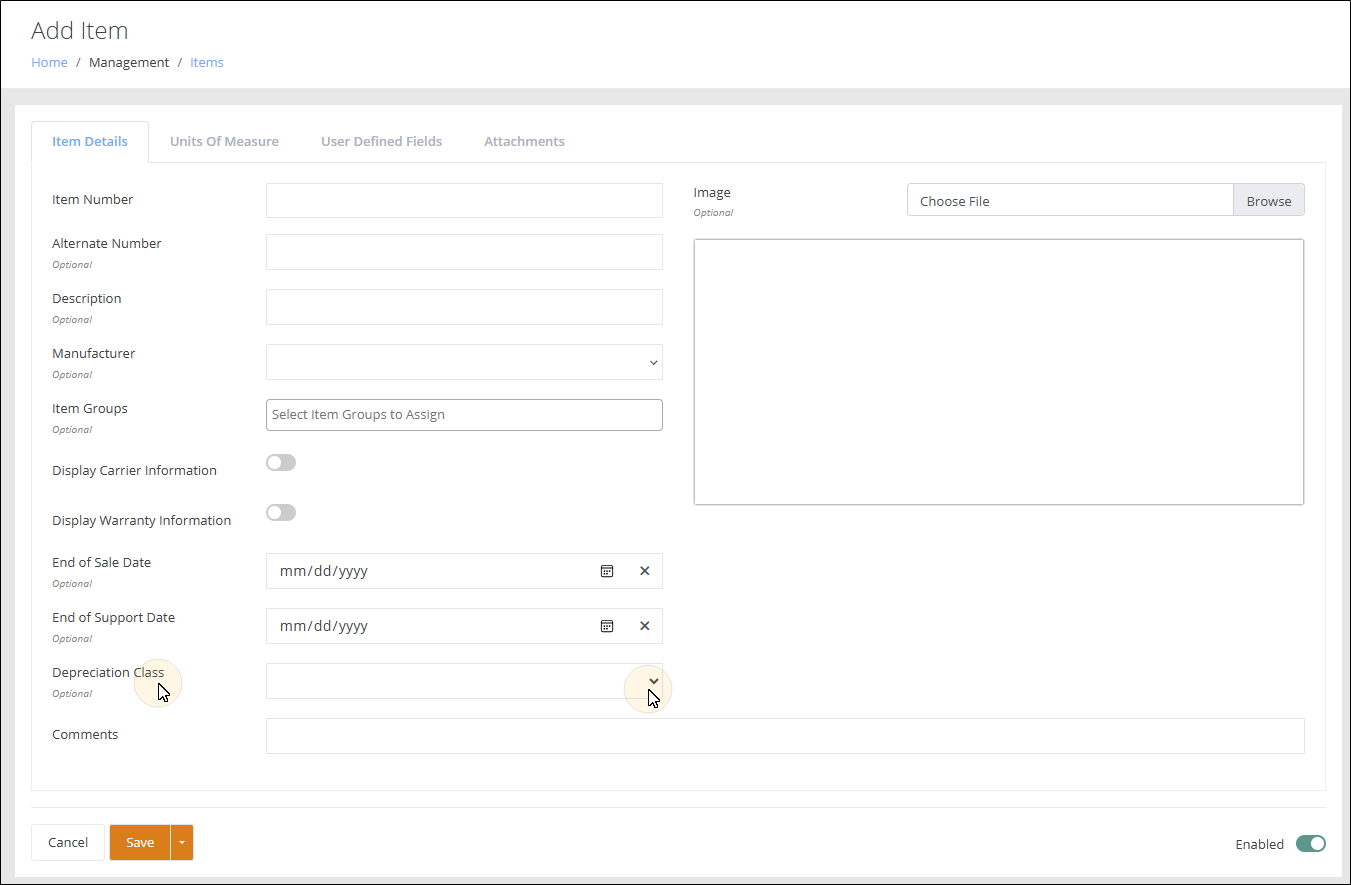
The Depreciation Class populates the Depreciation Class field.
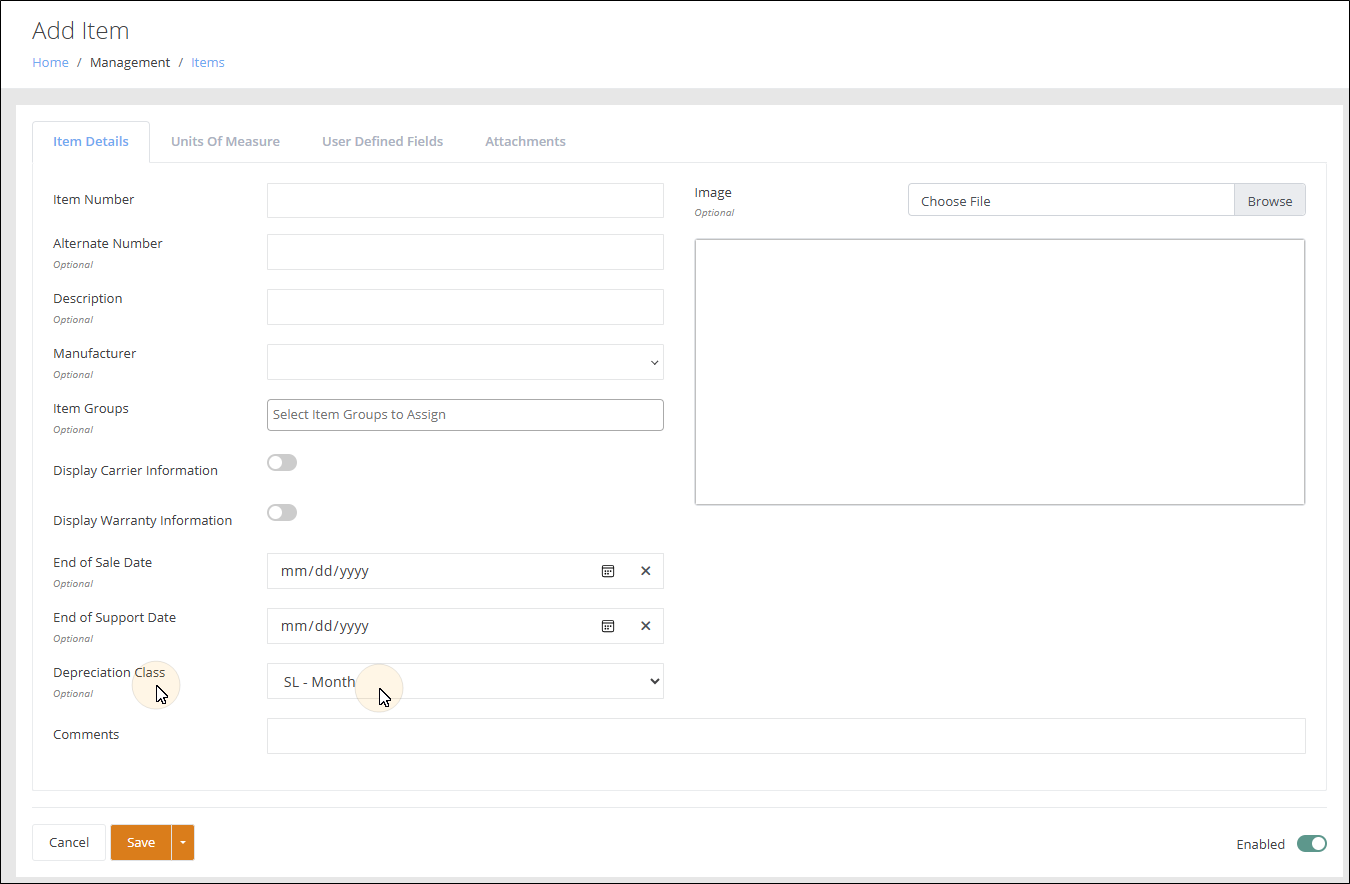
When the item is saved to have this Depreciation Class, the information in this depreciation class is applied to an asset that is associated with this item.
Setting Up an Asset to Use Depreciation
To calculate depreciation for an asset, the asset requires certain settings and values. They are detailed in this section.
Item Level Settings and Values Required for Deprecation
At the item level, the item associated with the asset must have the following information and settings.
| Item Requirement | Item Page | Item Page Tab | User Action |
|---|---|---|---|
| Depreciation Class Must be Selected | Add Item page or Edit Item page | Item Details | Select a Depreciation Class from the drop-down list. |
| Display Warranty Information Must be Toggled to On | Add Item page or Edit Item page | Item Details | Toggle to On |
| Item Unit of Measure Must Have an Each Count of 1 | Add Item page or Edit Item page | Units of Measure Tab | Select a Unit of Measure-Each Count of 1 |
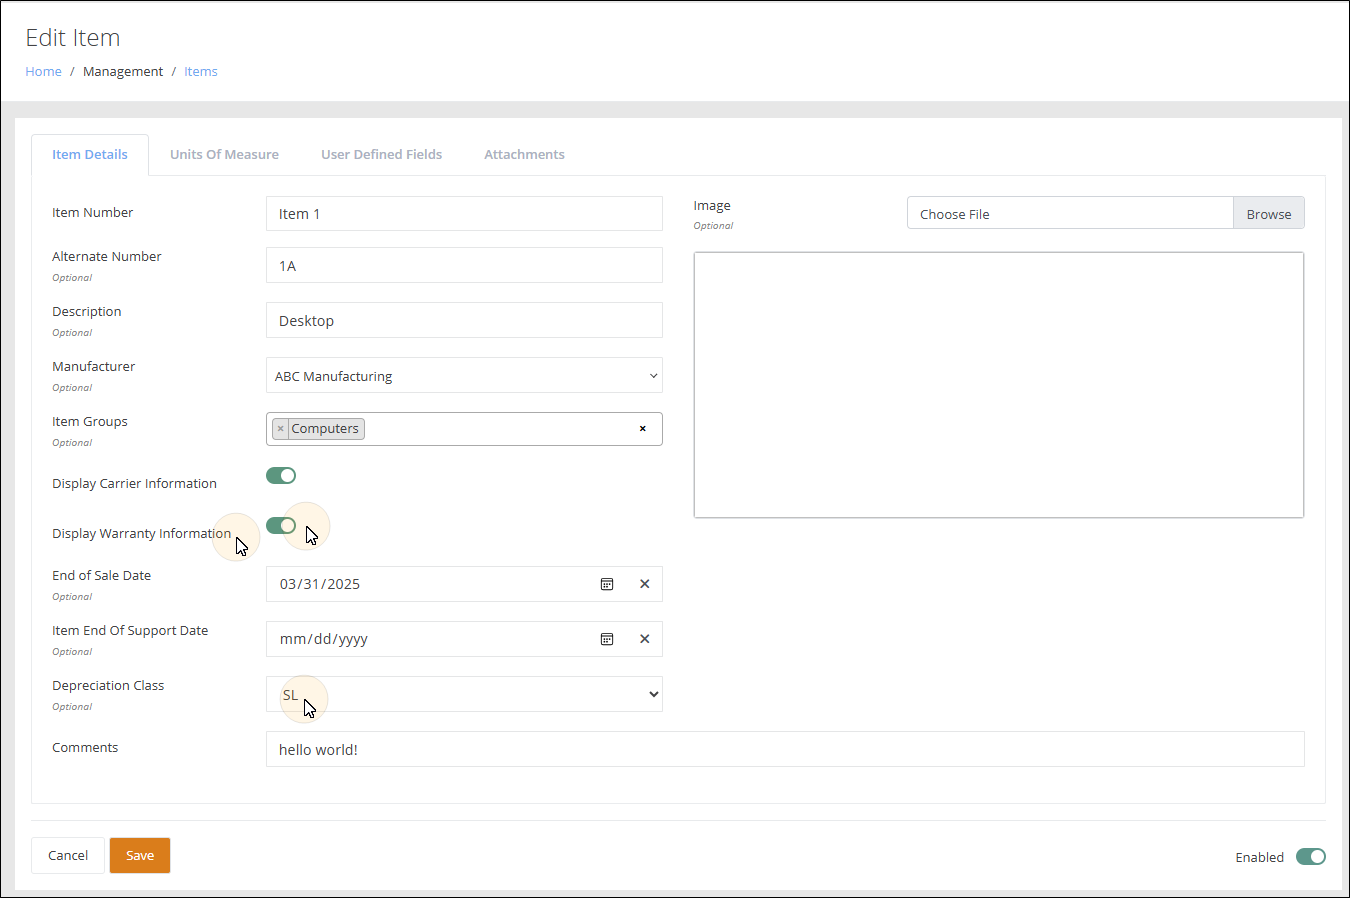
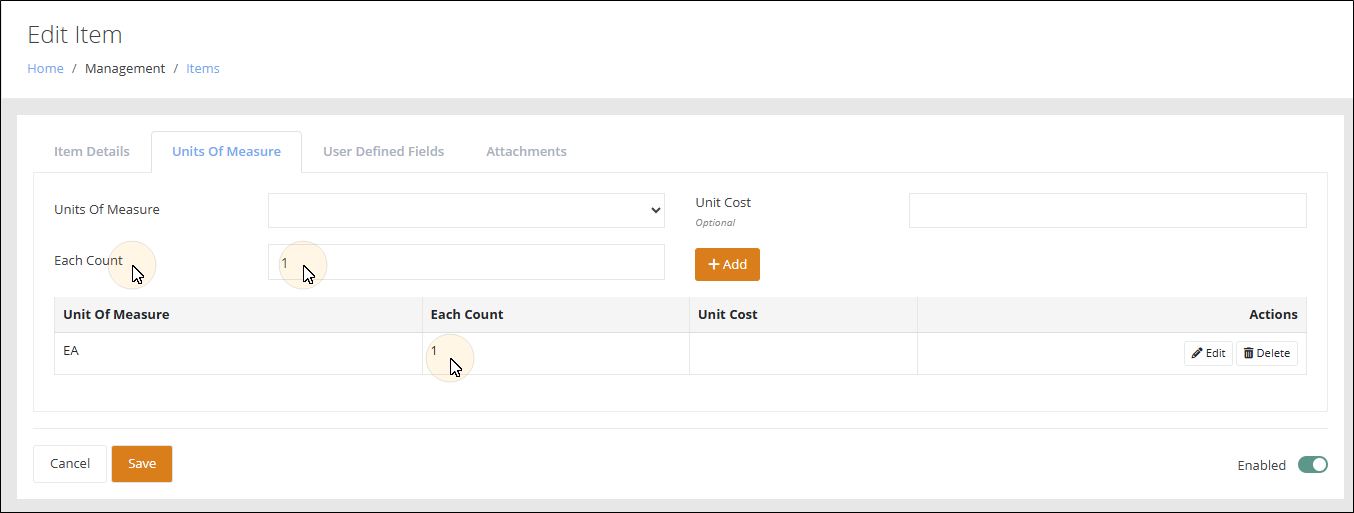
Asset Level Settings and Values Required for Depreciation
At the asset level, the asset must have the following information and settings.
| Asset Requirements | Asset Page | Asset Page Tab | User Action |
|---|---|---|---|
| Item Number Field | Add Asset | Asset Details | Select the Item Number that has the depreciation class, warranty information toggled to ON, and a unit of measure-each count of 1. |
| Purchase Date Field | Add Asset or Edit Asset | Asset Details | Enter the asset purchase date in the Purchase Date field. |
| Purchase Cost Field | Add Asset or Edit Asset | Asset Details | Enter the asset purchase cost in the Purchase Cost field. |
| In Service Date Field | Edit Asset | Depreciation | Enter the asset in service date in the In Service Date field. |
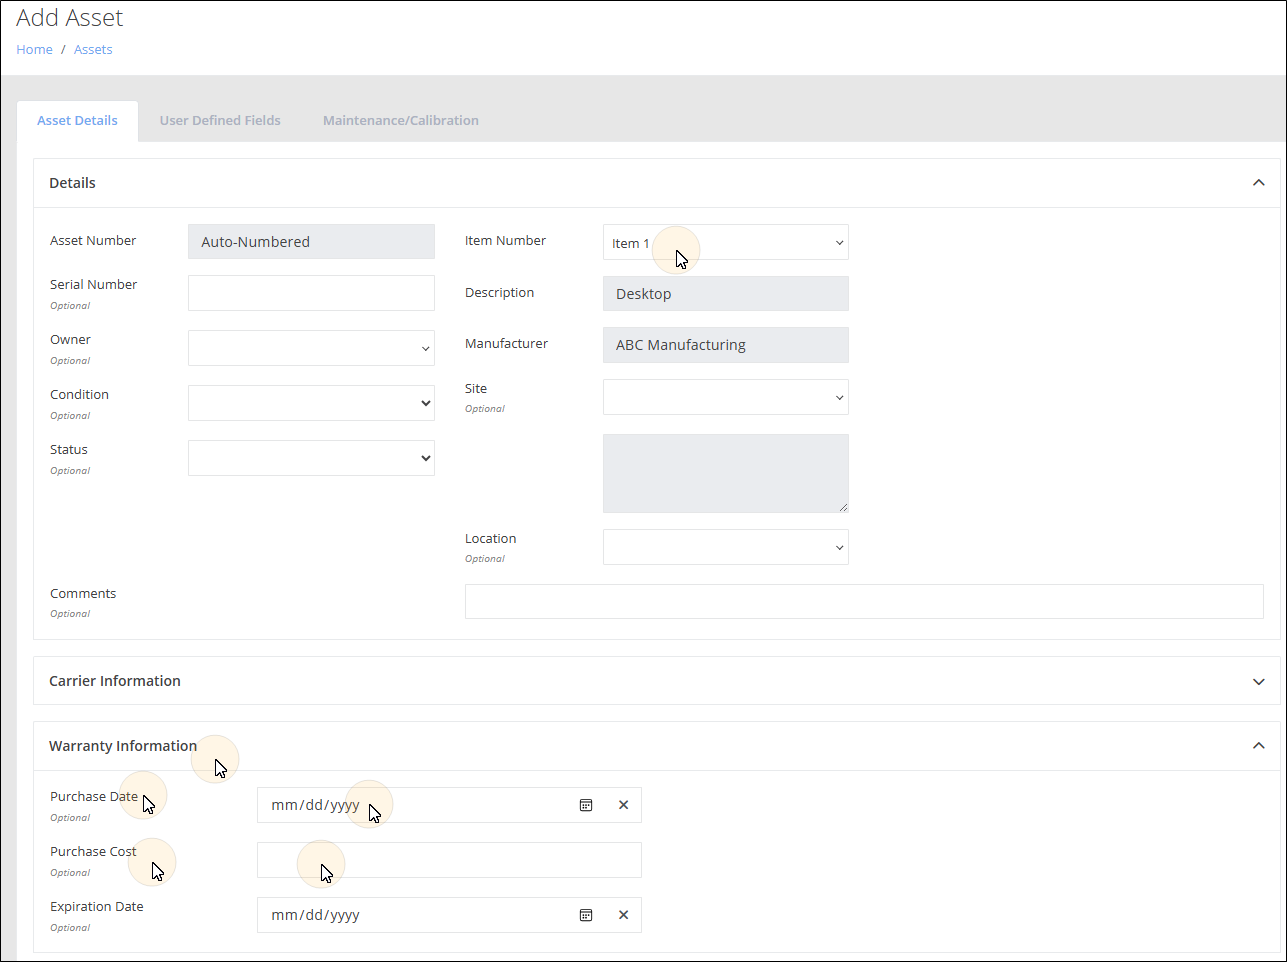
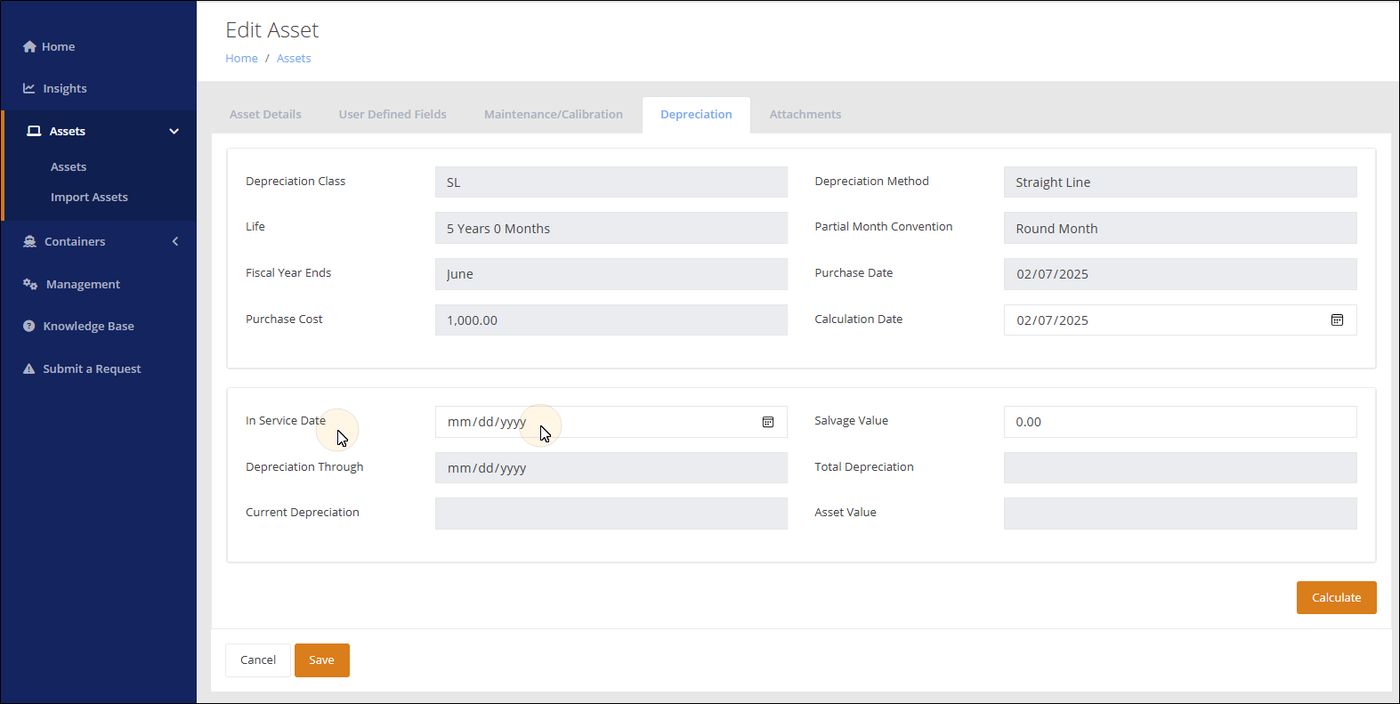
Asset Depreciation Tab Requirements
After the asset is saved, the remaining asset depreciation requirements are added to the Asset at the Edit Asset page > Depreciation Tab.
To reach the Edit Asset page, go to the Assets page by selecting Home > Assets > Assets. The Assets page appears.
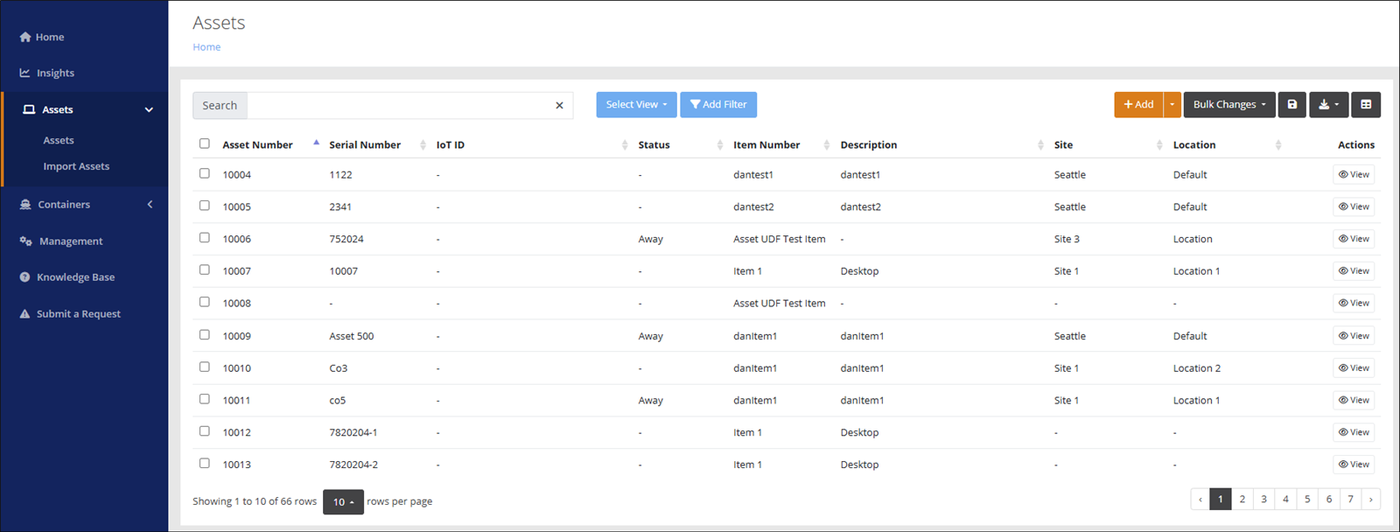
At the Assets page, find the asset by searching for it via the Search bar.
Select the View button to the right.

The View Asset page for the Asset appears.
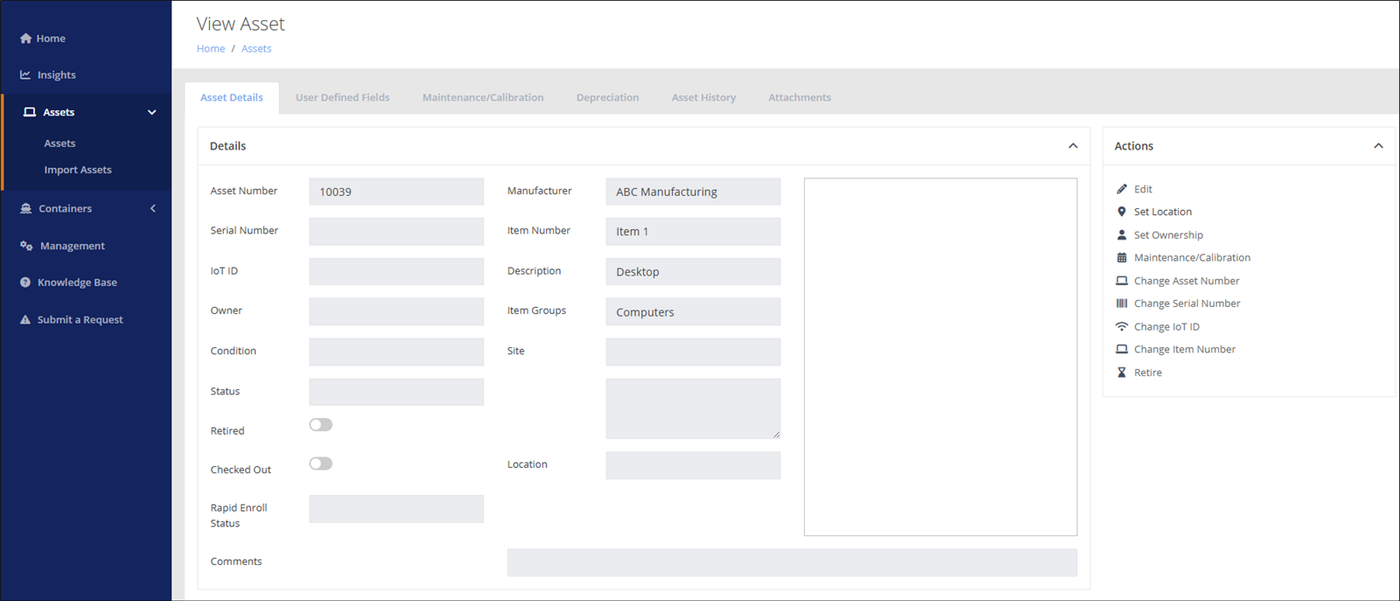
In the Actions pane to the right, select the Edit option.
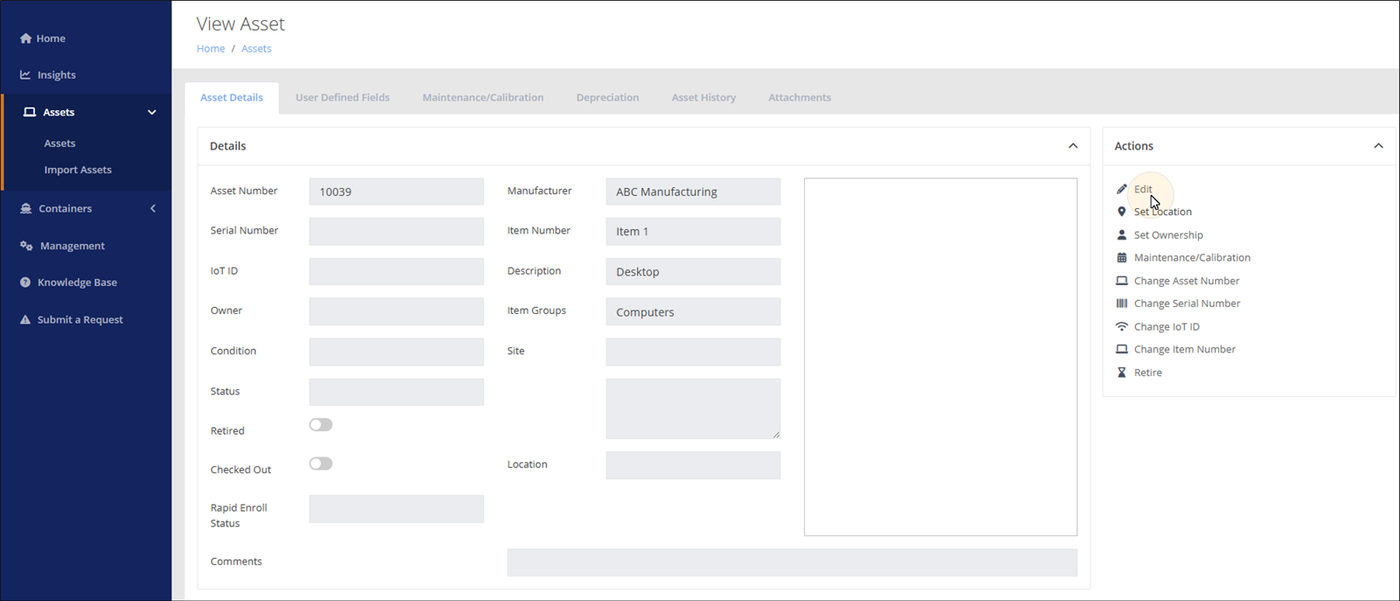
The Edit Asset page for this asset appears. Notice that it has a Depreciation Tab.
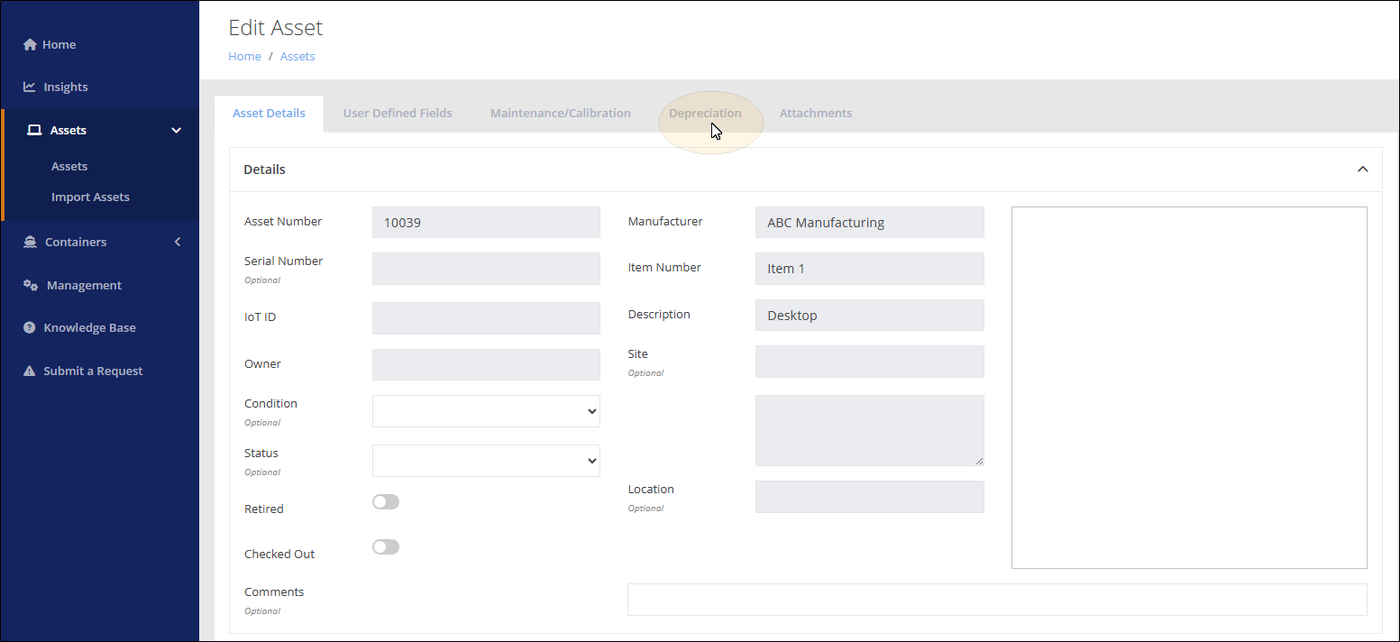
Press the Depreciation Tab to bring it to the front.
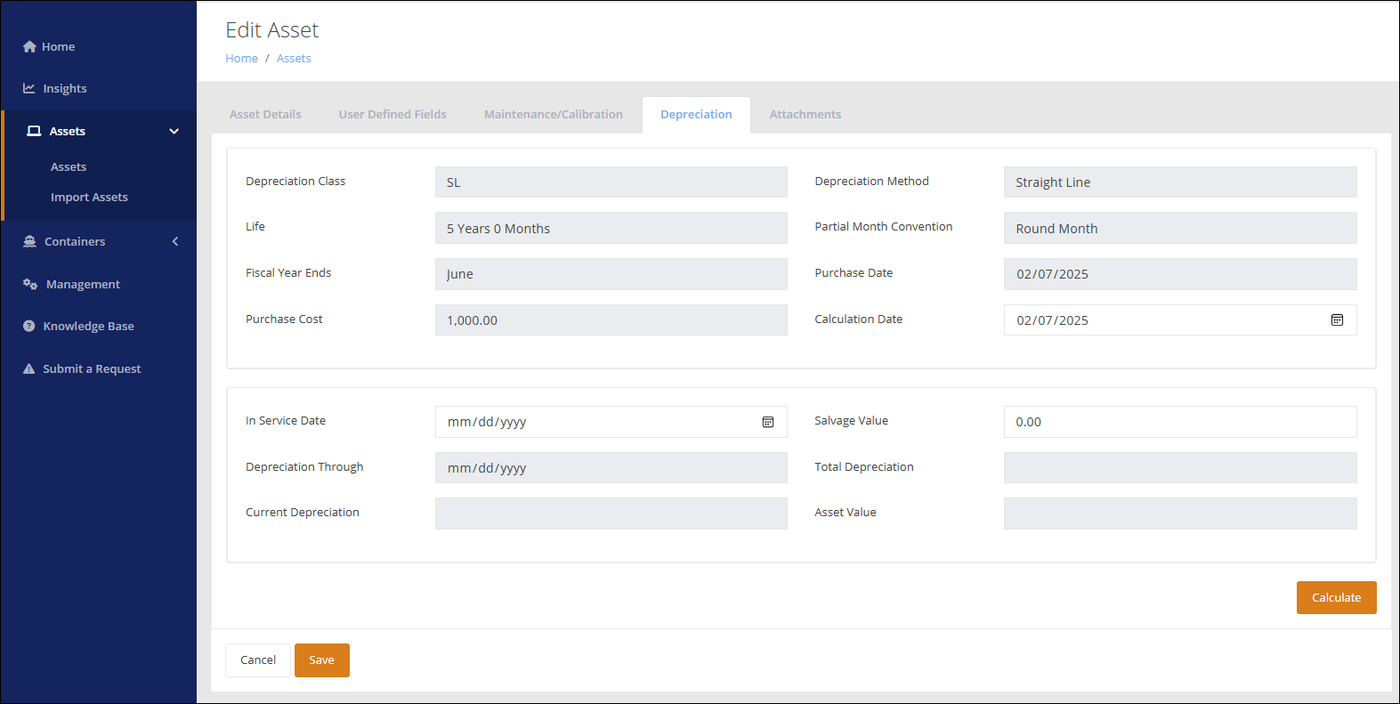
At the Depreciation Tab, you will notice that the following depreciation fields have inherited information from the required item level and asset level settings for depreciation.
- Depreciation Class: inherited from the item associated to the asset.
- Life: depreciation class usable life.
- Fiscal Years Ends: tenant setting for the organization's fiscal year end month.
- Purchase Cost: purchase cost amount of the asset.
- Depreciation Method: method of depreciation used for this depreciation class.
- Partial Month Convention: tenant setting for the organization's partial month convention policy.
- Purchase Date: purchase date of the asset.
- Calculation Date: calculation date for depreciation. Defaults to today's date, but can be changed to another date.
In Service Date field: To calculate depreciation, the In Service Date is required. It is added directly at the Depreciation Tab.
Salvage Value field: To calculate depreciation, the Salvage Value is required. The salvage value of the asset is its estimated value at the end of its usable life. It defaults to 0.00. The depreciation for an asset will continue to be calculated until it reaches its the end of its depreciable life.
To calculate depreciation, see "Calculating Depreciation" for details.
Chapter 18 - Calculating Depreciation
IntelliTrack calculates depreciation. When depreciation has been calculated for the asset, the depreciation information is entered into the Depreciation Tab in the asset's View Asset page.
- Depreciation Through: shows the date through which the total depreciation is calculated.
- Total Depreciation: shows the total depreciation for the asset since its in-service date.
- Current Depreciation: shows the asset’s depreciation for the current month.
- Asset Value: shows the asset value after depreciation is calculated; it is the purchase cost minus the total depreciation amount.
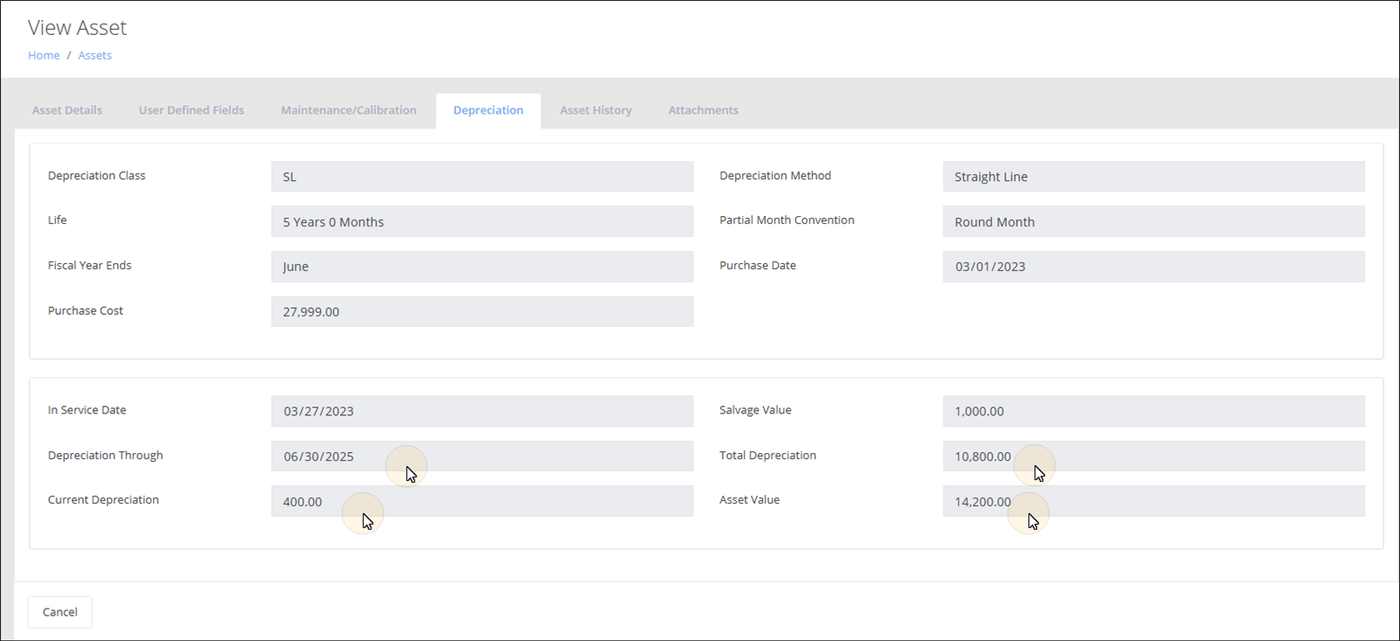
Calculate Depreciation - Bulk Changes
Asset depreciation is calculated by depreciation class at the Depreciation Classes page. To calculate asset depreciation by depreciation class refer to the steps below.
Select Home > Management > Assets > Depreciation Classes.
The Depreciation Classes page appears.
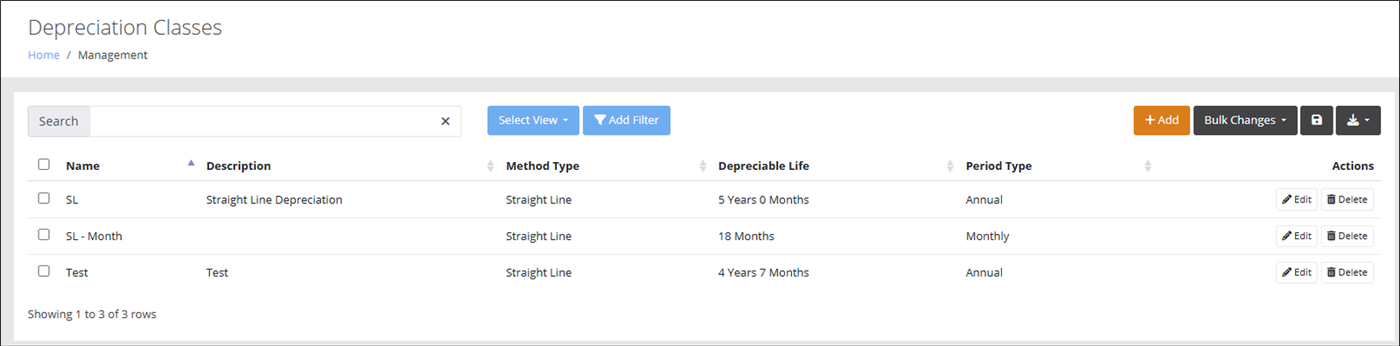
To calculate depreciation for a Depreciation Class mark the check box to the left of the asset.
To calculate depreciation for all Depreciation Classes mark the check box to the left of the Name column to select all Depreciation Classes.
Calculate the drop-down arrow in the Bulk Changes button. The Calculate Depreciation option appears.
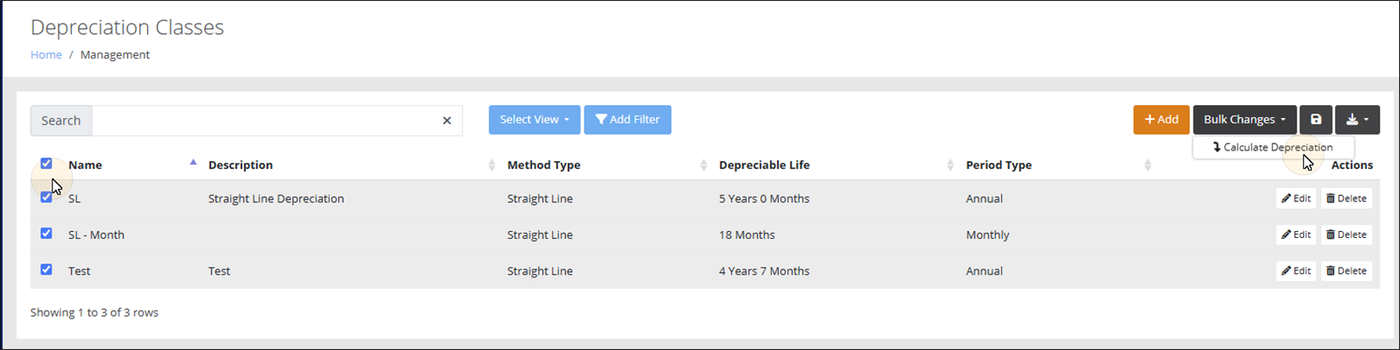
Press the Calculate Depreciation option. The Calculate Depreciation popup appears.
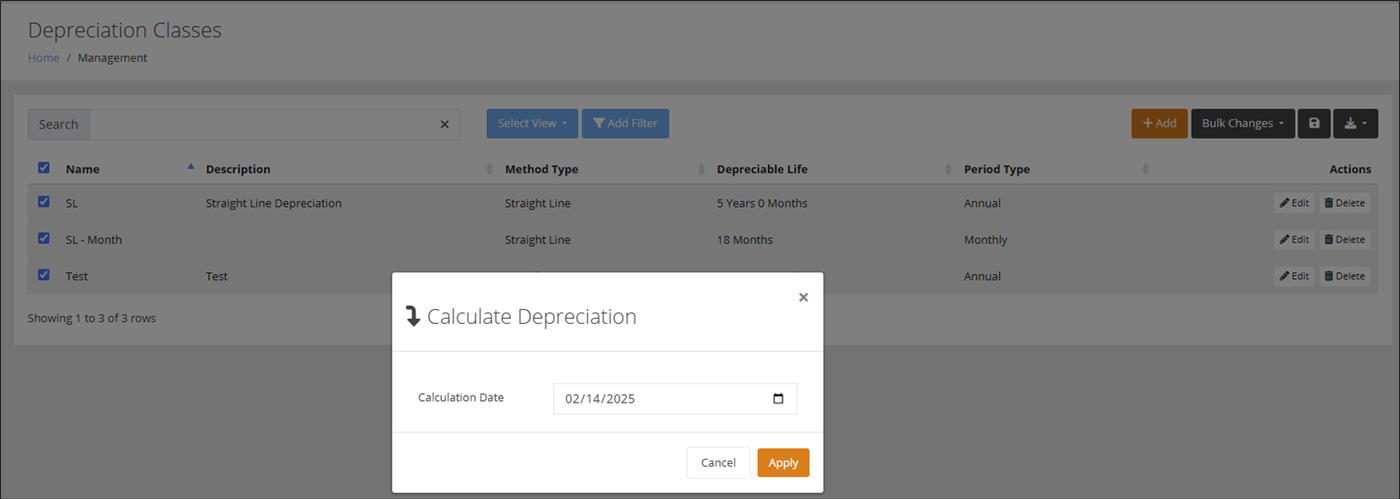
Calculate Date: set the calculate date for the asset. It defaults to today's date. The earliest date you can run depreciation from, or roll it back to, is your In Service Date.
Click the Apply button.
A Bulk Changes - Depreciation separate page appears as asset depreciation is calculated for the selected depreciation class or classes.

From the Bulk Changes - Depreciation page select Back to Main.
The Main menu appears. Select Home > Assets > Assets to reach the Assets page.
From the Manage Columns option, select Depreciation Class to add this Column to the Assets page.
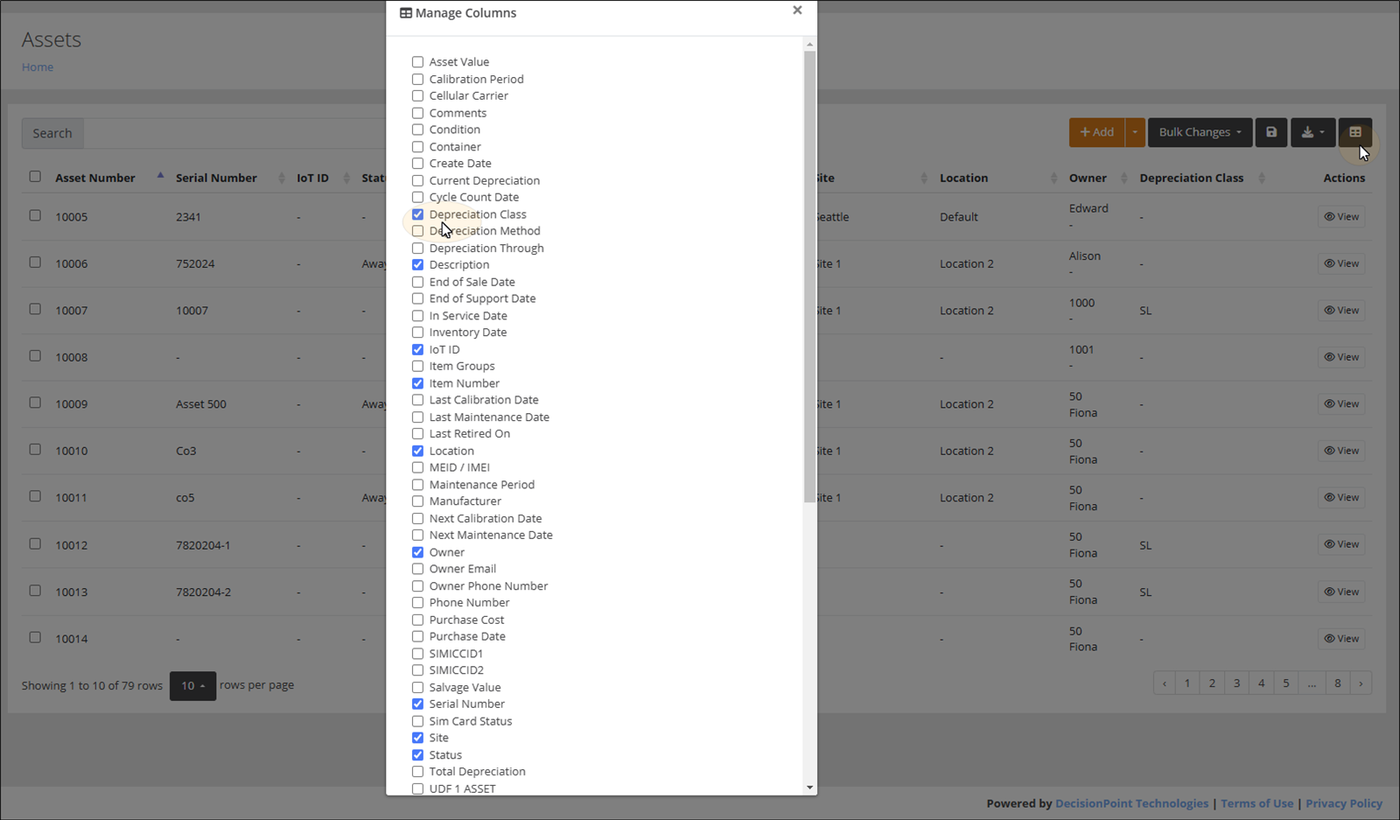
Close the Manage Columns window. You are returned to the Assets page. The Depreciation Class column is part of the page. For an asset with a Depreciation Class that was chosen for a Bulk Changes - Calculate Depreciation, press the View button.
The View Asset page for the Asset appears. Press the Depreciation Tab to bring it to the front.
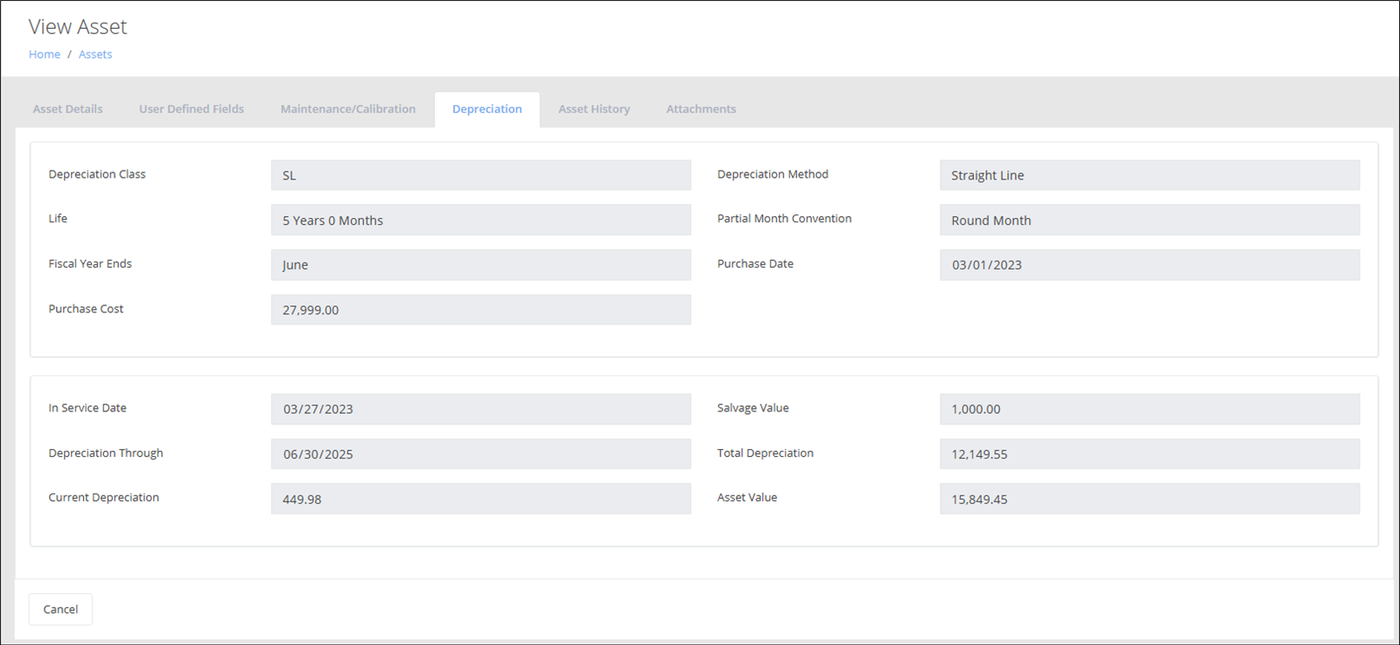
The Depreciation Through, Current Depreciation, Total Depreciation, and Asset Value are recorded for the asset.
Press the Asset History Tab to bring this portion of the page to the front. A transaction is recorded to this asset, Depreciation Calculated.
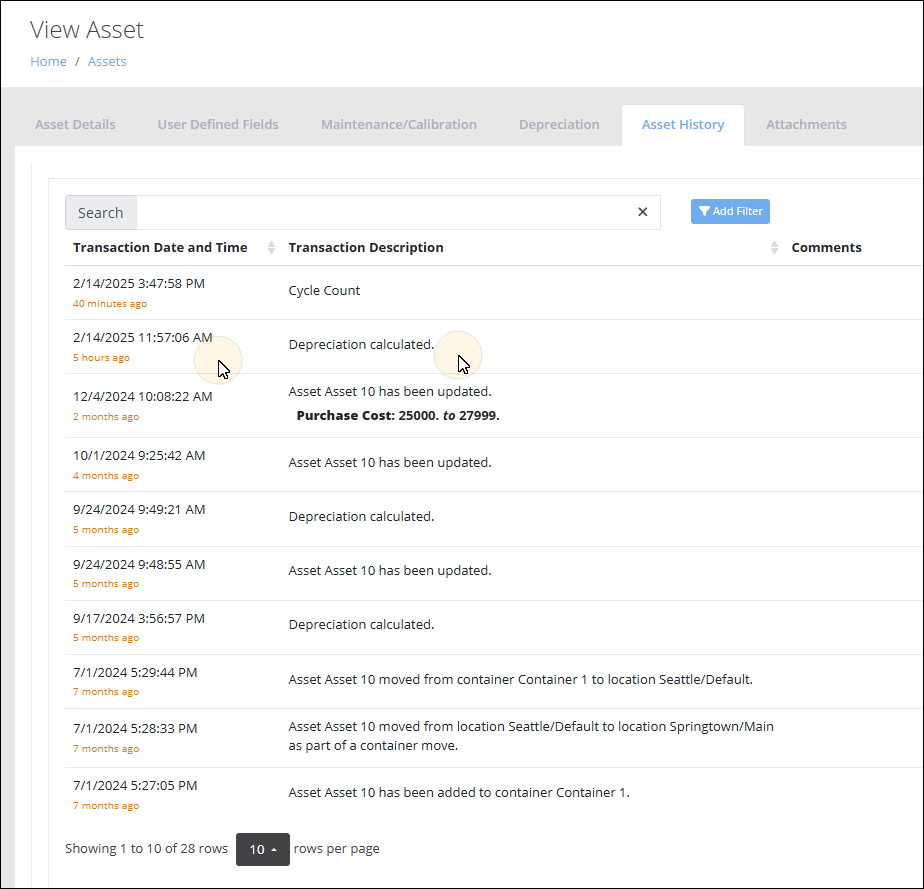
The Depreciation calculated transaction is recorded for all assets with the selected class for the Bulk Changes - Calculate Depreciation job.
Spot Checking Depreciation for an Asset
Depreciation may be checked for an asset at any time. To spot check the current depreciation for an asset without going through the calculation process, refer to the steps below.
Open the View Asset page.
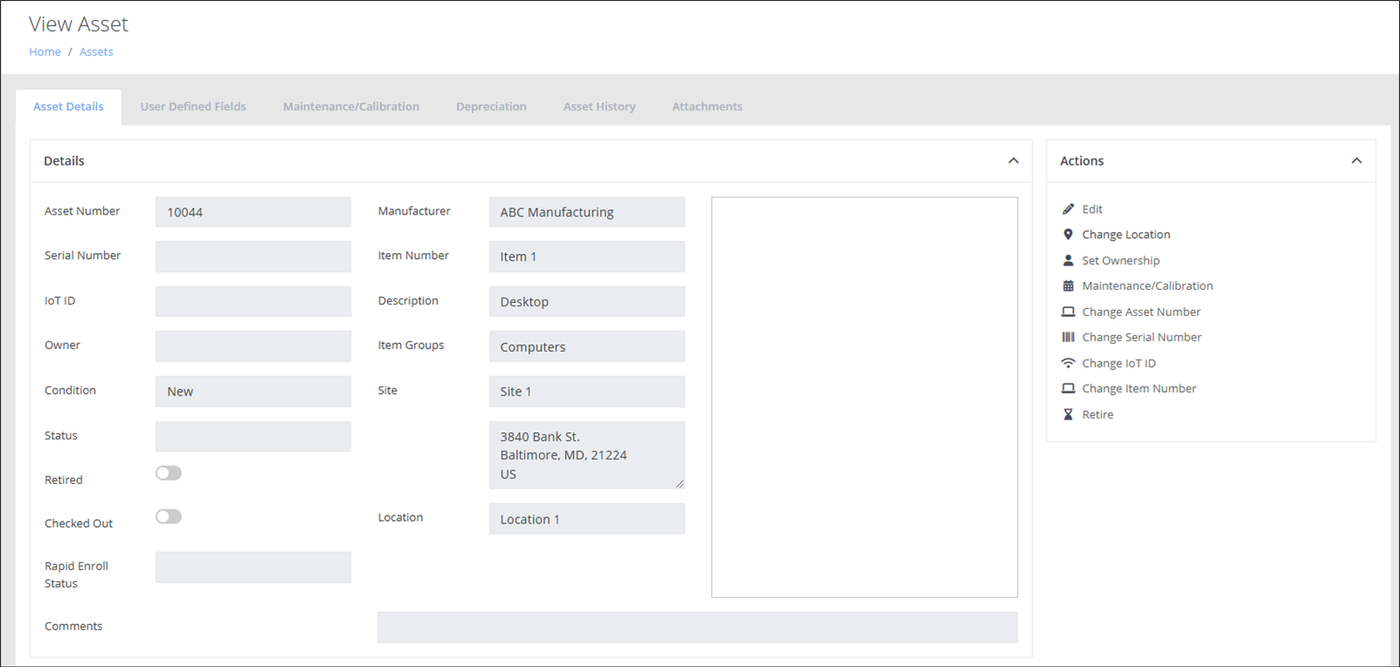
Press the Edit option in the Actions area to reach the Edit Asset page.
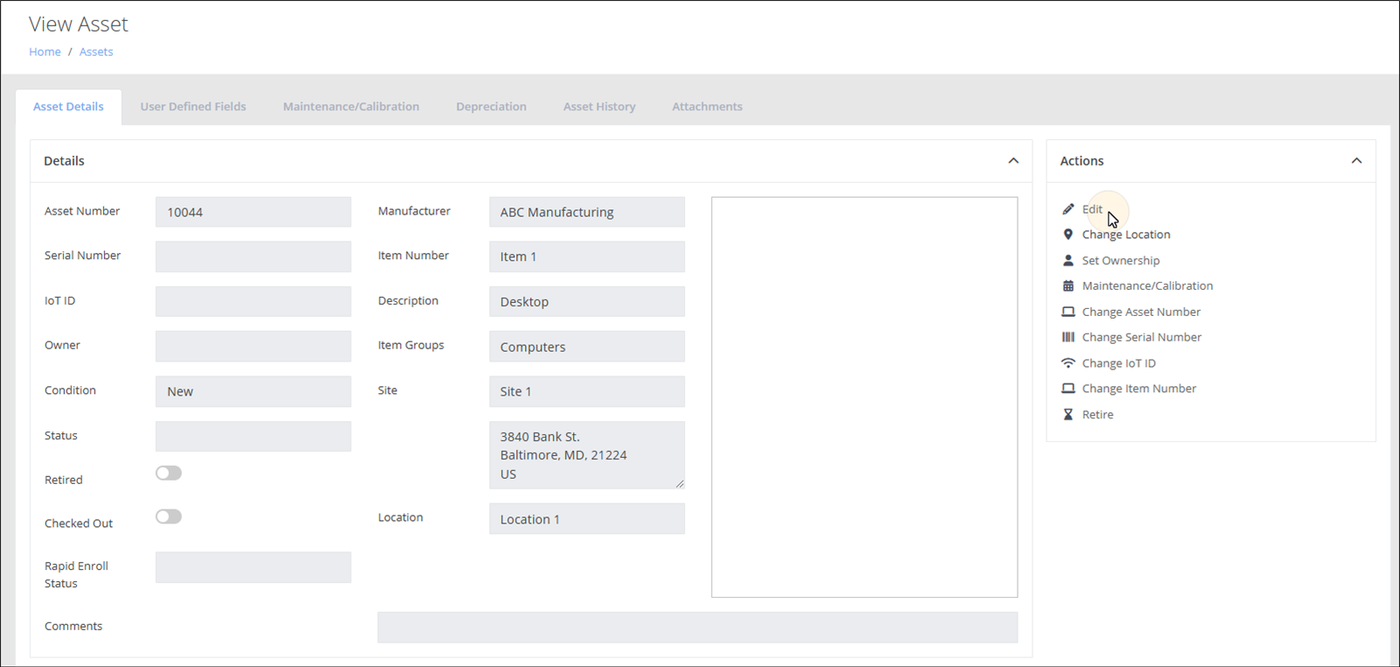
The Edit Asset page appears.
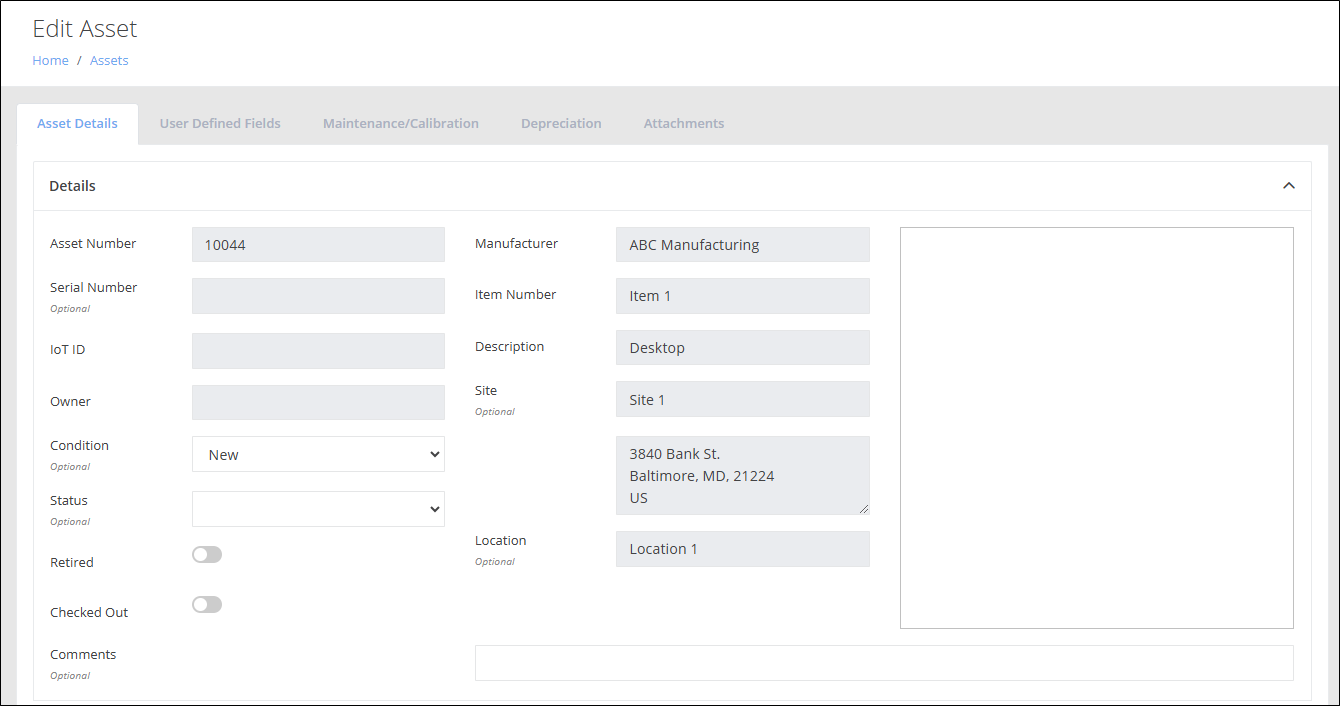
Press the Depreciation Tab to bring it to the front.
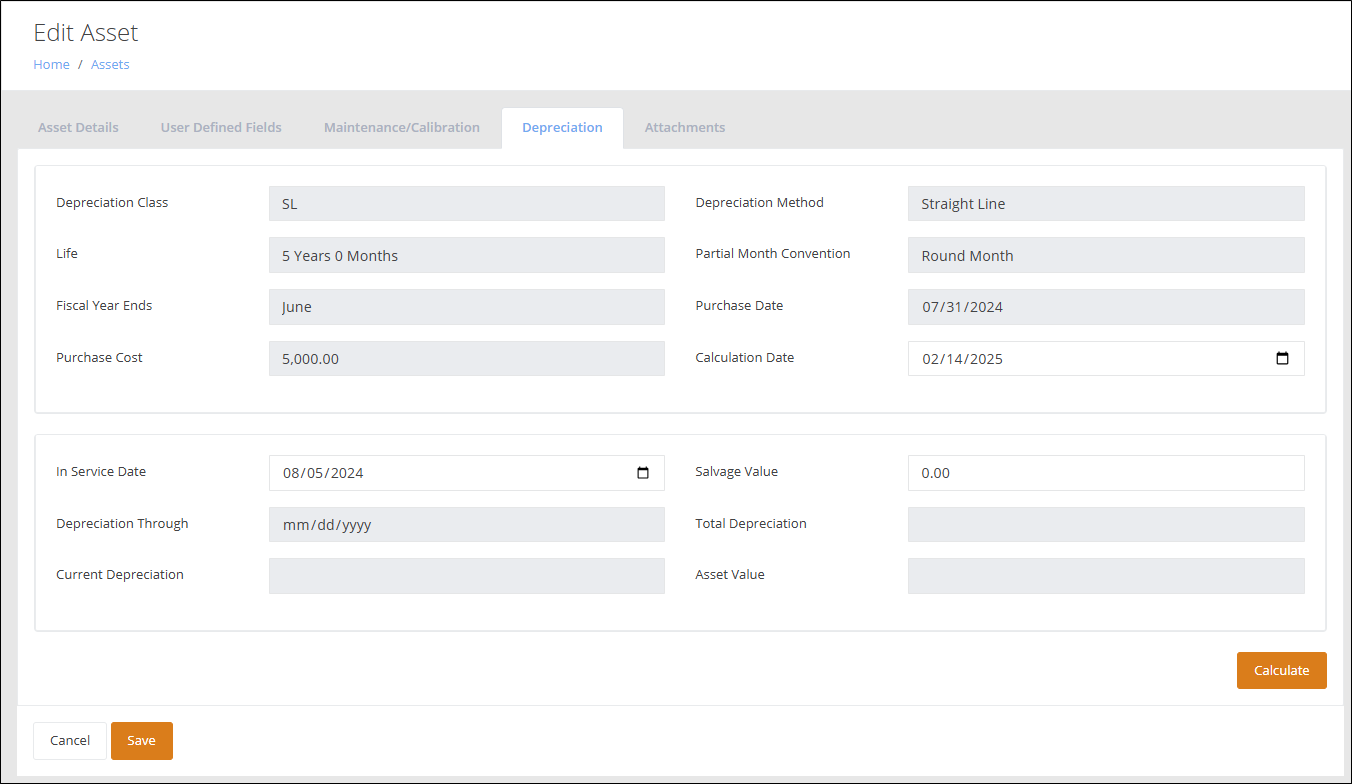
Press the Calculate button.
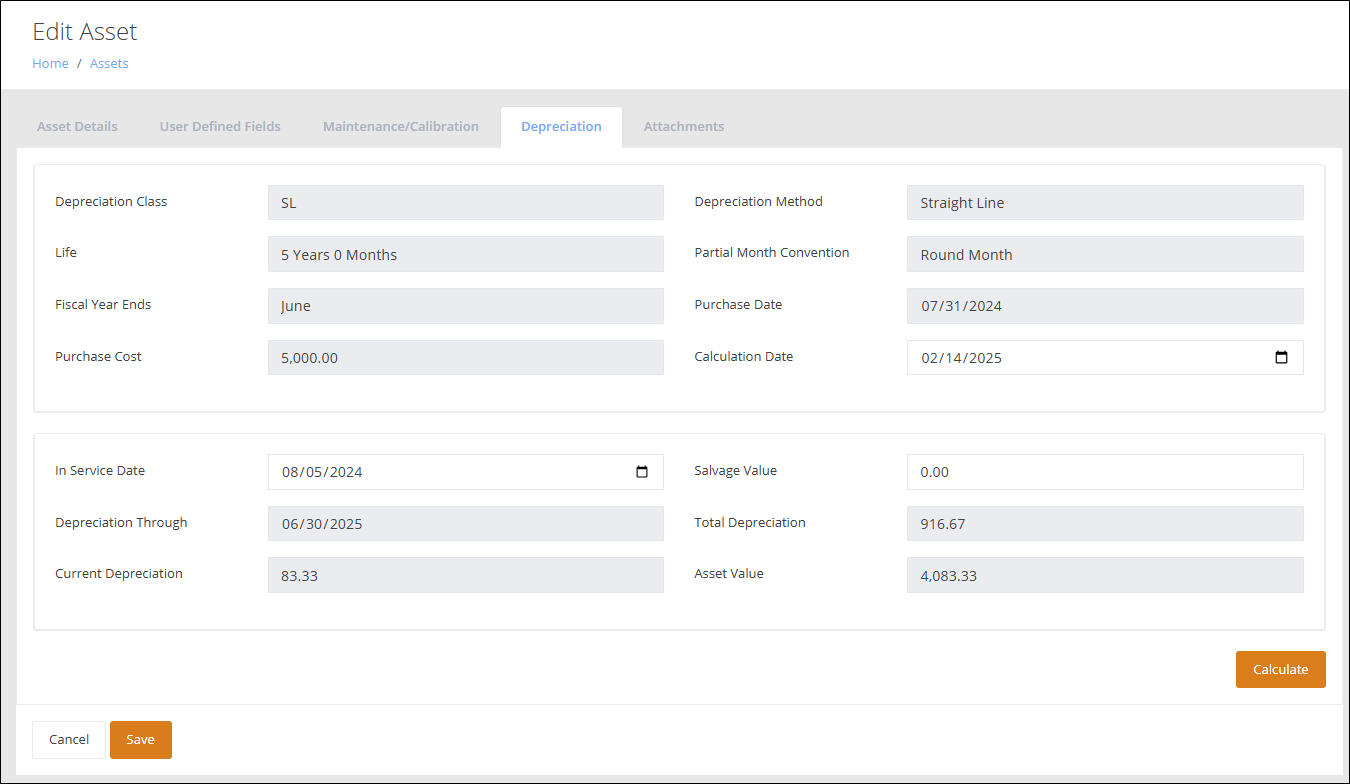
The Depreciation Through, Current Depreciation, Total Depreciation, and Asset Value information populates in the respective fields.
To discard this information, press Cancel. You are returned to the View Asset page for this asset. The depreciation information is not saved to the asset.
To save this information to the asset, press the Save button. You are returned to the View Asset page for this asset. An asset update transaction is posted to the asset.
Related
- IntelliTrack Getting Started Guide — users, sites and locations, which this guide builds on
- Setting Up a Label Printer for IntelliTrack — printer setup for asset, item and assignee labels
- What file types are supported for attachments? — the files you can attach to assets and items